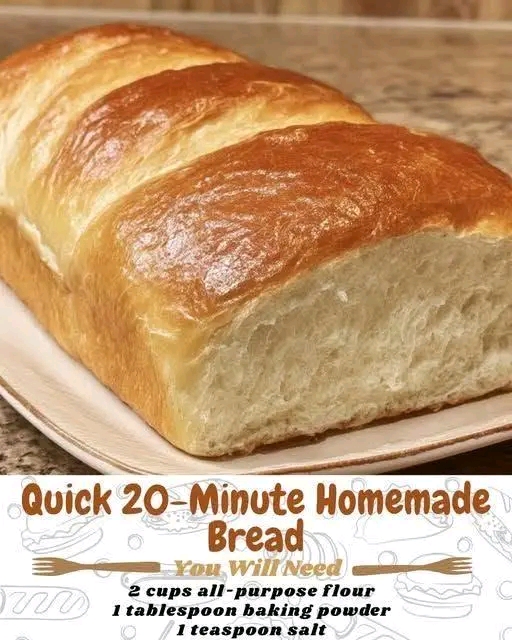
Quick 20-Minute Homemade Brea
### Introduction
There is something truly special about the smell of freshly baked bread filling your kitchen. This Quick 20-Minute Homemade Bread is a simple, convenient recipe for those moments when you want warm, homemade bread without waiting hours for yeast to rise.
Made with flour, baking powder, milk, salt, sugar, and olive oil, this easy bread comes together with just a few everyday ingredients. It has a soft interior, a lightly golden exterior, and a mild flavor that pairs beautifully with butter, soups, eggs, or your favorite sandwich fillings.
Unlike traditional yeast bread, this recipe uses baking powder as its leavening agent, eliminating the need for kneading and lengthy rising times. It is an excellent option for busy mornings, quick lunches, or whenever you need homemade bread in a hurry.
Preparation Time: 5 minutes Cooking Time: 15 minutes Total Time: Approximately 20 minutes Servings: 4–6 Difficulty: Easy
Note: The 20-minute timing assumes a quick-baking, small-format bread. A full-sized loaf may require longer in the oven.
### Origin
Quick breads have a long history in home baking. Unlike yeast breads, which rely on fermentation to develop their texture, quick breads use chemical leavening agents such as baking soda or baking powder.
Baking powder became increasingly popular during the nineteenth century, making it possible for home cooks to prepare breads, biscuits, and cakes more quickly and reliably.
This recipe follows that practical tradition. Its simple combination of flour, milk, baking powder, and oil reflects the everyday cooking methods used by families who want fresh bread without the extra time and effort required for yeast-based recipes.
Although this particular recipe is a modern convenience-style bread rather than a traditional regional specialty, it draws inspiration from generations of quick-bread baking.
### Cultural Significance
Bread is one of the world’s most familiar and meaningful foods. Across cultures, it represents nourishment, hospitality, family, and the comfort of sharing a meal.
Homemade bread often brings back memories of family kitchens, warm breakfasts, and simple meals made with care. Quick breads offer a practical alternative for modern households, allowing people to enjoy freshly prepared bread even when time is limited.
This 20-minute recipe is especially useful for beginners, students, busy parents, and anyone who wants to make something homemade without specialized equipment.
It can be served alongside a family dinner, toasted for breakfast, or transformed into a satisfying sandwich. Its simplicity makes it easy to adapt to different tastes and occasions.
### Ingredients Quantity
Here is everything you need to prepare this quick homemade bread.
* 2 cups all-purpose flour (approximately 240–260 g)
* 1 tablespoon baking powder
* 1 teaspoon salt
* 1 tablespoon granulated sugar
* 1 cup milk (240 ml)
* 2 tablespoons olive oil (30 ml)
Optional for the Top
* 1 teaspoon olive oil for brushing
* A pinch of sesame seeds
* A sprinkle of dried herbs
Equipment: A mixing bowl, spoon or spatula, measuring cups, and a baking sheet or small baking dish.
### Optional Additions
One of the best things about homemade bread is how easily you can customize it.
1\. Garlic and Herbs
Add ½ teaspoon garlic powder and 1 teaspoon dried Italian herbs for a savory bread that pairs beautifully with soups and roasted vegetables.
2\. Whole-Wheat Flour
Replace up to half of the all-purpose flour with whole-wheat flour for a heartier flavor and additional fiber. You may need a little extra milk because whole-wheat flour absorbs more liquid.
3\. Cheese
Fold in ½ cup grated cheddar or Parmesan for a richer, savory variation.
4\. Seeds
Add 1–2 tablespoons of sesame, sunflower, or pumpkin seeds for extra texture.
5\. Black Pepper
A small pinch of freshly ground black pepper gives the bread a subtle savory flavor.
6\. Honey
Replace the tablespoon of sugar with 1 tablespoon of honey if you prefer its flavor. The dough may be slightly wetter.
7\. Dairy-Free Version
Use unsweetened plant-based milk, such as soy milk, and check that the baking powder and other ingredients suit your dietary needs.
### Tips for Success
1\. Measure the flour carefully. Too much flour can make quick bread dry and dense. If possible, weigh it rather than packing it tightly into measuring cups.
2\. Check your baking powder. Fresh baking powder is essential because it helps the bread rise. Old baking powder may produce a heavy, flat result.
3\. Do not overmix. Stir the ingredients just until a soft dough forms. Overmixing can make the finished bread tougher.
4\. Expect a different texture from yeast bread. This bread is more similar to a quick bread or savory biscuit loaf than a traditional stretchy, airy yeast loaf.
5\. Adjust the milk gradually. Different flours absorb different amounts of liquid. If the dough seems excessively dry, add milk a tablespoon at a time.
6\. Shape the dough evenly. A relatively flat round or small loaf will cook faster than a tall, thick loaf. For a true 20-minute total time, use small portions.
7\. Preheat the oven fully. A properly heated oven helps the baking powder work effectively and encourages a golden exterior.
8\. Check doneness before serving. The center should be cooked through, not wet or gummy. If necessary, bake for a few extra minutes.
### Instructions
### Step 1: Preheat the Oven
Preheat your oven to 425°F (220°C).
Lightly grease a baking sheet or line it with parchment paper.
### Step 2: Combine the Dry Ingredients
In a large mixing bowl, combine the flour, baking powder, salt, and sugar.
Whisk or stir until the ingredients are evenly distributed.
### Step 3: Add the Wet Ingredients
Pour in the milk and olive oil.
Stir with a wooden spoon or spatula until the mixture forms a soft dough. Avoid mixing longer than necessary.
If the dough is too dry to come together, add a small amount of milk. If it is very sticky, lightly dust your hands with flour.
### Step 4: Shape the Bread
Turn the dough onto a lightly floured surface.
Gently bring it together and shape it into a small, relatively flat round loaf, approximately 1–1½ inches thick. Alternatively, divide it into 4–6 smaller portions for faster baking.
Avoid excessive kneading.
### Step 5: Bake
Place the shaped dough on the prepared baking sheet.
Bake for approximately 12–18 minutes, depending on the size and thickness, until the bread is lightly golden and cooked through.
Small portions will bake more quickly than one larger loaf. If you choose a deeper loaf, allow additional cooking time.
### Step 6: Check for Doneness
Insert a skewer or thin knife into the thickest part. It should come out without wet dough attached.
If the bread is still undercooked in the middle, return it to the oven for another 3–5 minutes and check again.
### Step 7: Cool and Serve
Transfer the bread to a wire rack and let it cool for about 5 minutes before cutting.
Brush the top with a little olive oil or butter if desired.
Serve warm with your favorite spread, soup, eggs, or sandwich fillings.
### Description
Quick 20-Minute Homemade Bread is a convenient, no-yeast bread with a tender crumb, a lightly crisp exterior, and a mild, comforting flavor.
The olive oil adds moisture and a subtle fruity note, while the milk helps create a softer texture. Baking powder gives the bread its lift without the need for fermentation or a long rising period.
Because it uses simple pantry staples, this recipe is ideal for everyday meals and last-minute baking. Serve it warm with butter, slice it for sandwiches, or toast leftover pieces for breakfast.
It is not identical to a traditional yeast loaf, but its speed and simplicity make it a useful alternative when time is short.
### Nutritional Information
The following estimates are based on the full recipe divided into 6 servings. Actual values vary with the flour brand, milk type, and serving size.
Estimated nutrition per serving:
* Calories: 180–210 kcal
* Protein: 4–6 g
* Carbohydrates: 28–33 g
* Fat: 5–7 g
* Saturated Fat: 1–2 g
* Sugar: 3–5 g
* Fiber: 1–2 g
* Sodium: 350–500 mg
These are approximate values and do not include optional cheese, seeds, or additional butter.
### Ways to Make It More Nutritious
* Replace up to half the white flour with whole-wheat flour.
* Add seeds for additional fiber and healthy fats.
* Reduce the salt slightly if appropriate for your dietary needs.
* Use unsweetened milk alternatives if you prefer a dairy-free version.
* Serve with protein-rich foods such as eggs, hummus, or chicken to make a more balanced meal.
Important: This recipe contains wheat and dairy when made with standard all-purpose flour and cow’s milk. It is not gluten-free, and it is not flour-free.
### Conclusion
Quick 20-Minute Homemade Bread is a simple solution for anyone who wants the pleasure of fresh bread without the time commitment of traditional yeast baking.
With just six basic ingredients, you can prepare a warm, versatile bread suitable for breakfast, lunch, dinner, or a comforting afternoon snack.
Its quick preparation, straightforward instructions, and customizable flavor make it an excellent recipe for beginner bakers and experienced home cooks alike.
Keep this recipe handy for busy days when you need a homemade accompaniment without waiting for dough to rise.
### Recommendation
For the most enjoyable results, serve this bread warm with a little butter or olive oil.
It also works well alongside vegetable soup, lentil stew, scrambled eggs, roasted chicken, or a fresh tomato salad.
For breakfast, toast the slices and top them with avocado, eggs, or your favorite savory spread.
Storage tips:
* Room temperature: Store in an airtight container for up to 2 days.
* Refrigerator: Refrigeration may dry out the bread, so room-temperature storage is preferable for short periods if your kitchen is cool.
* Freezer: Freeze completely cooled portions in a freezer-safe bag for up to 2 months.
* Reheating: Warm in a 350°F (175°C) oven for several minutes or toast individual slices to refresh the texture.
This bread is best enjoyed fresh on the day it is made because quick breads can become firmer as they cool.
### Embracing Healthful Indulgence
Homemade bread can be part of a balanced eating pattern, especially when you choose ingredients that suit your preferences and serve it alongside nourishing foods.
This recipe uses olive oil instead of a large quantity of butter, but it still contains refined flour and carbohydrates. If you want more fiber, replacing some of the all-purpose flour with whole-wheat flour or adding seeds can improve its nutritional profile.
Pair a slice with eggs, vegetables, hummus, or another protein-rich topping to create a more satisfying meal.
If you are avoiding white flour or added sugar, this recipe will need adjustments: the standard version contains both. You could experiment with a whole-grain quick bread and omit the sugar, although changing the flour can affect the texture and liquid requirements.
For a completely flour-free bread, a different recipe based on ingredients such as eggs, seeds, or other suitable alternatives would be a better starting point.
The beauty of homemade cooking is finding simple recipes that fit your lifestyle. With a few thoughtful adjustments, you can enjoy the warmth and comfort of freshly baked bread in a way that works for you.