The Ultimate Crispy Buttermilk Fried Chicken Recipe Secrets to a Perfect Golden Crust
There is a profound culinary joy in biting into a piece of flawlessly executed homemade fried chicken. The contrast between a deeply seasoned, shatteringly crisp exterior crust and a incredibly juicy, tender interior is the ultimate definition of comfort food. While fried chicken is a beloved staple across global dining tables, achieving that perfect restaurant-quality crunch at home can often feel elusive. Many home cooks struggle with coatings that slide right off the meat, crusts that burn before the inside cooks through, or chicken that turns out disappointingly dry and bland.
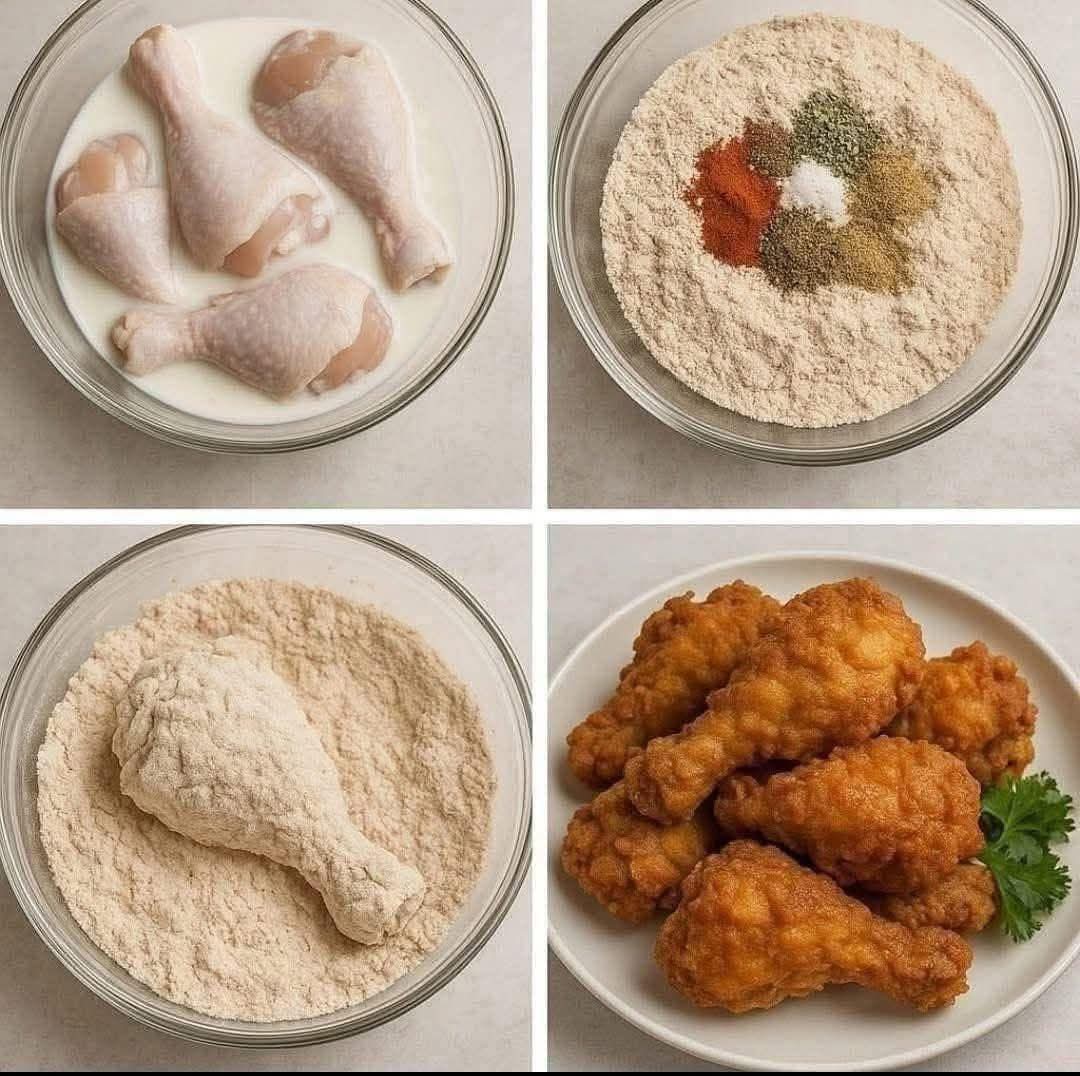
The mouthwatering progression captured in the multi-paneled graphic 1000005742.jpg illustrates exactly how a few simple preparation stages combine to create fried chicken perfection. In the top-left panel of 1000005742.jpg, raw chicken drumsticks are shown soaking in a rich, creamy buttermilk bath. The top-right panel reveals a meticulously arranged seasoned flour mixture, showcasing a colorful ring of distinct ground spices centered over a mountain of flour. The bottom-left pane demonstrates the crucial dredging step, where a drumstick is coated thoroughly in the flour, and the bottom-right panel displays the glorious end result: an extraordinarily crispy, golden-brown platter of fried chicken garnished with fresh parsley. This comprehensive guide will break down the essential food science, detailed techniques, and step-by-step methods required to master this recipe seamlessly in your own kitchen.
The Science of Sublimely Tender Fried Chicken
To guarantee your fried chicken turns out as exceptionally juicy as the batch displayed in 1000005742.jpg, it helps to understand the chemical reactions that occur during the brining and coating stages.
The Chemistry of the Buttermilk Marinade
The first step toward building a superior fried chicken is a lengthy soak in full-fat buttermilk, as shown in the top-left section of 1000005742.jpg. Buttermilk is highly valued by professional chefs because it is mildly acidic. The natural lactic acid present in cultured dairy behaves as a gentle tenderizing agent. It slowly breaks down the tight, stubborn protein filaments inside the chicken muscle tissue without turning the meat mushy. At the same time, the thick sugars and fats in the buttermilk cling to the skin of the chicken, creating a perfectly sticky, moisture-rich surface layer that allows your dry flour coating to adhere beautifully without peeling away in the hot oil.
The Dynamics of Flavor Infusion
A common mistake in cooking chicken is only seasoning the exterior coating, which leaves the meat inside tasting flat and bland. True flavor depth requires infusing the meat from the inside out. When you submerge your chicken drumsticks in the buttermilk bath, you should add a generous tablespoon of kosher salt and hot sauce to the liquid. Through the natural process of osmosis, the salt draws the seasoned moisture deep into the cells of the meat, locking in juiciness and ensuring every single bite is deeply seasoned down to the bone.
The Perfect Dredge: Crafting an Ultra-Crispy Seasoned Flour
The unmistakable crunch of exceptional fried chicken comes entirely from how you construct your dry dredging station. The top-right pane of 1000005742.jpg highlights the artistic and strategic arrangement of key spices that bring life to the flour base.
Building the Spice Matrix
To duplicate the deep complexity and beautiful golden hue seen in the final plate of 1000005742.jpg, your flour blend must be boldly spiced. Plain flour will cook up pale and flavorless. This recipe utilizes a robust combination of garlic powder, onion powder, smoked paprika (which adds an earthy sweetness and rich red color), ground black pepper, white pepper, and a touch of dried oregano. Mixing these spices thoroughly ensures that as the outer coating fries, the heat toasts the spices directly within the starch layer, releasing an incredible aroma and savory depth.
The Secret to Flawless Crust Adherence
If you have ever had your fried chicken crust shatter and fall away completely when you slice into it, you likely skipped the resting phase. As demonstrated in the bottom-left panel of 1000005742.jpg, when you lift a wet piece of chicken from the buttermilk and press it firmly into the seasoned flour, the flour hydrates instantly, turning into a paste-like glue. Once your chicken is completely coated, place it on a wire rack and let it sit undisturbed for 10 to 15 minutes before frying. This resting window allows the starches to dry slightly and lock onto the chicken skin, creating an ironclad bond that guarantees a perfect, continuous crunch that won’t separate during cooking.
Complete Ingredients Checklist for Your Fried Chicken
Before lighting your stovetop, gather all your ingredients and organize your bowls to mirror the clean setup displayed in 1000005742.jpg.
- 6 to 8 fresh chicken drumsticks or bone-in thighs
- 2 cups of full-fat buttermilk
- 1 tablespoon of kosher salt (for the marinade)
- 1 tablespoon of your favorite vinegar-based hot sauce
- 2.5 cups of all-purpose flour
- 0.25 cups of cornstarch (cornstarch dilutes the gluten proteins in the flour, making the crust significantly crunchier)
- 1.5 tablespoons of smoked paprika
- 1 tablespoon of garlic powder
- 1 tablespoon of onion powder
- 1 teaspoon of ground white pepper
- 1 teaspoon of freshly cracked black pepper
- 1 teaspoon of dried oregano
- 1 teaspoon of fine sea salt (for the flour mixture)
- Neutral frying oil with a high smoke point (such as peanut, canola, or corn oil)
Step-by-Step Assembly, Frying, and Execution Guide
Follow these sequential steps carefully to ensure a seamless transition from the raw preparation bowls to the pristine, golden presentation shown in 1000005742.jpg.
1. The Buttermilk Soak
In a large glass bowl, whisk together the full-fat buttermilk, kosher salt, and hot sauce. Submerge your fresh chicken drumsticks fully into the liquid, ensuring no dry spots remain, matching the visual configuration in the top-left panel of 1000005742.jpg. Cover the bowl with plastic wrap and place it in the refrigerator for at least 4 hours, or ideally overnight. This extended window gives the lactic acid ample time to tenderize the meat thoroughly.
2. Preparing the Dredging Station
In a separate wide, shallow bowl, combine your all-purpose flour, cornstarch, smoked paprika, garlic powder, onion powder, white pepper, black pepper, dried oregano, and fine sea salt, echoing the beautiful seasoning display in the top-right pane of 1000005742.jpg. Use a wire whisk to blend the spices into the flour until the color is completely uniform.
3. Executing the Perfect Dredge
Remove a chicken drumstick from the buttermilk, allowing any excessive liquid to drip off for a couple of seconds. Drop the damp chicken directly into your seasoned flour bowl. Using your hands, scoop the flour over the meat and press down firmly, ensuring that the flour compacts tightly into every fold, crevice, and corner of the drumstick, as demonstrated in the bottom-left panel of 1000005742.jpg. Shake off any loose, excess flour and transfer the coated chicken onto a wire cooling rack to rest for 15 minutes.
4. The Art of Deep Frying
Pour your high-smoke-point neutral oil into a large, heavy-bottomed Dutch oven or cast-iron skillet until it reaches a depth of roughly 2 inches. Place the pot over medium-high heat and use a clip-on candy thermometer to monitor the temperature. Bring the oil to exactly 350°F (175°C). Carefully lower the rested chicken drumsticks into the hot oil using metal tongs, working in small batches to avoid crowding the pan. Overcrowding drops the oil temperature rapidly, causing the chicken to absorb grease rather than frying crisp.
Maintain a steady frying temperature between 325°F and 350°F (163°C to 175°C). Fry the drumsticks for 12 to 14 minutes, turning them occasionally, until the crust achieves a deep, even, golden-mahogany crunch. Use a digital instant-read meat thermometer inserted into the thickest part of the drumstick to ensure the internal temperature reads 165°F (74°C). Lift the golden chicken out of the hot oil and let it drain on a clean wire rack set over a baking sheet for 5 minutes.
Professional Tips for Pristine Presentation and Textural Mastery
To make your final serving platter look as exceptionally clean, non-greasy, and professional as the plate showcased in the bottom-right portion of 1000005742.jpg, incorporate these essential kitchen habits.
Ditching Paper Towels for Wire Racks
The single biggest mistake home cooks make post-frying is placing hot fried chicken directly onto a plate lined with paper towels. While paper towels do absorb surface oil, they also trap the boiling steam escaping from the hot chicken underneath. This trapped steam instantly condenses back into water droplets, soaking your freshly fried crust and turning it completely soggy within minutes. For a long-lasting, shatteringly crisp crunch, always drain your hot chicken on an elevated wire cooling rack. This allows air to circulate completely around the entire piece, keeping the bottom crust as wonderfully dry and crunchy as the top.
The Power of a Post-Fry Salt Shower
The exact second your hot fried chicken lifts out of the frying oil, give it a tiny, delicate sprinkle of fine sea salt or kosher flake salt from high above. When the chicken is straight out of the pot, the microscopic film of surface oil is still hot and liquid. Spraying a touch of fresh salt at this exact moment allows the crystals to dissolve slightly and lock onto the hot crust, providing an immediate burst of savory brightness the moment it touches your tongue.
Optimal Reheating Methods to Restore the Crunch
If you find yourself with leftover fried chicken, skip the microwave completely. Microwaves heat by activating water molecules, which pushes internal moisture straight out through the crust, turning your chicken soggy and rubbery.
To restore your leftovers to their original golden glory, preheat your oven or air fryer to 375°F (190°C). Arrange the cold chicken drumsticks on a baking sheet and heat for 8 to 10 minutes (or 4 to 5 minutes in an air fryer). This process rapidly reheats the chicken through to the bone while simultaneously frying the surface starches back to a crisp, satisfying crunch.
Conclusion: Crafting Comfort at Home
Mastering the timeless art of homemade fried chicken is an incredibly fulfilling culinary milestone that turns simple kitchen staples into a breathtaking masterpiece of comfort food. By respecting the core principles of culinary science—leveraging a tenderizing buttermilk brine, incorporating a rich and complex spice matrix, and allowing your dry dredge to rest and set—you guarantee an exceptionally crisp and juicy result every single time you cook. The jaw-dropping balance between a deeply burnished, golden crust and a tender interior shown in 1000005742.jpg is completely within your reach. Organize your cooking bowls, bring your frying oil to the perfect temperature, and enjoy the immensely rewarding experience of sharing a legendary, golden-brown classic crafted with love in the heart of your home.