The Ultimate Japanese Soufflé Cheesecake Recipe Mastering the Art of the Jiggly Cake
Few desserts capture the imagination and satisfy a sweet tooth quite like a authentic Japanese soufflé cheesecake. Famous worldwide for its ethereal, cloud-like texture, delicate wobble, and melt-in-your-mouth crumb, this dessert represents a spectacular hybrid. It seamlessly bridges the gap between a rich, velvety Western cheesecake and a featherlight French soufflé. However, because it relies heavily on egg foam structure and precise temperature control, it can be intimidating to tackle at home, often prone to cracking, shrinking, or deflating into a dense layer.
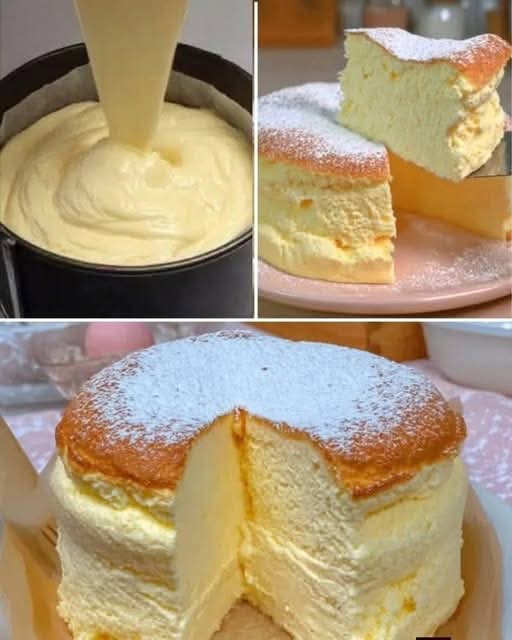
The beautiful baking journey captured in the multi-paneled graphic 1000005744.jpg illustrates exactly what flawless execution looks like. In the top-left panel of 1000005744.jpg, a thick, glossy, ribbon-stage batter is poured smoothly into a parchment-lined springform cake pan. The top-right and bottom panels display the magnificent, high-rising final product: a perfectly golden-topped cake dusted with a delicate layer of powdered sugar, with a clean slice cut out to reveal an exceptionally airy, fine, and uniform interior crumb structure. This comprehensive guide will break down the crucial food science, advanced techniques, and step-by-step methods required to master this jiggly masterpiece in your home kitchen.
The Science of Structure: Egg Whites and the Water Bath
Achieving the legendary texture shown in 1000005744.jpg requires a basic understanding of how egg proteins and baking physics interact. Unlike a traditional New York cheesecake, which is dense and contains high amounts of heavy cream, a soufflé cheesecake gets its entire lift from trapped air.
The Perfect Meringue Matrix
The absolute backbone of this cake is a perfectly whipped meringue (egg white foam). Whipping egg whites denatures their proteins, stretching them out to trap microscopic air bubbles. For a Japanese cheesecake, you must whip the whites to soft-to-medium peaks, not stiff peaks. If you whip them until they are stiff and dry, the air pockets will expand too aggressively in the oven, causing the cake to crack across the top. Soft peaks create a highly elastic matrix that can expand uniformly as the heat rises, resulting in the pristine, unblemished surface visible in 1000005744.jpg.
Steam Baking via the Bain-Marie
To keep the egg proteins from drying out and curdling, this cake must be baked in a water bath, or bain-marie. By placing the cake pan inside a larger tray filled with hot water, you guarantee that the ambient baking temperature surrounding the batter never exceeds 212°F (100°C) at the base. The water gently generates steam throughout the baking cycle, keeping the oven environment moist, ensuring a slow, even rise, and keeping the exterior walls of the cake beautifully pale, soft, and tender.
Complete Ingredients Checklist for Soufflé Cheesecake
For the absolute best results, ensure your cream cheese, eggs, and butter are fresh and handled at the temperatures specified below.
- Cream Cheese: 250g (full-fat brick style, slightly softened)
- Unsalted Butter: 50g (room temperature)
- Whole Milk: 100ml
- Egg Yolks: 6 large (room temperature)
- Egg Whites: 6 large (cold, as cold whites whip into a more stable meringue)
- Granulated White Sugar: 140g (divided into two portions)
- Cake Flour: 60g (sifted; cake flour is vital as its low protein content prevents excessive gluten development)
- Cornstarch: 20g (provides structural stability to the crumb)
- Lemon Juice: 1 tablespoon (adds a bright note and stabilizes the egg whites)
- Powdered Sugar: For dusting the finished cake
Step-by-Step Mixing, Folding, and Baking Guide
Follow these sequential steps carefully to ensure a seamless transition from a raw, smooth batter to the high-rising showstopper displayed in 1000005744.jpg.
1. Creating the Smooth Cheese Base
In a double boiler or a heatproof bowl set over a pot of gently simmering water, combine the cream cheese, unsalted butter, and whole milk. Whisk continuously until the mixture is completely melted, smooth, and free of any lumps. Remove the bowl from the heat and let it cool slightly. Whisk in 60g of the granulated sugar, followed by the 6 egg yolks one at a time. Sift the cake flour and cornstarch directly into the bowl, whisking gently until just combined. Pass this entire mixture through a fine-mesh strainer into a large bowl to secure the silky, ribbon-like consistency seen pouring in the top-left pane of 1000005744.jpg.
2. Whipping the Meringue
In a perfectly clean, grease-free glass or metal bowl, add your 6 cold egg whites and the tablespoon of lemon juice. Using an electric hand mixer on medium speed, whip the whites until they become frothy like beer foam. Gradually add the remaining 80g of granulated sugar, one tablespoon at a time, while continuing to whip. Once all the sugar is integrated, continue mixing until the whites form glossy, flexible soft peaks that gently bend over like a bird’s beak when you lift the beaters.
3. The Art of the Fold
This is the most critical step for preserving the cake’s volume. Add one-third of your meringue into the cheese base. Use a wire whisk to stir it in gently; this lightens the dense cheese batter so it matches the texture of the remaining foam. Switch to a silicone spatula and add the remaining meringue in two separate batches. Using a gentle hand, fold the mixture by cutting down through the center, sweeping around the bottom of the bowl, and folding the batter over itself while rotating the bowl. Stop the moment the color is uniform to avoid deflating the trapped air bubbles.
4. Pan Preparation and the Multi-Stage Bake
Preheat your oven to 325°F (160°C). Line the bottom and sides of an 8-inch solid cake pan (or a thoroughly double-wrapped springform pan) with high-quality parchment paper, ensuring the paper extends at least 2 inches above the rim of the pan to support the cake’s dramatic rise. Pour the batter gently into the pan, as shown in the top-left panel of 1000005744.jpg, and tap the pan firmly on the counter twice to pop any large trapped air bubbles.
Place the cake pan inside a larger, high-sided roasting tray. Pour hot water (not boiling, around 140°F / 60°C) into the roasting tray until it reaches halfway up the sides of the cake pan. Bake using the following multi-stage temperature profile to ensure a perfect crust color and internal rise:
- Stage 1: Bake at 325°F (160°C) for 20 minutes to kickstart the rise and form the top crust.
- Stage 2: Lower the temperature to 285°F (140°C) and bake for another 40 to 45 minutes until the top is an even, golden brown.
- Stage 3: Turn off the oven completely. Prop the oven door open slightly with a wooden spoon and let the cake sit undisturbed inside the cooling oven for 15 to 20 minutes. This slow temperature drop prevents the sudden thermal shock that causes a soufflé cake to collapse rapidly.
Cool-Down, Presentation, and Slicing Secrets
To ensure your cake keeps its pristine shape and exhibits the breathtaking interior crumb geometry displayed across the panels of 1000005744.jpg, follow these careful handling protocols.
Unmolding with Care
Remove the pan from the water bath and let it sit on a cooling rack for 10 minutes. As it cools slightly, the cake will naturally pull away from the parchment paper lining. Carefully invert the cake onto your hand or a flat plate, peel away the parchment paper from the base, and flip it right-side-up onto your final serving platter. While it is magnificent to serve warm for maximum “jiggle,” chilling the cake in the refrigerator for at least 3 to 4 hours allows the cream cheese fats to solidify, transforming the texture into a rich, velvety custard that melts elegantly on the tongue.
Replicating the Picture-Perfect Slice
Before slicing, give the golden top a light, uniform dusting of powdered sugar through a fine sifter, matching the gorgeous styling shown in the bottom panel of 1000005744.jpg. To achieve the exceptionally clean, professional cuts visible in the reference image, do not use a cold, dry knife.
Instead, submerge a long, sharp chef’s knife or a non-serrated cake knife into a tall container of hot water for 30 seconds. Wipe the blade completely dry with a clean kitchen towel, and slice through the cake in one continuous, downward pressing motion without sawing. Wipe the blade clean and re-warm it in hot water before making your second cut. This simple pro technique melts the delicate starches and fats cleanly on contact, showcasing the immaculate, airy structure of your home-baked masterpiece.
Proper Storage for Retaining Freshness
Because of its incredibly high moisture content and delicate egg base, store any remaining portions of your soufflé cheesecake in an airtight cake dome or a tightly sealed container inside the refrigerator. Kept cold and shielded from ambient fridge odors, it will retain its signature soft, velvety moisture profile for up to 3 to 4 days. Avoid freezing this style of cake, as the freezing and thawing process breaks down the delicate gelatinized starch walls, causing the moisture to separate and destroying the airy crumb structure.
Conclusion: A Triumph of Modern Pastry Technique
Baking a flawless Japanese soufflé cheesecake is a magnificent testament to the beauty of precision baking. By honoring the delicate boundaries of egg white whipping, mastering the gentle art of folding, and respecting the protective environment of a steam-filled water bath, you can effortlessly replicate the spectacular volume and golden beauty displayed in 1000005744.jpg. It is a true showstopper of a dessert that rewards patience with an unforgettable sensory experience. Prepare your ingredients, take your time folding your meringue, and enjoy the magical feeling of serving a cloud-like classic straight from your home oven.