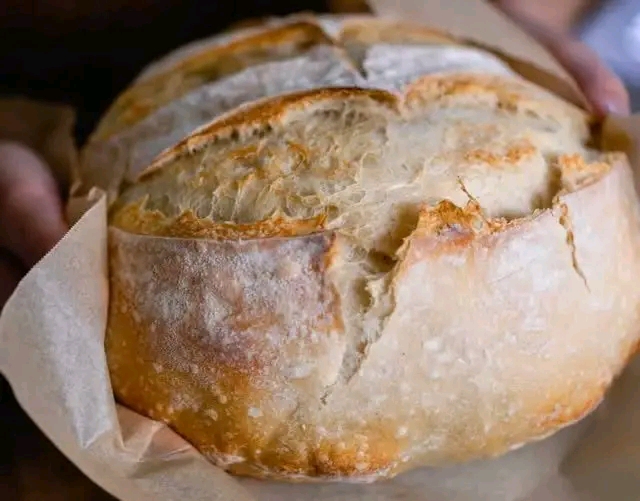
### Easy Homemade Sourdough Bread for Beginners
### Introduction
Homemade sourdough bread is one of the most rewarding recipes to learn. With its crisp, golden crust, soft and chewy interior, and deliciously tangy flavor, this traditional bread can turn a few simple ingredients into something truly special. Although sourdough requires patience, the process is surprisingly straightforward once you understand the basics.
This beginner-friendly recipe uses flour, water, salt, and an active sourdough starter. There is no need for commercial yeast when your starter is healthy and active. With a little preparation and time, you can enjoy fresh, homemade bread that tastes wonderful straight from the oven.
### Origin
Sourdough bread has a history stretching back thousands of years. Long before commercial baker’s yeast became widely available, people relied on naturally occurring wild yeast and beneficial bacteria to ferment their dough. These microorganisms produce the gases that help bread rise and the acids that give sourdough its distinctive flavor.
Over generations, sourdough techniques spread across cultures and became an important part of traditional baking. Today, home bakers continue this ancient practice, combining traditional fermentation with modern kitchen techniques.
### Cultural Significance
Bread is a symbol of nourishment, hospitality, and togetherness in many cultures. Sourdough baking carries this tradition forward by encouraging people to slow down, work with natural fermentation, and appreciate the transformation of simple ingredients.
For many families, maintaining a sourdough starter becomes a beloved kitchen tradition. Sharing a homemade loaf with friends, serving warm slices at breakfast, or bringing fresh bread to the dinner table makes the experience about much more than food.
### Ingredients Quantity
Preparation: 20–30 minutes of active work · Fermentation and proofing: approximately 8–16 hours, depending on temperature and starter activity · Baking: 45–50 minutes · Yield: 1 medium loaf

* 500 g bread flour (approximately 4 cups)
* 350 g water (1½ cups, plus 2 tablespoons)
* 100 g active sourdough starter (about ½ cup, depending on consistency)
* 10 g salt (approximately 1¾ teaspoons)
* A little extra flour or rice flour for dusting
Important: Use a bubbly, active starter that has risen noticeably after feeding. The exact fermentation time will depend on the strength of your starter and the temperature of your kitchen.
### Optional Additions
You can customize your sourdough loaf with a variety of ingredients:
* Seeds: Add 2–3 tablespoons of sunflower, sesame, pumpkin, or flax seeds.
* Herbs: Mix in dried rosemary, thyme, or oregano for a savory loaf.
* Olives: Add 75–100 g chopped, well-drained olives.
* Cheese: Fold in 75–100 g grated cheddar for a flavorful loaf.
* Whole-wheat flour: Replace up to 100 g of bread flour with whole-wheat flour for a heartier texture.
* Cinnamon and raisins: Add cinnamon and raisins for a lightly sweet breakfast loaf.
For your first attempt, it is best to keep the dough plain so you can learn how it behaves during fermentation.
### Tips for Success
* Use an active starter. Your starter should look bubbly and rise well after feeding. A weak starter can lead to dense bread.
* Measure by weight. A kitchen scale makes it easier to achieve consistent results than measuring flour and water by volume.
* Watch the dough, not just the clock. Fermentation can take longer in a cool kitchen and move faster in a warm one.
* Build gluten with folds. Gentle stretching and folding helps the dough develop strength without traditional kneading.
* Avoid overproofing. Dough that becomes excessively slack, fragile, and difficult to shape may have fermented too long.
* Create steam for a crisp crust. A preheated Dutch oven traps moisture and helps the loaf expand in the oven.
* Let the loaf cool. Allow the bread to cool for at least 2 hours before slicing so the crumb can finish setting.
### Instructions

Step 1: Mix the ingredients
Combine the water and active sourdough starter in a large bowl. Add the bread flour and mix until no dry flour remains. Cover and rest for 30 minutes.

Step 2: Add the salt
Sprinkle the salt over the dough. Work it in with damp hands, pinching and folding the dough until the salt is evenly incorporated.

Step 3: Stretch and fold
Over the next 2 hours, perform 3–4 sets of stretch-and-folds, spacing them approximately 30 minutes apart. Lift one edge of the dough, stretch gently, and fold it toward the center. Repeat around the dough.

Step 4: Bulk fermentation
Cover the dough and allow it to continue fermenting until it has risen by roughly 50–75%, looks aerated, and feels lighter. This may take several additional hours, depending on room temperature and starter strength.

Step 5: Shape the loaf
Turn the dough onto a lightly floured surface. Shape it into a tight round or oval loaf, creating gentle surface tension without tearing the dough. Place it seam-side up in a floured proofing basket or a bowl lined with a floured towel.

Step 6: Proof the dough
Cover and refrigerate for 8–16 hours. Cold proofing develops flavor and makes the loaf easier to score. Alternatively, proof at room temperature until the dough is ready to bake.

Step 7: Preheat and score
Preheat a Dutch oven with its lid to 240°C (465°F) for about 30–45 minutes. Carefully turn the cold dough onto parchment paper and score the top with a sharp bread lame or razor.

Step 8: Bake
Carefully place the dough in the hot Dutch oven. Bake covered for 25 minutes, then remove the lid and bake for another 20–25 minutes until the crust is deeply golden brown.

Step 9: Cool and serve
Transfer the loaf to a wire rack and let it cool for at least 2 hours before slicing. Serve plain or with your favorite toppings.
### Description
This easy homemade sourdough bread features a beautifully crisp crust, a soft and chewy center, and the subtle tang that makes naturally fermented bread so distinctive. The long fermentation gives the dough time to develop flavor, while gentle folding helps create a satisfying texture.
Each loaf will have its own character. Some may develop large, irregular holes, while others have a finer, more even crumb. Both can be delicious, and neither requires perfection to make wonderful bread.
### Nutritional Information
Approximate nutrition per slice, assuming the loaf is divided into 12 slices:
| Nutrient | Per slice |
| ————- | ————- |
| Calories | 160–175 kcal |
| Carbohydrates | 32–35 g |
| Protein | 5–6 g |
| Fat | 0.5–1.5 g |
| Fiber | 1–2 g |
| Sugar | Less than 1 g |
| Sodium | 300–350 mg |
Values vary with the flour used, starter composition, loaf size, and slice thickness. These estimates are for the basic recipe without optional additions. Sourdough bread is not gluten-free, and fermentation does not remove all carbohydrates or make it suitable for everyone with blood sugar concerns.
### Conclusion
Making sourdough bread at home is a skill that improves with every loaf. The process teaches you to recognize fermentation, handle dough gently, and appreciate the flavor that develops over time.
Even if your first loaf is not perfectly shaped or does not have the open crumb you hoped for, keep practicing. A flavorful homemade loaf with a crisp crust is already a wonderful achievement.
### Recommendation
Enjoy freshly sliced sourdough with scrambled eggs, avocado, tomatoes, homemade soup, or a simple olive oil dip. Toast leftover slices for breakfast or use them to make sandwiches.
For beginners, I recommend keeping a small baking journal. Record the room temperature, starter activity, fermentation time, and final texture. These observations will help you understand your dough and improve your next bake.
### Embracing Healthful Indulgence
Homemade sourdough offers a simple way to enjoy traditional bread made from ingredients you choose yourself. Naturally fermented bread may be easier for some people to digest than certain conventionally made breads, although individual responses vary and it is not suitable for people who must avoid gluten.
For a more fiber-rich loaf, experiment with replacing a portion of the bread flour with whole-wheat flour. Pair a slice with protein-rich foods, vegetables, or healthy fats for a more balanced meal.
Most importantly, enjoy the process. With flour, water, salt, a healthy starter, and a little patience, you can create a delicious homemade loaf that brings warmth and satisfaction to your kitchen.