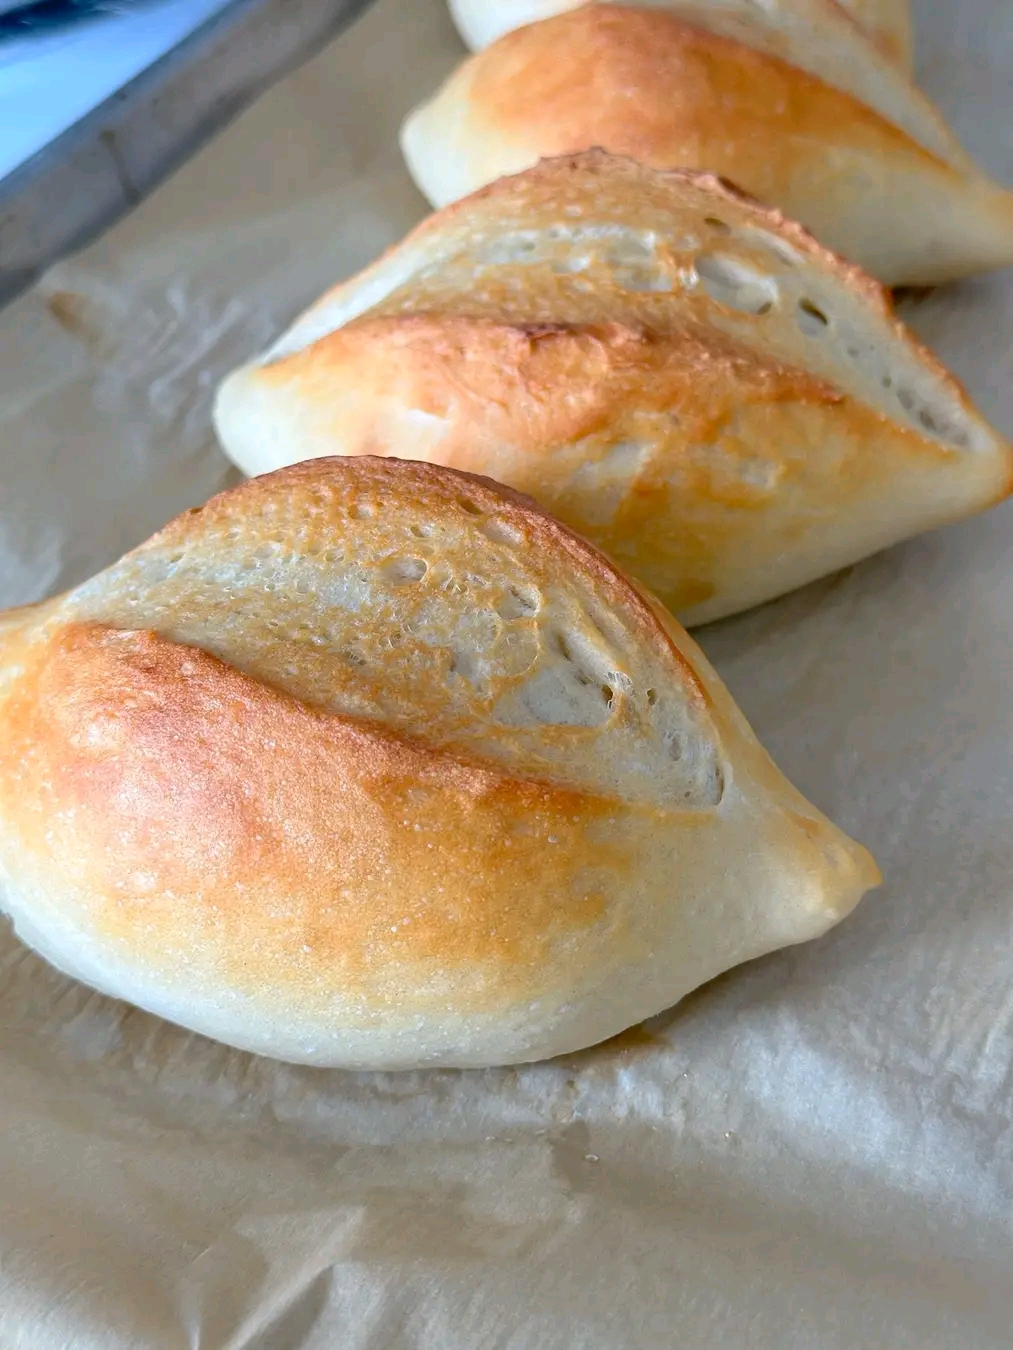
### Homemade Mexican Bolillos: Golden, Crusty Bread Rolls
### Introduction
Homemade bolillos are classic Mexican bread rolls loved for their golden, crunchy crust and soft, airy interior. With their distinctive oval shape and a signature slash down the center, these rolls are perfect for everyday meals, sandwiches, and traditional Mexican dishes.
Making bolillos at home is a rewarding baking experience. A few simple ingredients—flour, yeast, salt, water, and oil—come together to create delicious bakery-style bread. The secret to achieving a beautifully crisp crust is steam in the oven, while proper kneading and rising help produce a tender, fluffy crumb.
Serve them warm with butter, fill them with your favorite sandwich ingredients, or use them to prepare traditional Mexican tortas and molletes.
Preparation Time: 25 minutes
Rising Time: 1½–2½ hours, depending on room temperature
Baking Time: 20 minutes
Cooling Time: 20 minutes
Total Time: Approximately 2½–3½ hours
Yield: 6 bolillos
### Origin
Bolillos are among Mexico’s most recognizable everyday breads. Their history is associated with the introduction of European wheat-bread traditions during the Spanish colonial period and the development of local Mexican baking practices.
Over generations, Mexican bakers developed the bolillo into a distinctive bread roll with an oval shape, pointed ends, and a crisp crust. Although it resembles the French baguette in some ways, bolillos have become a uniquely familiar part of Mexican food culture.
Today, bolillos are sold in neighborhood panaderías (bakeries), supermarkets, and markets throughout Mexico. Homemade versions allow bakers to enjoy the same comforting flavor and texture straight from their own ovens.
### Cultural Significance
Bolillos are much more than simple bread rolls in Mexico. They are an everyday staple enjoyed at breakfast, lunch, dinner, and between meals.
One of their most popular uses is the torta, a Mexican sandwich filled with ingredients such as seasoned meat, chicken, beans, avocado, cheese, lettuce, tomato, and spicy salsa. The crusty exterior helps the roll hold its filling without becoming too soft.
Bolillos are also essential for molletes, a comforting dish made by splitting the rolls, spreading them with refried beans, topping them with cheese, and baking until melted. Salsa or pico de gallo is often added before serving.
Because they are versatile, affordable, and satisfying, bolillos are a familiar part of family meals, lunchboxes, street food, and celebrations. Baking them at home brings that beloved bakery experience into your kitchen.
### Ingredients Quantity
For 6 homemade bolillos

4 cups bread flour
Provides the structure and chewiness needed for a classic crusty roll. Depending on the flour, this is approximately 480–520 g; weighing is recommended.

2¼ teaspoons instant yeast
Helps the dough rise and develop a light, airy interior.

2 teaspoons salt
Enhances the flavor and helps regulate fermentation.

1½ cups water
Use lukewarm water, approximately 95–105°F (35–40°C), to help the yeast work effectively.

1 tablespoon neutral oil
Adds a little softness to the dough and helps prevent sticking during handling.
### Optional Additions
You can keep the recipe traditional and simple or make small adjustments to suit your preferences.
* Olive oil: Substitute it for neutral oil for a subtle fruity flavor.
* Whole-wheat flour: Replace up to ¼ of the bread flour for a heartier roll. You may need a little additional water.
* Garlic powder: Add ¼–½ teaspoon for a gentle savory flavor.
* Sesame seeds: Sprinkle a few on top before baking for a different finish.
* Herbs: Add a small amount of dried oregano or rosemary for an aromatic variation.
* Butter: Serve the warm rolls with a little butter or use them for buttery garlic bread.
For classic Mexican bolillos, avoid adding too many ingredients that could change the traditional texture.
### Tips for Success
1\. Measure the flour carefully. Too much flour can make the rolls dense. A kitchen scale provides the most consistent results.
2\. Knead until elastic. The dough should become smooth and stretchy, rather than rough and easily torn. A stand mixer usually takes around 8 minutes, though timing varies.
3\. Watch the dough, not just the clock. During the first rise, aim for approximately doubled volume. Cooler kitchens may require more time.
4\. Shape with care. Roll each portion into an oval with tapered ends. Keep the surface reasonably taut without tearing the dough.
5\. Avoid overproofing. The shaped rolls should look puffy and feel light. If they rise too long, they may spread or lose their oven spring.
6\. Create steam safely. Place a sturdy, oven-safe metal pan in the oven during preheating and carefully add hot water when baking begins, following the pan manufacturer’s instructions. Avoid pouring water onto the oven floor or glass.
7\. Score just before baking. Use a sharp blade to make one shallow lengthwise cut along the top of each roll.
8\. Let them cool before slicing. Cooling for about 20 minutes allows the interior to finish setting while the crust remains crisp.
### Instructions
Step-by-step method

Step 1: Mix the dough
Combine the bread flour, instant yeast, salt, water, and oil in a stand mixer bowl. Mix until the ingredients come together, then knead for approximately 8 minutes until the dough is smooth and elastic. If mixing by hand, knead for around 10–15 minutes.

Step 2: Let the dough rise
Transfer the dough to a lightly oiled bowl, turning it once to coat the surface. Cover and leave in a warm, draft-free place until doubled in size, usually 1–2 hours.

Step 3: Divide the dough
Gently press the dough to release excess gas. Divide it into 6 equal portions. If possible, weigh the pieces so the rolls bake evenly.

Step 4: Shape the bolillos
Shape each portion into an oval with pointed ends. Place the rolls on a parchment-lined baking sheet, leaving enough room between them for expansion.

Step 5: Proof the rolls
Cover the shaped rolls loosely and let them rise for approximately 45–60 minutes, or until noticeably puffy. Brush lightly with oil if desired, but avoid pressing down on the dough.

Step 6: Preheat the oven
Heat the oven to 450°F (230°C). If using a separate metal pan for steam, preheat it as well. Allow the oven to reach temperature fully before baking.

Step 7: Score the dough
Using a sharp knife or bread lame, make one shallow lengthwise slit down the center of each roll. Lightly mist or brush the surface with water if desired.

Step 8: Bake with steam
Carefully add hot water to the preheated metal pan to create steam, keeping your hands and face away from the escaping vapor. Place the bread in the oven and bake for about 18–22 minutes, until golden brown and crisp.

Step 9: Cool and serve
Transfer the bolillos to a wire rack and allow them to cool for about 20 minutes. Enjoy warm or use them to prepare tortas, molletes, or your favorite sandwiches.
### Description
These homemade bolillos have a beautifully golden exterior with a crisp, crackly crust and a soft, chewy interior. Their mild flavor makes them an excellent match for savory fillings, melted cheese, beans, eggs, or roasted vegetables.
The steam in the oven helps the crust develop, while the yeast gives the interior its characteristic airy texture. Fresh from the oven, they smell wonderful and have a satisfying crunch when broken open.
Whether served beside a comforting bowl of soup or filled with flavorful sandwich ingredients, these bread rolls bring homemade warmth to any meal.
### Nutritional Information
Estimated nutrition per bolillo, based on 6 rolls:
| Nutrient | Approximate amount |
| ————- | —————— |
| Calories | 320–350 kcal |
| Carbohydrates | 63–68 g |
| Protein | 10–12 g |
| Fat | 2–3 g |
| Fiber | 2–3 g |
| Sugar | 1–2 g |
| Sodium | 650–800 mg |
Values vary with the exact flour weight, ingredient brands, and portion size. These estimates are for the bread alone, without butter or sandwich fillings.
Dietary note: Bolillos are made primarily with wheat flour, so they are not gluten-free or low-carbohydrate. For anyone limiting refined flour or carbohydrates, they are best enjoyed in a portion that fits their individual dietary needs.
### Conclusion
Homemade bolillos are a wonderful way to bring the flavor of a Mexican bakery into your kitchen. With simple ingredients, proper kneading, enough rising time, and steam during baking, you can create rolls with a crisp crust and a soft, fluffy center.
Once you master the shaping technique, these versatile rolls can become a regular part of your homemade bread routine. They are delicious fresh, useful for sandwiches, and easy to customize with your favorite savory fillings.
### Recommendation
For the best experience, serve your bolillos slightly warm on the day they are baked. Try them in one of these delicious ways:
* Mexican tortas: Fill with chicken, beef, beans, avocado, lettuce, tomato, and salsa.
* Molletes: Spread with refried beans, top with cheese, and bake until bubbling.
* Breakfast rolls: Fill with scrambled eggs, vegetables, or your favorite breakfast ingredients.
* Soup accompaniment: Serve alongside vegetable soup, chicken soup, or a hearty stew.
* Garlic bread: Slice, brush with garlic-infused oil, and toast until crisp.
Store cooled rolls in a paper bag or bread box for up to 2 days for the best texture. To restore crispness, warm them in a 350°F (175°C) oven for 5–8 minutes. For longer storage, freeze them in an airtight freezer bag for up to 2–3 months.
### Embracing Healthful Indulgence
Enjoying homemade bread can be part of a balanced approach to eating. Bolillos provide carbohydrates for energy and some protein, while their simple ingredient list lets you control what goes into your food.
For a more balanced meal, pair a bolillo with lean protein, such as chicken or eggs, and plenty of vegetables. You can also experiment with replacing a small portion of the white bread flour with whole-wheat flour to increase fiber, keeping in mind that the texture may become denser.
If you prefer to avoid white flour, this traditional recipe will need a more substantial adaptation using suitable alternative flours and a different dough structure. Simply swapping in almond or coconut flour will not produce the same classic bolillo texture.
The goal is to enjoy food that tastes wonderful while choosing portions and ingredients that suit your needs. A freshly baked bolillo, paired thoughtfully with nourishing fillings, can be a satisfying homemade treat.