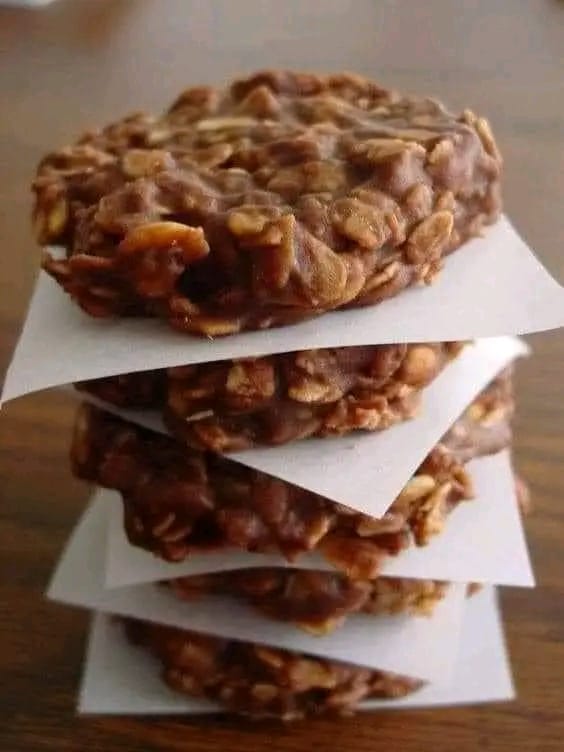
### The Secret to Making Perfect Chocolate & Peanut Butter No-Bake Cookies
### Introduction
If you love the irresistible combination of rich chocolate and creamy peanut butter, these classic Chocolate & Peanut Butter No-Bake Cookies are sure to become a favorite! Made with simple pantry ingredients, instant oats, cocoa powder, and smooth peanut butter, these cookies deliver delicious flavor without requiring an oven.
The secret to getting them just right is the boiling time. Cooking the butter, sugar, milk, and cocoa mixture for exactly the right amount of time helps the cookies set properly while keeping their texture pleasantly chewy. Once everything is combined, simply drop spoonfuls onto wax paper and let them cool.
Perfect for busy afternoons, family gatherings, lunchbox treats, or late-night chocolate cravings, these easy cookies prove that homemade desserts don’t have to be complicated.
Preparation Time: 10 minutes Cooking Time: 5–7 minutes Setting Time: 30 minutes Total Time: Approximately 45 minutes Yield: 24–30 cookies, depending on size
### Origin
No-bake cookies became popular in American home kitchens as a convenient alternative to traditional oven-baked desserts. Recipes using oats, cocoa, sugar, butter, and peanut butter appeared in various forms throughout the twentieth century, offering families an affordable way to prepare sweet treats with minimal equipment.
These cookies are sometimes called chocolate oatmeal cookies, chocolate peanut butter drops, or preacher cookies in different regional traditions. Their precise origin is difficult to establish because many similar recipes have circulated through family cookbooks and community recipe collections for decades.
Their lasting popularity comes from their simplicity, rich flavor, and the fact that no oven is needed.
### Cultural Significance
Chocolate and peanut butter no-bake cookies hold a special place in many American family kitchens. They’re often associated with childhood memories, after-school snacks, bake sales, holiday treats, and afternoons spent making desserts with family members.
Because the ingredients are inexpensive and readily available, these cookies are also a popular choice for beginners learning to make homemade sweets. The quick preparation and familiar flavor make them an easy treat to share with friends, neighbors, and loved ones.
### Ingredients Quantity

For the cookies
* ½ cup (113 g) unsalted butter
* 2 cups (400 g) granulated sugar
* ½ cup (120 ml) milk
* 4 tablespoons unsweetened cocoa powder
* 1 cup (250–260 g) creamy peanut butter
* 3 cups (approximately 270 g) instant oats
* 2 teaspoons pure vanilla extract
### Optional Additions
Customize your cookies with one or more of these additions:
* A pinch of salt: Enhances the chocolate and peanut butter flavors.
* Shredded coconut: Adds a pleasant chewy texture.
* Chopped roasted peanuts: Provides extra crunch and a stronger peanut flavor.
* Mini chocolate chips: Create an even richer chocolate taste. Allow the mixture to cool slightly before adding them to prevent complete melting.
* Ground cinnamon: Adds a subtle warmth.
* Almond butter: Can replace the peanut butter, although the flavor and setting texture may differ.
* Rolled oats: Can replace instant oats, but the cookies will have a heartier texture and may require slight adjustments.
For a less-sweet variation, you can experiment with reducing the sugar, but be aware that sugar plays an important role in helping these cookies set.
### Tips for Success
* Measure everything before starting. Once the chocolate mixture reaches a boil, the remaining steps move quickly.
* Use instant oats for the classic texture. They absorb moisture readily and help the cookies hold together.
* Watch the boiling time carefully. Start timing only when the mixture reaches a full rolling boil across the surface.
* Boil for exactly 1 minute and 15 seconds. This is the timing specified in the original recipe. Differences in humidity, cookware, and heat can affect the final texture, so allow the cookies to set fully before judging the result.
* Avoid excessive stirring while boiling. Stir to combine the ingredients and prevent scorching, but keep the mixture at a steady boil.
* Remove the pan from the heat promptly. Overcooking can lead to dry, crumbly cookies.
* Work quickly after cooking. Stir in the peanut butter, oats, and vanilla promptly, then drop the mixture onto the prepared sheets before it thickens.
* Use parchment paper if preferred. Parchment paper is a convenient alternative to wax paper for cooling the cookies.
* Allow enough setting time. Leave the cookies undisturbed for at least 30 minutes, or longer if your kitchen is warm.
### Instructions
Step 1: Prepare your workspace
Line two baking sheets with wax paper or parchment paper. Measure the peanut butter, instant oats, and vanilla extract before you begin cooking.
Step 2: Combine the chocolate ingredients
In a medium saucepan, add the butter, granulated sugar, milk, and cocoa powder. Place the saucepan over medium heat and stir until the butter melts and the mixture becomes smooth.
Step 3: Bring the mixture to a boil
Continue heating until the mixture reaches a full rolling boil. Once it is boiling vigorously across the surface, start a timer and boil for exactly 1 minute and 15 seconds, stirring carefully to prevent scorching.
Step 4: Add the peanut butter
Remove the saucepan from the heat immediately. Add the creamy peanut butter and stir until completely melted and incorporated into the chocolate mixture.
Step 5: Stir in the oats and vanilla
Add the instant oats and mix thoroughly until all the oats are coated. Stir in the vanilla extract until evenly distributed.
Step 6: Shape the cookies
Working quickly, drop tablespoon-sized portions of the mixture onto the prepared baking sheets. Leave a little space between the cookies, although they will not spread like oven-baked cookies.
Step 7: Allow the cookies to set
Leave the cookies at room temperature for approximately 30 minutes, or until firm enough to lift easily from the paper. If your kitchen is particularly warm, they may need additional time or a brief period in the refrigerator.
Step 8: Serve and enjoy
Once completely set, transfer the cookies to a serving plate. Enjoy their chewy oatmeal texture, rich chocolate flavor, and creamy peanut butter goodness!
### Description
These Chocolate & Peanut Butter No-Bake Cookies are rich, chewy, chocolatey, and wonderfully satisfying. The cocoa creates a deep chocolate flavor, while the peanut butter adds creaminess and a nutty taste. Instant oats give the cookies their signature texture and help hold everything together.
Unlike traditional cookies, these treats don’t need to be baked in an oven. Their texture develops as the cooked mixture cools, creating a delicious homemade sweet that’s perfect for sharing.
Enjoy them with a glass of milk, a cup of coffee, or your favorite hot drink.
### Nutritional Information
The following values are estimates per cookie, assuming the recipe produces 30 cookies.
| Nutrient | Approximate amount |
| ————- | —————— |
| Calories | 125–145 kcal |
| Protein | 3–4 g |
| Carbohydrates | 18–21 g |
| Fat | 5–7 g |
| Fiber | 1–2 g |
| Sugar | 12–15 g |
Actual nutritional values depend on the brands used and the size of each cookie. Making fewer, larger cookies will increase the nutritional values per serving.
### Conclusion
Chocolate & Peanut Butter No-Bake Cookies are a timeless homemade treat that combines convenience with irresistible flavor. With no oven required and only a few simple ingredients, they’re ideal for beginner bakers, busy families, and anyone who enjoys a chewy chocolate dessert.
The key to success is preparing your ingredients in advance and paying close attention to the boiling time. Follow the instructions, allow the cookies to set properly, and you’ll have a delicious batch ready to share.
### Recommendation
Serve these cookies at room temperature for the best chewy texture. They’re wonderful for family gatherings, holiday dessert trays, school events, or a homemade gift for friends.
Store them in an airtight container at room temperature in a cool environment for about 3–5 days, or refrigerate them for up to a week. They can also be frozen in a sealed container for approximately 2–3 months for best quality. If stacking the cookies, place parchment paper between the layers.
For a slightly more balanced snack, enjoy one or two cookies alongside fresh fruit or a handful of berries.
### Embracing Healthful Indulgence
Enjoying homemade desserts can be part of a balanced lifestyle. These cookies offer flavor and satisfaction from familiar ingredients, including oats, which provide some fiber, and peanut butter, which contributes protein and unsaturated fats.
However, the traditional recipe contains a substantial amount of added sugar. If you’d like a less-sweet version, you can experiment with reducing the sugar, but the cookies may not set as firmly because sugar helps create their structure.
For a different approach, consider making a separate no-bake oat treat with peanut butter, unsweetened cocoa, and mashed banana or a small amount of date paste. Such a variation can reduce refined sugar, although it will have a different texture and nutritional profile.
The goal is to enjoy your favorite flavors mindfully, savor each bite, and choose ingredients and portions that suit your personal preferences. A homemade treat can be both comforting and enjoyable without needing to be an everyday indulgence.