The Ultimate Crispy Vegetable Tots Recipe A Healthy Kid Friendly Meal Prep Favorite
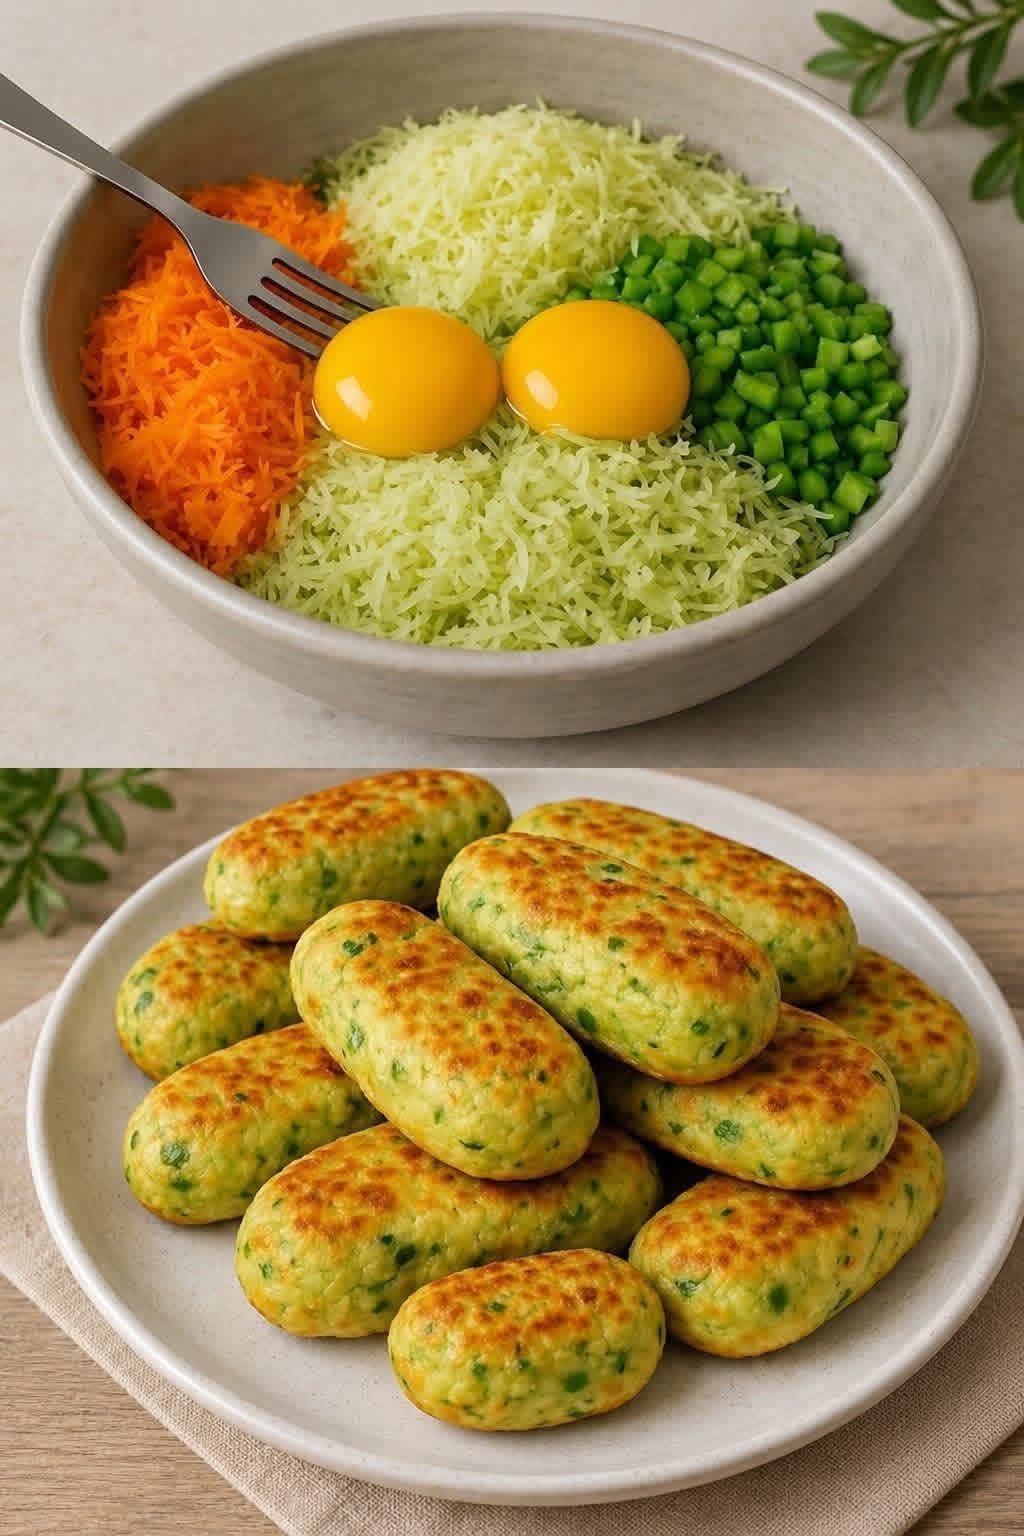
Finding a nutritious, family-friendly meal that satisfies both picky eaters and health-conscious adults can often feel like an uphill battle in the kitchen. We are constantly searching for clever ways to sneak more nutrient-dense vegetables into our daily diets without sacrificing flavor, texture, or the joy of eating comfort food. Enter the homemade crispy vegetable tot, a vibrant, wholesome twist on a classic American side dish that transforms humble garden vegetables into golden, pan-seared bites of pure joy. If you look at the vibrant ingredients shown in 1000005763.jpg, you will see exactly how a handful of fresh, colorful produce can be combined with simple kitchen staples to create a beautifully structured, delicious dish that everyone will love.
Unlike store-bought frozen tots, which are frequently packed with excess sodium, preservatives, and mystery fillers, making your own vegetable tots at home gives you complete control over the quality of your ingredients. This long-form guide will take you step-by-step through the process of crafting the perfect vegetable tots, offering essential culinary tips for moisture control, flavor customization, and versatile cooking methods. Whether you are looking for an enticing afternoon snack for the kids, a unique side dish for your next weekend barbecue, or a batch-cooking option for your weekly meal prep routine, this recipe delivers on every front. Let’s dive deep into the world of homemade vegetable tots and explore how to achieve that perfect contrast between a golden, crispy exterior and a tender, savory interior.
Why You Will Love This Wholesome Vegetable Tot Recipe
There is a reason vegetable-forward finger foods have taken the culinary world by storm, and it goes far beyond the simple desire to eat healthier. These tots bridge the gap between nutritional functionality and genuine comfort food satisfaction, making them an instant favorite in any household. By utilizing a base of finely grated zucchini or broccoli stalks, sweet carrots, and crisp green bell peppers combined with a binding agent and fresh egg yolks, you create a complex flavor profile that far outshines standard potato tots.
A Nutrient-Dense Alternative to Processed Snacks
Standard frozen potato tots are primarily composed of simple carbohydrates and are often flash-fried in low-quality oils before they ever reach your grocery store’s freezer section. This homemade alternative swaps out the starchy potato base for a high-fiber, vitamin-rich medley of fresh vegetables. Carrots provide a significant dose of beta-carotene and vitamin A, while green bell peppers offer a bright burst of vitamin C and antioxidants. When you combine these with the hydrating properties and micronutrients found in summer squash or brassicas, you are serving a powerful dose of nutrition in every single bite.
The Perfect Solution for Sneaky Veggie Loading
If you have children or a partner who turns their nose up at a side salad or a pile of steamed broccoli, this recipe is your secret weapon. The process of finely grating and dicing the vegetables ensures that they blend together into a cohesive, uniform mixture. Once seasoned, shaped, and cooked to a beautiful golden brown, the individual identity of the vegetables softens, leaving behind a delicious, savory, and mildly sweet flavor profile that appeals directly to picky eaters. It is a stress-free way to incorporate multiple servings of produce into a single meal.
Highly Adaptable and Meal-Prep Friendly
One of the greatest strengths of this recipe is its versatility. Once you master the basic formula and the crucial technique of moisture elimination, you can easily swap ingredients based on what you have available in your refrigerator. Furthermore, these vegetable tots freeze beautifully, making them an exceptional option for batch cooking. You can spend an hour on Sunday preparing a massive batch, freeze them before or after cooking, and have a quick, healthy snack or side dish ready to reheat at a moment’s notice throughout a busy workweek.
Understanding the Ingredients for Structural and Flavor Success
To replicate the stunning results displayed in the images within 1000005763.jpg, it helps to understand the specific role that each ingredient plays within the mixture. Crafting a veggie tot is a delicate balancing act between moisture, structure, and seasoning; choosing the right components ensures your tots hold their oblong shape perfectly without flattening out or becoming mushy in the pan.
The Vegetable Base: Grated and Diced Produce
The bulk of this recipe relies on a dual-textured vegetable base consisting of finely grated ingredients and small, uniformly diced accents. As shown in the top portion of 1000005763.jpg, a large quantity of finely shredded light green vegetables—such as zucchini, summer squash, or peeled broccoli stems—forms the foundation of the mixture. This is paired with vibrant shredded carrots for a touch of natural sweetness and depth. To add a bit of structural crunch and a pop of color, finely minced green bell peppers are folded into the mix, ensuring that every bite has a complex, multi-dimensional texture.
The Binding Agents: Egg Yolks and Starch
Vegetables are naturally high in water and lack the natural binding starch found in traditional potatoes, meaning they require a little assistance to stay held together. Two rich egg yolks are added directly to the center of the bowl to act as a primary emulsifier and binder. The fats in the yolks provide a rich mouthfeel while helping to glue the vegetable strands together as they cook. To supplement this, a light dusting of finely grated starch or flour—such as potato starch, cornstarch, rice flour, or standard flour—is mixed throughout to absorb residual moisture and create a cohesive dough that can be easily molded by hand.
Seasoning Staples for Maximum Depth
Because vegetables have a naturally mild, sweet profile, proper seasoning is absolutely critical to elevating this dish from a simple healthy snack to a crave-worthy culinary experience. A generous pinch of sea salt is required not only for flavor but also to assist in drawing out excess water during the preparation phase. Garlic powder, onion powder, a touch of white pepper, and perhaps a handful of finely chopped fresh herbs like parsley or chives can be added to the mixture to introduce a savory, aromatic complexity that pairs beautifully with the natural sweetness of the carrots and peppers.
The Step-by-Step Guide to Making Perfect Vegetable Tots
Achieving the gorgeous, uniform, oblong tots pictured in the bottom half of 1000005763.jpg requires a specific sequence of steps. Skipping the preparation phases can result in a wet mixture that falls apart upon contact with heat, so be sure to follow this methodology closely for flawless execution.
Step 1: Grating and Precise Dicing
Begin by thoroughly washing all of your produce. Take your primary green vegetable (such as zucchini or broccoli stalks) and your carrots, and run them against the fine side of a box grater. You want fine, delicate strands rather than thick ribbons, as smaller pieces will pack together much more tightly. Next, take your green bell pepper and use a sharp chef’s knife to cut it into an incredibly fine, uniform dice. The diced peppers should be roughly the size of a peppercorn so they distribute evenly without creating large structural weak points in your molded tots.
Step 2: The Critical Moisture Extraction Phase
This is the single most important step in the entire recipe. Vegetables like zucchini contain an immense amount of water, which will instantly turn your tots into mush if it isn’t removed. Place your grated zucchini or squash into a clean, dry kitchen towel or a fine nut milk bag. Sprinkle a pinch of salt over the vegetables and let them sit for five minutes to draw out the moisture. Twist the towel tightly over the sink and squeeze with all your might. You will be amazed at how much liquid drains out. Continue squeezing until the vegetable pulp feels completely dry and compacted to the touch.
Step 3: Mixing and Binding the Ingredients
Transfer your thoroughly dried, grated vegetables, shredded carrots, and diced green peppers into a large mixing bowl. Create a small well in the center of the vegetable mound. Drop in your two fresh egg yolks, along with your choosing of starch, garlic powder, onion powder, salt, and pepper. Using a fork or clean hands, work the egg yolks and dry ingredients into the vegetables until a uniform, sticky dough forms. The mixture should easily hold its shape when pressed together in your palm; if it still feels overly wet, add an extra tablespoon of starch to balance it out.
Step 4: Shaping the Perfect Oblong Tots
To mimic the classic diner-style tot shape seen in 1000005763.jpg, scoop out a portion of the mixture roughly the size of a golf ball (about two tablespoons). Roll the mixture between your palms to form a smooth ball, then gently roll it back and forth to elongate it into a cylinder. Press the top and bottom ends gently against a flat surface or your index finger to flatten the edges, creating a clean, professional, oblong tot. Place the shaped tots onto a baking sheet lined with parchment paper as you work through the remaining mixture.
Step 5: Cooking to Golden, Crispy Perfection
While there are multiple ways to cook these vegetable treats, pan-searing them in a light coating of oil yields the magnificent, dappled golden-brown crust shown in the final plate presentation. Heat a large non-stick skillet over medium heat and add a tablespoon of high-smoke-point oil, such as avocado or grapeseed oil. Gently place the tots into the hot pan, leaving ample space between each one to ensure they sear rather than steam. Cook for approximately 3 to 4 minutes per side, gently rolling them to a new edge as they brown, until the entire exterior is beautifully crisp and the interior is fully cooked and hot throughout.
Alternative Cooking Methods: Baking and Air Frying
While pan-searing gives you that classic, rustic, pan-fried finish, you can easily adapt this recipe to suit your favorite kitchen appliances if you prefer a hands-off approach or want to minimize the use of cooking oils.
The Oven-Baked Approach
If you are cooking a massive batch of tots for a large group, baking them all at once on a sheet pan is incredibly convenient. Preheat your conventional oven to 400°F (200°C) and line a large baking sheet with parchment paper. Lightly spray the parchment with a non-stick cooking spray, arrange your shaped vegetable tots in a single layer, and mist the tops of the tots with a bit of olive oil or avocado oil spray. Bake for 20 to 25 minutes, flipping them halfway through the cooking time, until they are firm to the touch and golden brown on all sides.
The Modern Air Fryer Method
For those who want maximum crispiness with minimal oil, the air fryer is an absolute game-changer for vegetable tots. Arrange the tots in a single layer within your air fryer basket, ensuring they are not touching or overlapping, which can impede optimal airflow. Set your air fryer to 375°F (190°C) and cook for 12 to 15 minutes. Gently shake the basket or flip the tots with silicone-tipped tongs at the halfway mark. The intense, circulating convection heat dries out the exterior beautifully, mimicking a deep-fried texture flawlessly.
Pro-Tips for Flavor Variations and Customization
Once you have mastered the basic structural technique outlined above, you can treat this recipe as a blank canvas for your culinary creativity. Modifying the flavor profile allows you to tailor the tots to complement a wide variety of main dishes and global cuisines.
| Variation Style | Recommended Additions | Best Pairing Sauces |
|---|---|---|
| Cheesy Herb | Sharp Cheddar, Grated Parmesan, Fresh Parsley | Garlic Aioli, Ranch Dressing |
| Spicy Southwestern | Smoked Paprika, Cumin, Minced Jalapeños | Chipotle Crema, Fresh Avocado Salsa |
| Mediterranean | Crumbled Feta, Dried Oregano, Lemon Zest | Tzatziki, Lemon-Garlic Yogurt Sauce |
| Smoky Barbecue | BBQ Seasoning Rub, Finely Minced Smoked Bacon | Sweet BBQ Sauce, Honey Mustard |
How to Properly Store, Freeze, and Reheat Your Tots
Because these homemade vegetable tots require a bit of prep work with grating and squeezing moisture, it makes excellent sense to prepare a double or triple batch to store away for future meals.
Refrigeration Guidelines
Leftover cooked vegetable tots can be kept in the refrigerator for up to 4 days. Allow the tots to cool down completely to room temperature before transferring them to an airtight storage container. To prevent them from becoming soggy from residual steam, line the bottom of your container with a paper towel to absorb any condensation that forms during refrigeration.
Freezing for Long-Term Storage
To freeze uncooked tots, arrange the freshly shaped cylinders on a parchment-lined baking sheet and place the entire tray into the freezer for 1 to 2 hours until the tots are frozen solid. Once firm, transfer them into a heavy-duty freezer bag, labeling it with the date. They will keep beautifully for up to 3 months. You can cook them directly from frozen by adding an extra 3 to 5 minutes to your baking or air frying time.
Reheating to Restore Crispiness
Avoid using the microwave to reheat your leftover tots, as this will trap steam inside the vegetable structure and leave you with a soft, spongy texture. Instead, pop them back into an air fryer at 350°F for 4 to 5 minutes, or place them on a baking sheet in a 375°F oven until they are heated completely through and the exterior shell regains its signature satisfying crunch.
Conclusion: Bringing Wholesome Comfort to Your Table
Homemade crispy vegetable tots prove that you do not need to sacrifice flavor or texture to enjoy a nutrient-dense, vegetable-forward meal. By taking simple ingredients like carrots, green peppers, and grated squashes, drawing out their moisture, and binding them together with rich egg yolks, you create a versatile, crowd-pleasing snack that honors both your health goals and your love for comforting food textures. They are a brilliant testament to how creative cooking can transform standard garden produce into an artistic, delicious, and highly functional addition to your weekly meal rotations. Gather your ingredients, grab your box grater, and enjoy the process of making these delightful golden bites from scratch!