The Ultimate Keto Bacon Chicken Cheese Wraps Recipe A Low Carb Comfort Food Masterpiece
Finding a satisfying, high-fat, low-carb meal that delivers the ultimate comfort food experience can be a challenge on a ketogenic diet. Many people miss the satisfying pull and texture of traditional flour tortilla wraps or burritos. However, you do not need to compromise on texture or flavor to maintain your state of ketosis. By thinking creatively about common ingredients, you can transform simple protein and dairy staples into a crispy, cheesy, and deeply comforting meal that completely replaces the need for high-carb grains.
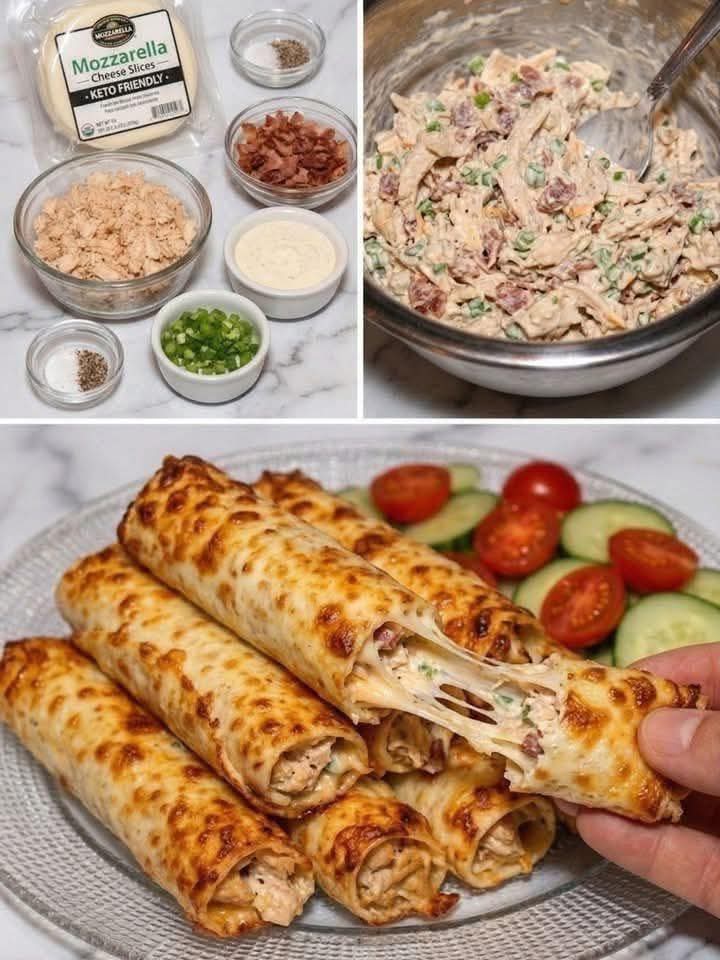
The incredible culinary progression captured in the visual reference 1000005727.jpg showcases exactly how a few simple ingredients can be transformed into a gourmet, keto-friendly feast. In the top-left panel of 1000005727.jpg, we see the clean mise en place, highlighting basic kitchen essentials like pre-packaged mozzarella cheese slices, shredded chicken, crispy bacon bits, chopped green onions, and spices. The top-right panel reveals these ingredients combined into a rich, savory cream filling. Finally, the bottom panel displays the magnificent end result: golden-brown, crispy cheese wraps baked to absolute perfection, complete with an incredibly indulgent, stretchy cheese pull as a wrap is lifted from the serving plate. This comprehensive guide will walk you through the precise culinary science, structural techniques, and step-by-step methods required to execute this low-carb masterpiece seamlessly at home.
The Structural Science of the Crispy Cheese Shell
The most innovative element of this recipe is replacing a traditional high-carb wrap with a shell made entirely from baked cheese. Understanding how cheese behaves under heat is the key to achieving the perfect balance of structural flexibility and crispy, golden edges without creating a greasy mess.
Selecting the Perfect Base Cheese
To achieve the robust structural integrity and beautiful mottled browning displayed in 1000005727.jpg, choosing the right type of cheese is essential. Pre-sliced, low-moisture mozzarella cheese is the gold standard for this technique. Low-moisture mozzarella has had a significant portion of its water content removed during processing, which prevents the wrap from releasing excess liquid and becoming soggy in the oven. Furthermore, mozzarella contains a high ratio of protein to fat, giving it exceptional elasticity and stretch. This elasticity allows the cheese to melt into a cohesive sheet that can be easily rolled around your filling without tearing or snapping.
The Role of Temperature in Shell Formations
Baking a cheese shell requires precise heat application. When low-moisture mozzarella slices are baked at a moderately high temperature, the protein network relaxes, allowing the fat to melt and the cheese to spread into a uniform, continuous layer. As the baking continues, the natural sugars and proteins in the dairy undergo the Maillard reaction, developing those gorgeous, deeply browned spots visible in the bottom portion of 1000005727.jpg. This browning is what introduces a delightful, nutty crunch to the exterior, while keeping the inner layer pliable enough to wrap tightly around your ingredients.
Complete Ingredients Checklist for Keto Cheese Wraps
Before you begin assembling your ingredients, ensure your shredded chicken is relatively dry and free from excess cooking liquid or broth, which could compromise the consistency of your savory cream filling.
- 6 to 8 thick slices of low-moisture mozzarella cheese (ensure the package specifies a sturdy slice structure, like the keto-friendly variety shown in 1000005727.jpg)
- 1.5 cups of fully cooked chicken breast, finely shredded or pulled
- 0.5 cups of thick-cut bacon, cooked until completely crispy and finely crumbled
- 0.25 cups of fresh green onions (scallions), finely chopped (including both green and white parts)
- 3 tablespoons of full-fat cream cheese, softened to room temperature
- 2 tablespoons of full-fat sour cream or heavy cream (to smooth out the texture)
- 0.5 teaspoons of garlic powder
- 0.5 teaspoons of onion powder
- Sea salt and freshly cracked black pepper to taste
Step-by-Step Filling Assembly and Shell Preparation
Executing this recipe perfectly requires a two-stage assembly process: creating a cohesive, well-seasoned internal protein matrix followed by the careful melting and rolling of the hot cheese shells.
Crafting the Savory Bacon Chicken Filling
Start by softening your cream cheese in a large glass or stainless steel mixing bowl. Once pliable, stir in the sour cream, garlic powder, onion powder, sea salt, and black pepper until completely smooth and emulsified. Add the finely shredded cooked chicken, crispy crumbled bacon pieces, and chopped green onions into the seasoned cream base. Using a large spoon, fold the ingredients together vigorously, breaking up any large clumps of chicken until the protein is uniformly coated by the cream sauce, mimicking the rich texture shown in the top-right bowl of 1000005727.jpg. Taste the filling mixture and adjust the seasoning with extra salt or pepper if desired.
Prepping Your Baking Sheets
Preheat your oven to 400°F (204°C). Line a large, sturdy baking sheet with a high-quality sheet of unbleached parchment paper or a food-grade silicone baking mat. Do not skip this step or attempt to bake the cheese directly on a non-stick metal pan; the hot, melted cheese requires the absolute non-stick surface of parchment paper or silicone to lift away cleanly without tearing. Arrange your mozzarella cheese slices flat on the parchment paper, leaving at least 1 to 2 inches of space between each slice to allow for natural expansion as the cheese melts outward.
Baking, Rolling, and Achieving the Ultimate Crisp
The transition from molten cheese to a crisp, perfectly shaped cylinder requires a swift, confident hand during the assembly window.
Timing the Cheese Melt
Slide your prepared baking sheet with the mozzarella slices onto the center rack of your preheated oven. Bake for approximately 6 to 8 minutes. Keep a very close eye on the oven through the glass door during the final minutes. You want the individual slices to melt completely together, bubble furiously across their entire surface, and begin developing deep golden-brown, toasted spots around the outer perimeters, identical to the crust quality captured in 1000005727.jpg.
The Art of the Quick Roll
Remove the baking sheet from the oven and let it sit undisturbed on your counter for 60 to 90 seconds. This brief cooling window is absolutely critical; if you attempt to roll the wraps immediately, the cheese will be too liquid and hot to hold its shape. Allowing it to cool slightly lets the protein structure firm up just enough to become workable. Working quickly while the cheese is still warm and flexible, spoon a generous log of your prepared chicken and bacon filling directly down the center line of each melted cheese square. Lift the edge of the parchment paper slightly to help you fold one side of the warm cheese over the filling, then roll it tightly into a clean cylinder, sealing the seam flat against the bottom. Repeat this process for each wrap.
Professional Tips for Flawless Presentation and Serving
To ensure your final platter looks as incredibly appetizing and clean as the presentation on the glass plate in 1000005727.jpg, incorporate these pro-level kitchen practices.
Managing Excess Moisture and Fat
Because low-moisture mozzarella and bacon naturally release oils when baked at high temperatures, your wraps may have a light layer of residual fat on the exterior immediately after rolling. To achieve a perfectly clean hand-held experience, let the rolled wraps rest on a clean cutting board lined with paper towels for 2 minutes post-rolling. The paper towels will absorb any excess surface oil, allowing the outer cheese shell to cool into a clean, crisp, and beautifully burnished crust that can be easily held without making your fingers greasy.
Creating a Balanced Plate
As beautifully demonstrated in the background of 1000005727.jpg, these rich, decadent bacon chicken cheese wraps pair wonderfully with fresh, crisp, and slightly acidic side dishes. Serve your hot wraps alongside a vibrant garden salad, sliced English cucumbers, and juicy cherry tomatoes tossed in a light, zesty vinaigrette. The bright, clean crunch of the fresh vegetables cuts through the rich, savory density of the melted cheese and cream sauce, providing a perfectly balanced culinary experience that satisfies both the palate and your nutritional goals.
Optimal Storage and Reheating Methods
While these wraps deliver the absolute best crunch and stretchy cheese pull when consumed fresh out of the oven, they can be stored and reheated successfully for effortless low-carb meal prep.
Keeping Leftovers Fresh
Allow any leftover rolled wraps to cool completely to room temperature on a wire rack to prevent steam from building up. Place them in a single layer inside an airtight container, separating any stacked layers with a sheet of parchment paper to prevent the cheese shells from sticking together. Stored securely in your refrigerator, they will remain perfectly fresh and flavorful for up to 3 days.
Reheating to Restore the Crunch
Avoid using a microwave to reheat your leftover wraps, as microwaves heat unevenly and will turn the crispy mozzarella shell completely soft and rubbery. Instead, preheat your oven or air fryer to 375°F (190°C). Place the chilled wraps on a parchment-lined tray or directly in your air fryer basket and heat for 4 to 5 minutes. This process quickly warms the internal chicken cream filling thoroughly while simultaneously frying the exterior mozzarella shell back to its original, crispy, golden-brown glory.
Conclusion: Elevating Low-Carb Dining
Mastering these keto bacon chicken cheese wraps proves that transitioning to a low-carb lifestyle does not mean sacrificing the textures and flavors that make eating a joyful experience. By understanding the structural capabilities of low-moisture mozzarella, creating a perfectly balanced savory cream filling, and respecting the delicate baking and cooling windows, you can easily replicate the stunning results shown in 1000005727.jpg right in your own kitchen. This recipe is an incredible tool for busy weeknights, an impressive option for hosting friends, and a definitive answer to any comfort food cravings. Gather your high-quality ingredients, fire up your oven, and enjoy the immensely rewarding process of crafting a wholesome, nutrient-dense meal that looks, feels, and tastes like an absolute indulgence.