Ultimate No Bake Chocolate Cream Delight The Easiest Layered Dessert Recipe
Finding a dessert that balances absolute indulgence with effortless preparation can feel like a culinary holy grail. We have all been there: you need a show-stopping sweet treat for a family gathering, a potluck, or a weekend craving, but the thought of turning on the oven and dealing with precise baking times feels overwhelming. Enter the ultimate no-bake chocolate cream delight. This layered masterpiece delivers everything you want in a premium dessert—a silky, velvety cream base topped with a glossy, rich chocolate ganache—without requiring a single minute of baking time. It is a foolproof recipe that looks like it came straight from a high-end bakery, yet it can be whipped up in your home kitchen with just a handful of everyday ingredients.
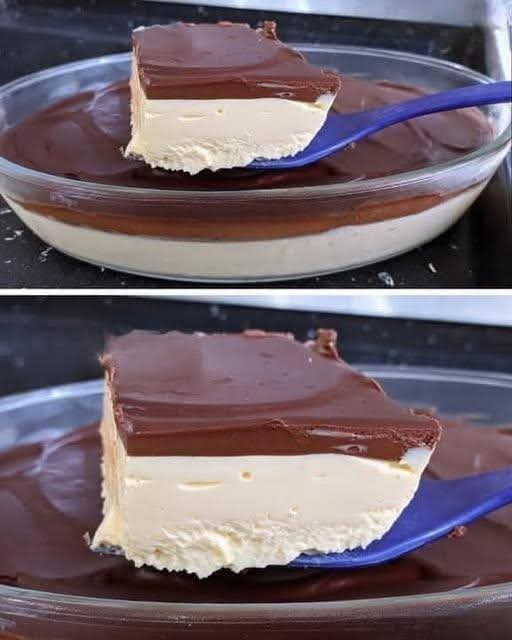
When you look at the stunning presentation of this dish, as beautifully captured in 1000005492.jpg, it is hard to believe how simple it is to construct. The image showcases a perfect cross-section of the dessert, highlighting a thick, cloud-like white cream layer that acts as the foundational star of the show. Resting directly on top is a smooth, perfectly set layer of decadent chocolate that promises a rich contrast in every single spoonful. Whether you are an experienced home baker looking for a quick crowd-pleaser or a complete novice in the kitchen, this step-by-step guide will walk you through creating this exact dessert perfectly on your very first try.
Why This No-Bake Chocolate Cream Dessert Works
The magic of this dessert lies in its brilliant texture play and flavor balance. Many layered desserts fall into the trap of being overly sweet or structurally unstable, leading to a collapsed mess when you try to slice into them. This recipe relies on a meticulously balanced cream foundation that achieves a stable, sliceable structure while maintaining an incredibly light and airy mouthfeel. By pairing this delicate, lightly sweetened cream with a deeply rich and slightly bitter chocolate topping, you create a harmonious flavor profile that keeps everyone coming back for a second slice.
Another reason this recipe has become a viral sensation among home cooks is its immense versatility. Because it requires no oven time, it is the perfect solution for hot summer days when you want to keep your house cool, yet it is rich enough to serve as a comforting conclusion to a heavy holiday meal. It can be made a full day in advance, making it an excellent option for stress-free entertaining. When you pull this out of the refrigerator and lift that first slice, revealing the pristine layers seen in 1000005492.jpg, your guests will think you spent hours meticulous tempering, whisking, and baking.
The Essential Ingredients Breakdown
To achieve the immaculate layering and professional finish featured in 1000005492.jpg, you only need a few premium pantry staples. Because this recipe relies on very few ingredients, choosing the right components will make a massive difference in the final taste and texture of your dessert. Let us break down exactly what you will need to gather before starting.
For the Luscious Cream Base
- Heavy Whipping Cream: This is the backbone of your bottom layer. Look for cream with a minimum of 36% milk fat content to ensure it whips up to stiff, stable peaks that can support the weight of the chocolate topping.
- Cream Cheese or Mascarpone: This provides the necessary structural integrity and a subtle, pleasant tanginess that cuts through the richness of the dessert. Ensure it is completely softened to room temperature before mixing to prevent any unsightly lumps.
- Condensed Milk or Powdered Sugar: This acts as the sweetening agent for your cream layer. Sweetened condensed milk offers an ultra-fudgy, milky flavor profile, while powdered sugar keeps things classic and ultra-light.
- Pure Vanilla Extract: A high-quality vanilla extract or vanilla bean paste elevates the cream layer from a simple filler to a deeply aromatic, gourmet experience.
For the Rich Chocolate Topping
- High-Quality Chocolate Chips or Bars: You can use semi-sweet, milk chocolate, or dark chocolate depending on your personal preferences. A blend of half semi-sweet and half milk chocolate provides the perfect balance of deep cocoa flavor and smooth sweetness.
- Heavy Cream (for the Ganache): This will be combined with your chocolate to create a smooth, pourable glaze that sets into a glossy, fudge-like consistency rather than hardening into a solid brick.
- Unsalted Butter (Optional): A single tablespoon of room-temperature butter stirred into your hot chocolate mixture at the very end adds an unbelievable glossy sheen, matching the reflective surface seen in 1000005492.jpg.
Step-by-Step Instructions for Perfect Layers
Creating a visually striking dessert requires just a tiny bit of patience, particularly when it comes to letting your layers chill. Follow these detailed steps to recreate the stunning results shown in 1000005492.jpg.
Step 1: Preparing the Cream Base
Begin by placing your softened cream cheese or mascarpone into a large mixing bowl. Using a hand mixer or a stand mixer fitted with the paddle attachment, beat the cheese on medium-high speed for about two to three minutes until it is completely smooth, creamy, and free of any lumps. Slowly pour in your sweetened condensed milk or powdered sugar along with the vanilla extract, continuing to mix until the ingredients are fully integrated and silky. In a separate, chilled bowl, whip your heavy whipping cream until it forms stiff peaks. Gently fold the whipped cream into the cream cheese mixture in three separate batches using a rubber spatula. Be careful not to over-mix during this stage; you want to retain as much air as possible to keep the layer light and fluffy. Once combined, spread the cream evenly into the bottom of a glass dish, smoothing the top with an offset spatula, and place it in the freezer for 20 minutes to set.
Step 2: Making the Glossy Chocolate Ganache
While your cream foundation is chilling and firming up, it is time to prepare the chocolate topping. Place your chopped chocolate or chocolate chips into a heatproof bowl. In a small saucepan, heat your heavy cream over medium heat until it just begins to simmer around the edges—do not let it come to a rolling boil. Pour the hot cream directly over the chocolate chips, making sure all the chocolate is submerged. Let the mixture sit undisturbed for five minutes to allow the heat to melt the chocolate thoroughly. After five minutes, start stirring from the center outward using a whisk or spatula. Watch as the mixture transforms into a dark, shiny, cohesive ganache. If you are using butter for extra shine, drop it in now and stir until completely melted and incorporated.
Step 3: Assembly and Chilling
Remove your chilled cream base from the freezer. It should be firm to the touch on the surface. Slowly and carefully pour the warm chocolate ganache over the back of a spoon onto the cream layer. Pouring it over a spoon breaks the fall of the warm liquid, ensuring it does not disturb or melt the pristine white layer underneath. Gently tilt your glass dish from side to side to distribute the chocolate evenly across the entire surface, creating the uniform, dual-layer effect demonstrated in 1000005492.jpg. Place the completed dessert into the refrigerator for at least 4 hours, or ideally overnight, to allow both layers to set completely and develop their rich flavors.
Pro Tips for Achieving Clean, Bakery-Style Slices
One look at 1000005492.jpg reveals a perfectly clean cut with absolutely no bleeding between the white cream and dark chocolate layers. Recreating this pristine look at home is incredibly easy if you follow a few professional pastry chef secrets.
The Hot Knife Technique
Never try to slice into a layered cream dessert with a cold, dry knife. Before cutting, fill a tall glass or container with hot tap water. Submerge your sharp, thin-bladed knife into the hot water for a few seconds to heat up the metal. Wipe the blade completely dry with a clean kitchen towel, and then make your first straight cut down into the dessert. The residual heat from the blade will cleanly melt through the chocolate ganache and glide through the cream layer effortlessly without dragging the layers into each other.
Clean the Blade Between Every Single Cut
This is the ultimate secret to flawless presentation. After making your first slice and removing the piece of dessert, you will notice some cream and chocolate residue on the sides of your knife. If you proceed to make your next cut immediately, that residue will smudge onto the top of your next slice. Always wipe your knife completely clean with a paper towel, re-dip it into the hot water, dry it again, and then make your subsequent cut. It takes a tiny bit of extra time, but the resulting presentation is worth every second.
Customization Ideas to Make This Recipe Your Own
While the minimalist elegance of the classic version shown in 1000005492.jpg is hard to beat, this recipe serves as a brilliant canvas for your creative culinary twists. You can easily adapt the flavors to suit different holidays, themes, or personal cravings.
Add a Crunchy Base Layer
If you prefer a dessert with a bit of textural contrast, you can easily introduce a crust to this recipe before adding your cream layer. Crush up some graham crackers, Oreo cookies, or chocolate wafers into fine crumbs. Mix the crumbs with a few tablespoons of melted butter and press the mixture firmly into the bottom of your dish. Chill the crust for 10 minutes before adding your cream base on top to create a gorgeous three-layered treat.
Infuse Flavor into the Cream
You can easily change the flavor profile of the thick bottom layer by adding mix-ins or extracts. For a fruity twist, gently fold a cup of fresh raspberries or a swirl of strawberry puree into the cream base before chilling. If you love coffee, dissolve a tablespoon of instant espresso powder into your heavy cream before whipping it. This will transform your dessert into a mocha cream delight that pairs beautifully with an after-dinner espresso.
Frequently Asked Questions (FAQs)
Can I make this dessert completely dairy-free or vegan?
Yes, you can absolutely adapt this recipe to fit alternative dietary needs. To make a vegan version, substitute the heavy whipping cream with a high-quality canned coconut cream (using only the thick solid part from the top of the chilled can). Replace the cream cheese with a dairy-free cream cheese alternative, and use a vegan sweetened condensed milk made from coconut or oat milk. Finally, ensure your chocolate topping is made with high-quality dark dairy-free chocolate chips combined with a bit of coconut milk.
How long can I store this dessert in the refrigerator?
When stored properly in an airtight container or tightly covered with plastic wrap, this no-bake chocolate cream delight will remain fresh and delicious in the refrigerator for up to 4 to 5 days. In fact, many people find that the flavors deepen and the texture becomes even more luxurious after it sits for 24 hours, making it the ultimate make-ahead dessert for busy hosts.
Why did my chocolate ganache layer crack when I sliced it?
If your chocolate layer is splitting or cracking into jagged pieces when you cut into it, it usually means your ganache did not have enough liquid fat, or the dessert was served straight from an ultra-cold freezer. Ensure you are using the correct ratio of heavy cream to chocolate to keep the ganache soft and pliable even when chilled. Additionally, using the hot knife method outlined above will completely eliminate cracking.
Conclusion
The ultimate no-bake chocolate cream delight proves that you do not need to spend hours measuring flour, monitoring oven temperatures, or washing a mountain of baking pans to create a truly memorable dessert. By focusing on high-quality ingredients and giving your layers the proper time to chill and set, you can easily achieve the jaw-dropping results pictured in 1000005492.jpg right in your own kitchen. It is a luxurious, crowd-pleasing dessert that brings maximum reward for minimal effort. Gather your ingredients, dust off your mixing bowl, and get ready to impress your friends and family with this decadent, effortless, layered masterpiece.