Few things in life are more satisfying than the aroma of freshly baked bread wafting through your kitchen. The process of making bread from scratch can feel magical, and the end result—a warm, soft loaf—brings an undeniable sense of accomplishment. This Soft Homemade Bread Dough recipe is simple yet guarantees a light, fluffy loaf that rivals any bakery. The best part? You don’t need fancy ingredients or equipment to create this cloud-like bread. It’s a recipe anyone can make, with just a little time and patience. In this detailed guide, I will walk you through each step, share helpful tips, and explain how to achieve the perfect soft loaf every time.
The Essential Ingredients:
Before diving into the recipe, it’s important to understand the ingredients you’ll need and why they’re essential to the process:
4 cups of all-purpose flour (500g): This is the foundation of the dough. High-quality all-purpose flour ensures a lighter texture and contributes to the bread’s fluffiness.
2 teaspoons of salt (10g): Salt is vital for flavor and for controlling the yeast’s activity, helping to regulate the rise and the bread’s texture.
2 teaspoons of sugar (10g): Sugar acts as food for the yeast, helping it activate and start the fermentation process. It also contributes a touch of sweetness to the bread.
1 ½ tablespoons of dry yeast (or 2 tablespoons of fresh yeast) (15g dry or 30g fresh): Yeast is the magical ingredient that makes bread rise. It feeds on the sugar and produces carbon dioxide, which causes the dough to expand and become light and airy.
1 ½ cups of warm water (about 98°F or 37°C) (350ml): The water should be warm but not hot. This temperature range is ideal for activating the yeast and encouraging it to rise.
1 tablespoon of vegetable oil (optional): Adding oil helps keep the bread soft and moist. While optional, this step can make your bread even fluffier.
Step-by-Step Instructions:
Step 1: Mix Dry Ingredients
Start by combining the all-purpose flour, salt, and sugar in a large mixing bowl. Stir them together to evenly distribute the ingredients. This helps ensure a consistent dough and an even rise when the yeast is added. It’s essential to measure your ingredients accurately for the best results, especially when it comes to flour. Too much flour can lead to a dense loaf.
Step 2: Activate the Yeast
Add the dry yeast (or fresh yeast) to the dry ingredients. Mix the yeast into the flour mixture gently. If you’re using fresh yeast, you’ll need to dissolve it in a little warm water first, but with dry yeast, you can just stir it in directly. Yeast is most effective when it’s evenly distributed through the flour mixture. If you’re using active dry yeast, you may need to activate it by dissolving it in a small portion of the warm water first.
Step 3: Gradually Add Warm Water
Now, it’s time to add the warm water. Start pouring it gradually into the dry ingredients while stirring with a spoon or spatula. The goal here is to create a homogeneous dough. Stir until the mixture starts coming together into a rough dough. If the dough feels too dry, add a little more warm water—just a tablespoon at a time—until it’s moist but not sticky.
Step 4: Knead the Dough
Transfer the dough onto a lightly floured surface and begin kneading it by hand. Kneading is essential for developing the gluten structure in the dough, which contributes to the softness and elasticity of the bread. Knead for about 10 minutes, or until the dough becomes smooth and elastic. When you press the dough with your finger, it should bounce back. This process is where the magic happens—the yeast is working its way through the dough, creating air bubbles and making the dough rise.
Step 5: First Rise
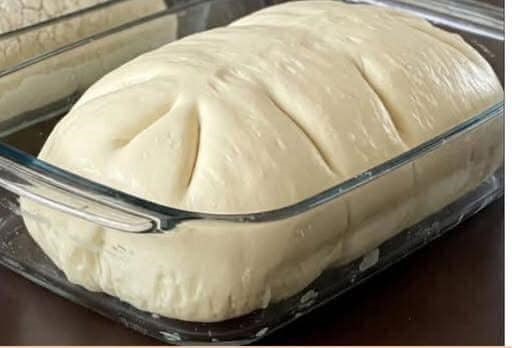
Once you’ve kneaded the dough, grease a glass bowl with a little oil and place your dough in it. Cover the bowl with plastic wrap or a clean kitchen towel. Allow the dough to rest in a warm place for about 1 hour, or until it has doubled in size. The warmth activates the yeast, which makes the dough rise. This is your first rise, and it’s critical for achieving that light, fluffy texture. Don’t rush it—allow the dough to rise completely.
Step 6: Punch Down and Divide the Dough
Once the dough has doubled in size, punch it down gently to release the air bubbles. This process, called “punching down,” helps prevent the dough from becoming overly airy. Divide the dough into 4 equal portions.
Step 7: Shape the Loaves
Take each portion of dough and gently shape it into a French bread loaf. To do this, elongate the dough, rolling it gently with your hands while rounding the edges. Be careful not to deflate the dough too much during this process, as you want to keep some of the air pockets intact to ensure the bread remains soft.
Step 8: Second Rise
Place the shaped loaves onto an oiled baking sheet. Cover them again with plastic wrap or a clean cloth and let them rise for an additional 30 minutes. This second rise is just as important as the first, as it gives the dough a chance to expand again, resulting in a lighter loaf with a perfect texture.
Step 9: Preheat the Oven
While the loaves are rising, preheat your oven to 392°F (200°C). A hot oven is crucial for getting that golden, crispy crust while ensuring the inside stays soft and fluffy. Make sure to preheat the oven fully before baking your bread.
Step 10: Bake the Bread
Once the loaves have completed their second rise, place them in the oven and bake them for 20–25 minutes. The bread should turn a golden brown on top and feel firm when tapped on the bottom. If you prefer a crustier top, you can bake it a little longer, but be careful not to overbake, as this will dry out the bread.
Step 11: Cool Before Serving
Once the loaves are baked, remove them from the oven and place them on a cooling rack. Let them cool completely before slicing. This allows the steam to escape, which helps keep the bread from becoming soggy. Cutting into the bread while it’s still hot can also cause the texture to be denser than it should be.
Expert Tips for Perfect Bread:
Quality Flour Matters: Use high-quality all-purpose flour for the best texture. The flour helps create the structure of the bread, so don’t skimp on quality.
Proper Water Temperature: The water used to activate the yeast should be warm—about 98°F (37°C)—but not hot. Water that’s too hot can kill the yeast, while water that’s too cold will slow down the fermentation process.
Knead Gently: Over-kneading can make the dough tough. Knead the dough for about 10 minutes until it’s smooth and elastic, but don’t overdo it.
Let the Dough Rise Fully: Be patient and let the dough rise fully during both the first and second rise. Rushing these steps can result in dense, under-risen bread.
Cool Before Storing: After baking, let the bread cool completely before storing it. This prevents moisture from accumulating and making the bread soggy.
Why This Recipe Works:
The simplicity of this recipe lies in the perfect balance of yeast, flour, and water. The two-rising method ensures the dough has enough time to expand, creating the perfect texture. The yeast does the heavy lifting, while the kneading process ensures that the gluten is developed properly, which gives the bread that chewy, soft texture.
Serving Suggestions:
Sandwiches: Soft homemade bread is perfect for sandwiches. It holds up well with fillings like roasted meats, cheese, and fresh veggies.
Garlic Bread: Transform this loaf into garlic bread by brushing it with a garlic-butter mixture and toasting it in the oven for a delicious side dish.
Fresh Toast: Slice the bread and toast it for a simple, comforting breakfast with butter and jam.
Final Thoughts:
Making Soft Homemade Bread Dough from scratch is a labor of love, but it’s an incredibly rewarding process. Whether you’re enjoying it as a side with dinner, using it to make sandwiches, or just eating it with a little butter, this homemade bread will quickly become a staple in your home. The secret to perfect, fluffy bread lies in the careful steps of kneading, rising, and baking—and with this recipe, you’ll create a loaf that’s soft, airy, and delicious every time. Enjoy the process and, most importantly, the bread!
More Articles You Might
-
Texas Toast Sloppy Joes: The Crunchy, Cheesy Upgrade You Didn’t Know You Needed
There’s something timeless about sloppy joes. For generations, this saucy, savory, and slightly sweet ground beef sandwich has been a go-to comfort food in American kitchens. It’s quick, filling, and family-friendly—perfect for busy weeknights. But what if we told you there’s a way to take this classic dish up a notch? Enter the Texas Toast…
-
Classic Pig Pickin’ Cake
When it comes to Southern desserts, few sweets shine as brightly as the Classic Pig Pickin’ Cake. This nostalgic cake, sometimes called a “Mandarin Orange Cake,” has roots deep in Southern tradition. It gets its playful name from its frequent appearance at pig pickin’s—Southern-style barbecue gatherings where communities come together to enjoy slow-cooked pork, sides,…
-
Lemon Garlic Butter Chicken with Creamy Parmesan Pasta
There’s something irresistible about the combination of tender, golden-browned chicken paired with a creamy pasta coated in Parmesan cheese. Add the brightness of lemon, the depth of garlic, and the richness of butter, and you have a recipe that feels indulgent yet approachable enough for a weeknight dinner. Lemon Garlic Butter Chicken with Creamy Parmesan…


