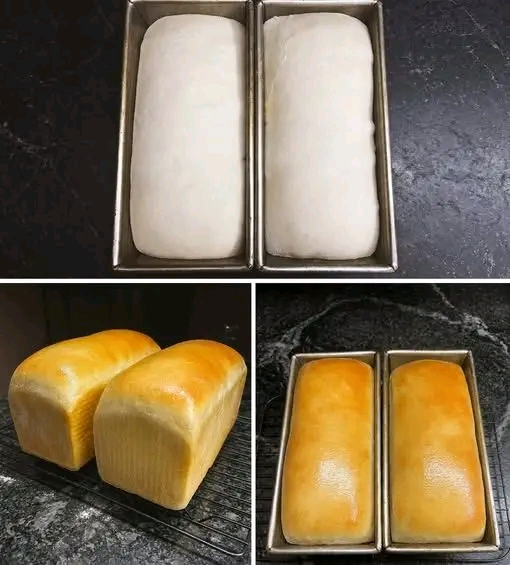
Perfect Sourdough Sandwich Bread Soft, Fluffy, Buttery, and Naturally Leavened
Prep Time: 25 minutes Fermentation Time: 6–10 hours, depending on starter activity and room temperature Cook Time: 40–45 minutes Total Time: Approximately 7–11 hours Servings: 12–14 slices Difficulty: Medium
### Introduction
If you’ve been searching for the perfect homemade sourdough sandwich loaf, this recipe might become your new favorite! This Soft Sourdough Sandwich Bread combines the natural flavor of sourdough with the tenderness of a traditional sandwich loaf.
Made with active sourdough starter, honey, butter, and simple pantry ingredients, it produces a beautifully risen loaf with a soft, buttery crust and a light, fluffy interior.
Unlike rustic sourdough boules with thick, crunchy crusts, this sandwich bread is designed to be tender, easy to slice, and perfect for everyday meals.
Whether you’re making breakfast toast, lunch sandwiches, or a comforting grilled cheese, this recipe delivers homemade goodness in every slice.
### Origin
Sourdough bread has been prepared for thousands of years, using naturally occurring wild yeast and beneficial bacteria to ferment flour and water.
Traditional sourdough baking developed across many regions, with each culture creating its own bread styles.
The softer sourdough sandwich loaf is a more modern adaptation, combining traditional fermentation with ingredients such as butter, milk, honey, or oil to create a tender crumb and softer crust.
Today, sourdough sandwich bread has become especially popular among home bakers who want the flavor of naturally fermented bread in a practical everyday loaf.
### Cultural Significance
Bread has always represented nourishment, hospitality, and family traditions.
Sourdough baking has experienced a renewed appreciation among home bakers because it encourages patience, creativity, and a connection with traditional food preparation.
A homemade sandwich loaf brings that tradition into everyday life. It can be used for breakfast, packed lunches, family picnics, and comforting evening meals.
There is something particularly satisfying about slicing into a loaf you prepared yourself, knowing exactly what ingredients went into it.
### Ingredients Quantity
For the Sourdough Sandwich Loaf:
* 1 cup (approximately 200–220 g) active sourdough starter, at peak activity
* 3½ cups (420–450 g) bread flour
* ¾ cup (180 ml) lukewarm water
* 2 tablespoons (42 g) honey
* 4 tablespoons (56 g) unsalted butter, softened
* 1½ teaspoons (9 g) salt
For the Optional Topping:
* 1 tablespoon melted butter for brushing the crust
* 1 teaspoon sesame seeds, optional
* A little rolled oats for decoration, optional
Note: These quantities are a suggested complete formula based on the ingredients mentioned in the original description. The exact original article recipe was not provided.
### Optional Additions
* Whole-wheat flour: Replace up to 25% of the bread flour for a heartier loaf.
* Olive oil: Replace the butter with olive oil for a different flavor and dairy-free adaptation.
* Flaxseeds: Add 1–2 tablespoons for additional fiber.
* Sunflower seeds: Include 2 tablespoons for a pleasant crunch.
* Cinnamon: Add 1 teaspoon for a subtly sweet breakfast loaf.
* Vanilla: Add ½ teaspoon for a gentle aromatic flavor.
* Milk: Replace some of the water with milk for a richer, softer crumb.
* Dried herbs: Add rosemary or oregano for a savory sandwich bread.
### Tips for Success
* Use an active starter: Your starter should be bubbly, strong, and recently fed. A weak starter can result in a dense loaf.
* Measure accurately: Weighing the flour and starter gives more consistent results.
* Use bread flour: Its higher protein content helps develop the gluten structure needed for a beautiful rise.
* Add butter gradually: Incorporate softened butter after the initial dough has come together for easier gluten development.
* Develop the gluten: Knead or perform stretch-and-folds until the dough becomes smooth and elastic.
* Watch the dough, not the clock: Fermentation depends on starter strength and room temperature.
* Avoid overproofing: The dough should be visibly puffy and ready to bake, not collapsed or excessively bubbly.
* Shape tightly: A well-shaped loaf helps create an even crumb and attractive rise.
* Cool completely: Allow the loaf to cool before slicing to prevent a gummy interior.
* Brush with butter: A little melted butter after baking gives the crust a beautiful softness and flavor.
### Instructions
### Step 1: Prepare the Dough
In a large mixing bowl, combine the active sourdough starter, lukewarm water, and honey.
Stir until the starter is mostly dissolved.
Add the bread flour and salt. Mix until a rough dough forms.
Cover and let the dough rest for approximately 20–30 minutes.
### Step 2: Incorporate the Butter
Add the softened butter gradually.
Knead by hand or using a stand mixer until the butter is fully incorporated and the dough becomes smooth, elastic, and slightly tacky.
This may take approximately 8–12 minutes in a mixer or 12–15 minutes by hand.
### Step 3: Begin Bulk Fermentation
Transfer the dough to a lightly greased bowl.
Cover and allow it to ferment at room temperature.
During the first 2 hours, perform 2–3 sets of stretch-and-folds at approximately 30-minute intervals if the dough needs additional strength.
Continue fermentation until the dough becomes noticeably puffy and increases in volume by approximately 50–75%.
Depending on temperature and starter activity, this may take 4–8 hours or longer.
### Step 4: Shape the Loaf
Transfer the dough onto a lightly floured work surface.
Gently flatten it into a rectangle.
Fold the sides toward the center, then roll the dough into a tight log.
Pinch the seam closed to create a neat shape.
### Step 5: Transfer to the Loaf Pan
Grease a standard 9 × 5-inch loaf pan.
Place the shaped dough inside with the seam facing down.
Cover loosely and allow it to proof until it rises approximately 1 inch above the rim of the pan or becomes visibly light and puffy.
This may take 2–4 hours, depending on room temperature and starter activity.
### Step 6: Preheat the Oven
Preheat your oven to 375°F (190°C).
Make sure the oven is fully heated before baking.
### Step 7: Bake the Bread
Bake for approximately 40–45 minutes, until the loaf is golden brown and fully cooked.
The internal temperature should reach approximately 195–205°F (90–96°C).
If the top browns too quickly, loosely cover it with aluminum foil.
### Step 8: Add the Buttery Finish
Remove the loaf from the oven.
Brush the top lightly with melted butter for a soft, flavorful crust.
Allow the bread to rest in the pan for about 10 minutes before transferring it to a wire rack.
### Step 9: Cool and Slice
Let the loaf cool completely for at least 1–2 hours.
Slice with a serrated bread knife and enjoy your homemade sourdough sandwich bread!
### Description
This sourdough sandwich loaf is everything homemade bread should be: soft, fluffy, tender, and full of wonderful flavor.
The honey provides a gentle sweetness, while the butter creates a rich, delicate crumb and a beautifully soft crust.
Its even texture makes it ideal for slicing, and its mild sourdough flavor pairs wonderfully with both sweet and savory ingredients.
Every slice is perfect for toast, sandwiches, French toast, or simply enjoying with your favorite spread.
### Nutritional Information
ESTIMATED PER SLICE · BASED ON 14 SLICES
| Nutrient | Amount |
| ————- | ———— |
| Calories | 175–195 kcal |
| Protein | 5–6 g |
| Carbohydrates | 29–32 g |
| Fat | 4–5 g |
| Fiber | 1–2 g |
| Sugar | 2–3 g |
| Sodium | 250–300 mg |
Values are estimates based on the suggested ingredient quantities and may vary with flour type, starter hydration, and slice size.
### Conclusion
This Perfect Sourdough Sandwich Loaf brings together the best of traditional sourdough baking and soft homemade sandwich bread.
With its beautiful rise, tender buttery crust, and fluffy interior, it is a wonderful everyday loaf that the whole family can enjoy.
Although sourdough requires patience, the results are worth the wait. Once you make this recipe successfully, you may find yourself baking it every week!
### Recommendation
This bread is especially delicious when served as:
* Classic turkey or chicken sandwiches.
* Avocado toast with tomatoes and olive oil.
* Homemade grilled cheese sandwiches.
* Peanut butter or almond butter toast.
* French toast with cinnamon.
* Breakfast toast topped with eggs.
* Sandwiches filled with fresh vegetables and hummus.
For storage, keep the completely cooled loaf in an airtight bread bag at room temperature for 2–3 days.
For longer storage, slice the bread and freeze it in portions for up to 2–3 months.
### Embracing Healthful Indulgence
Homemade sourdough bread can be part of a balanced eating routine. Making your own loaf allows you to choose the flour, sweetener, fat, and salt quantities.
Here are some ways to make this recipe more nourishing:
* Use whole-grain flour: Replace part of the bread flour with whole-wheat flour for additional fiber.
* Reduce the honey: Use less honey if you prefer a less-sweet loaf.
* Add nutritious seeds: Flaxseed, chia seeds, and sunflower seeds provide additional fiber and texture.
* Choose quality fats: Use extra-virgin olive oil instead of butter if you want a dairy-free variation.
* Control portions: Enjoy a slice alongside eggs, vegetables, hummus, or another protein-rich food.
* Experiment with fermentation: Allow sufficient fermentation time to develop the characteristic sourdough flavor.
For a dairy-free version, replace the butter with olive oil or a suitable plant-based alternative.
For those avoiding white flour, whole-wheat flour can be incorporated gradually, although the dough will need adjustments to hydration and fermentation.
The joy of sourdough is that every loaf teaches you something new. With a healthy, active starter and a little patience, you can create a beautiful homemade sandwich bread that makes every meal more special!