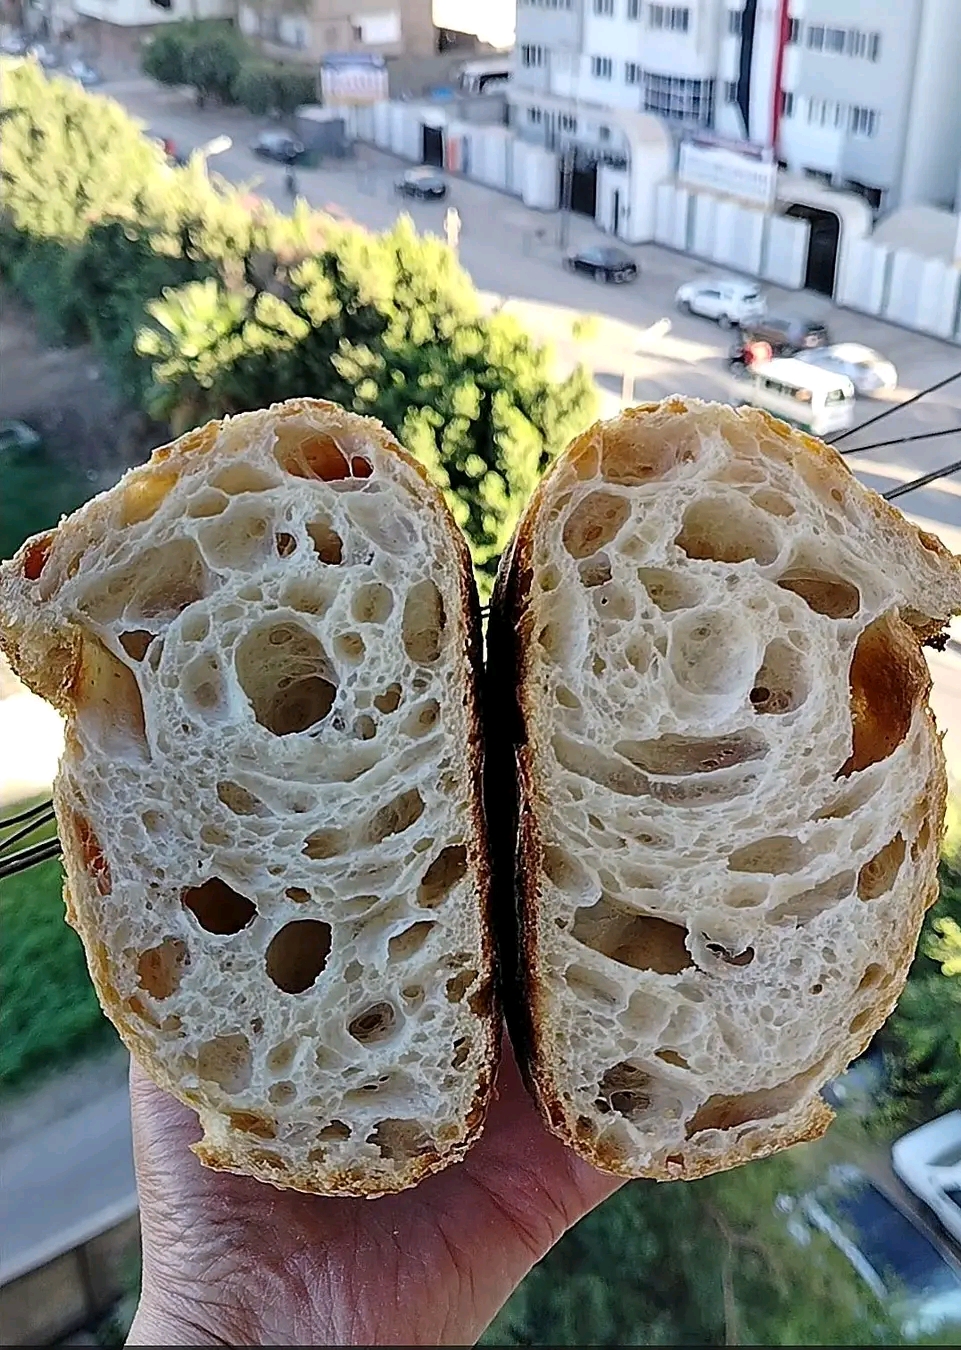
72% Hydration Sourdough Bread – Perfectly Fermented, Open Crumb Artisan Loaves
### Introduction
There is something truly special about homemade sourdough bread. With its crisp golden crust, beautifully developed gluten structure, chewy interior, and naturally fermented flavor, this 72% hydration sourdough recipe is a wonderful choice for home bakers who want bakery-quality bread.
Made with a combination of 90% white flour and 10% whole wheat flour, this recipe produces two flavorful loaves with excellent structure and a satisfying texture.
The 72% hydration provides a lovely balance between dough manageability and an open, airy crumb. Temperature control, careful mixing, proper fermentation, and overnight refrigeration all contribute to a delicious result.
Preparation Time: 45 minutes Autolyse Time: 1 hour Bulk Fermentation: Approximately 4 hours Cold Fermentation: 12 hours Baking Time: 40–45 minutes Yield: 2 medium loaves
### Origin
Sourdough is one of the oldest forms of naturally leavened bread. Long before commercial baker’s yeast became widely available, people relied on naturally occurring wild yeast and beneficial bacteria to ferment flour and water.
Traditional sourdough techniques have been passed down through generations, evolving into the artisan baking methods used today.
The 72% hydration method represents a modern approach to sourdough baking, combining traditional fermentation with controlled mixing, bassinage, lamination, and cold retardation to improve dough strength, flavor, and texture.
### Cultural Significance
Sourdough bread has a special place in baking traditions around the world. In many households, maintaining a sourdough starter is more than a cooking habit; it is a connection to generations of home bakers.
Artisan sourdough has also become popular because it celebrates patience, craftsmanship, and simple ingredients.
Sharing a freshly baked loaf with family and friends is a wonderful tradition. The distinctive aroma, crackling crust, and naturally developed flavor make sourdough a memorable addition to any meal.
### Ingredients Quantity
Yield: 2 medium sourdough loaves
### Flour – 500 g total
* 450 g white bread flour (90%)
* 50 g whole wheat flour (10%)
### Water – 360 g total (72% hydration)
* 275 g ice-cold water for autolyse
* 85 g additional water for bassinage
### Remaining Ingredients
* 150 g active liquid sourdough starter (30%)
* 12.5 g salt (2.5%)
Baker’s Percentage:
| Ingredient | Quantity | Percentage |
| ———– | ——– | ———- |
| Total flour | 500 g | 100% |
| Total water | 360 g | 72% |
| Starter | 150 g | 30% |
| Salt | 12.5 g | 2.5% |
Note: These percentages describe the added flour and water. Assuming a 100%-hydration starter, the overall dough hydration, including the starter, is approximately 75.2%.
### Optional Additions
This sourdough recipe is delicious on its own, but you can customize it with:
* 50–75 g sunflower seeds for a nutty flavor.
* 40 g pumpkin seeds for extra crunch.
* 30 g flaxseeds for additional fiber.
* 50 g chopped walnuts for a rustic loaf.
* 1 tablespoon dried rosemary for an aromatic bread.
* 50–75 g chopped olives for a Mediterranean variation.
* 1 teaspoon honey for a subtle sweetness.
For your first attempt, I recommend following the original formula without additions so you can evaluate the dough’s strength and fermentation.
### Tips for Success
1\. Control the Dough Temperature
Temperature control is particularly important when baking in warm environments. If your kitchen and flour are around 32°C, refrigerate the flour for one or two hours before mixing.
Use ice-cold water for the autolyse to help prevent excessive dough heating.
2\. Use an Active Starter
Your starter should be bubbly, strong, and near its peak. A weak or underactive starter can lead to slow fermentation and poor oven spring.
3\. Respect the Autolyse
Allowing the flour and water to rest for one hour helps hydrate the flour and encourages gluten development.
4\. Add Water Gradually
The bassinage technique allows the dough to absorb additional water gradually. Avoid adding all the remaining water at once.
5\. Monitor Fermentation, Not Just the Clock
The four-hour bulk fermentation is an estimate. Look for a 30–50% increase in dough volume, along with visible aeration and a slightly domed surface.
6\. Handle the Dough Gently
Lamination and shaping should strengthen the dough without unnecessarily removing the gas that has developed during fermentation.
7\. Don’t Skip Cold Retardation
The 12-hour refrigerator rest improves flavor and makes the dough easier to score before baking.
### Instructions
### Step 1: Temperature Preparation
If your kitchen temperature is approximately 32°C, place the flour in the refrigerator for one or two hours.
Prepare 275 g of ice-cold water, optionally using a little crushed ice. Make sure the actual measured water weight remains 275 g.
### Step 2: Autolyse
Combine:
* 450 g white flour
* 50 g whole wheat flour
* 275 g cold water
Mix on low speed for approximately one minute until no dry flour remains.
Cover the dough and refrigerate for one hour.
### Step 3: Mixing and Dough Development (Bassinage)
Remove the dough from the refrigerator.
Run the mixer on low speed for approximately four minutes, gradually adding a portion of the remaining 85 g water.
Add the 150 g active sourdough starter while continuing to mix.
Gradually incorporate more of the remaining water.
Add the 12.5 g salt and incorporate the final water.
Mix on medium speed for approximately 10 minutes, or until the dough develops a strong, smooth gluten network.
Avoid overheating the dough during mixing.
### Step 4: Bulk Fermentation
Transfer the dough into a shallow, lightly greased container.
Place it in a controlled environment at approximately 28°C for around four hours.
Monitor the dough’s height and aim for a 30–50% increase.
For example, if the dough initially measures 4 cm in height, the target is approximately 5.2–6 cm.
The actual fermentation time will depend on starter strength and dough temperature.
### Step 5: Division and Lamination
Lightly mist your work surface with water.
Turn out the dough and divide it into two equal portions.
Gently flatten each portion into a thin rectangle.
Perform the lamination folds:
* Fold the right side toward the center.
* Fold the left side over the first fold.
* Bring the top side toward the center.
* Fold the bottom side over the top to create a neat square package.
Handle the dough gently to preserve its internal air structure.
### Step 6: Resting
Allow the folded dough portions to rest uncovered for approximately 15 minutes.
This short rest helps the gluten relax and makes final shaping easier.
### Step 7: Final Shaping
Gently stretch each dough portion and turn it over.
Roll it tightly approximately three times to create a smooth, taut outer surface.
Avoid excessive tension that could tear the dough.
### Step 8: Cold Retardation
Place each shaped loaf into a well-floured banneton basket.
Cover the baskets and refrigerate for approximately 12 hours.
This overnight cold fermentation develops flavor and makes the loaves easier to handle.
### Step 9: Baking
Preheat a Dutch oven inside your oven to 250°C.
Remove one loaf directly from the refrigerator and turn it onto parchment paper.
Score the surface with a sharp bread lame.
Bake using the following schedule:
* First 20 minutes: Covered at 240–250°C.
* Next 20–25 minutes: Uncovered at 220–230°C until deeply golden.
The bread should have a crisp crust and an internal temperature of approximately 96–98°C.
Repeat with the second loaf.
### Step 10: Cooling
Transfer the baked loaves to a wire rack.
Allow them to cool completely for at least 1–2 hours before slicing.
This allows the crumb to finish setting and prevents a gummy interior.
### Description
This 72% hydration sourdough bread delivers everything you want from an artisan loaf.
The crust is beautifully golden and crisp, while the interior is soft, chewy, and naturally flavorful. The small percentage of whole wheat flour adds a subtle nuttiness and extra depth.
The combination of bassinage, controlled bulk fermentation, lamination, and overnight cold retardation helps create a loaf with excellent structure and a satisfying bite.
Each batch produces two beautiful loaves that are perfect for sandwiches, breakfast toast, or serving alongside homemade soups.
### Nutritional Information
Approximate nutritional values per 100 g of baked bread:
| Nutrient | Amount |
| ————- | ——– |
| Calories | 245 kcal |
| Protein | 8 g |
| Carbohydrates | 48 g |
| Fat | 1.5 g |
| Fiber | 2.5 g |
| Sugar | 0.5 g |
| Sodium | 400 mg |
Values are estimates and vary depending on flour brands, baking moisture loss, and final loaf weight.
### Conclusion
This 72% hydration sourdough recipe is an excellent combination of traditional fermentation and modern artisan baking techniques.
The carefully controlled temperature, gradual water incorporation, strong gluten development, and overnight refrigeration all contribute to a flavorful loaf with a beautiful crust and satisfying crumb.
Although sourdough requires patience, the results are absolutely worth the effort. Once you master this process, it can become a dependable recipe for your regular baking routine.
### Recommendation
Enjoy this bread freshly sliced with olive oil, avocado, or homemade nut butter.
It is also wonderful toasted and topped with tomatoes, fresh herbs, and a drizzle of olive oil.
For an especially delicious meal, serve it alongside vegetable soup, roasted vegetables, or a hearty homemade stew.
You can freeze the cooled loaves in slices or halves to enjoy homemade sourdough whenever you like.
### Embracing Healthful Indulgence
Homemade sourdough can be part of a balanced eating pattern. The combination of white flour and whole wheat flour provides carbohydrates for energy, while the whole wheat portion contributes fiber and minerals.
Natural fermentation also develops the bread’s distinctive flavor and texture. However, sourdough is not automatically gluten-free or low-carbohydrate, and its nutritional benefits depend on the ingredients and fermentation process.
For a more fiber-rich version, you can gradually increase the whole wheat flour percentage while adjusting the water according to the flour’s absorption.
Enjoy your bread with protein-rich toppings, vegetables, and healthy fats to create a more balanced meal.
The secret to beautiful sourdough is patience, temperature control, and learning to read your dough. Every loaf teaches you something new!