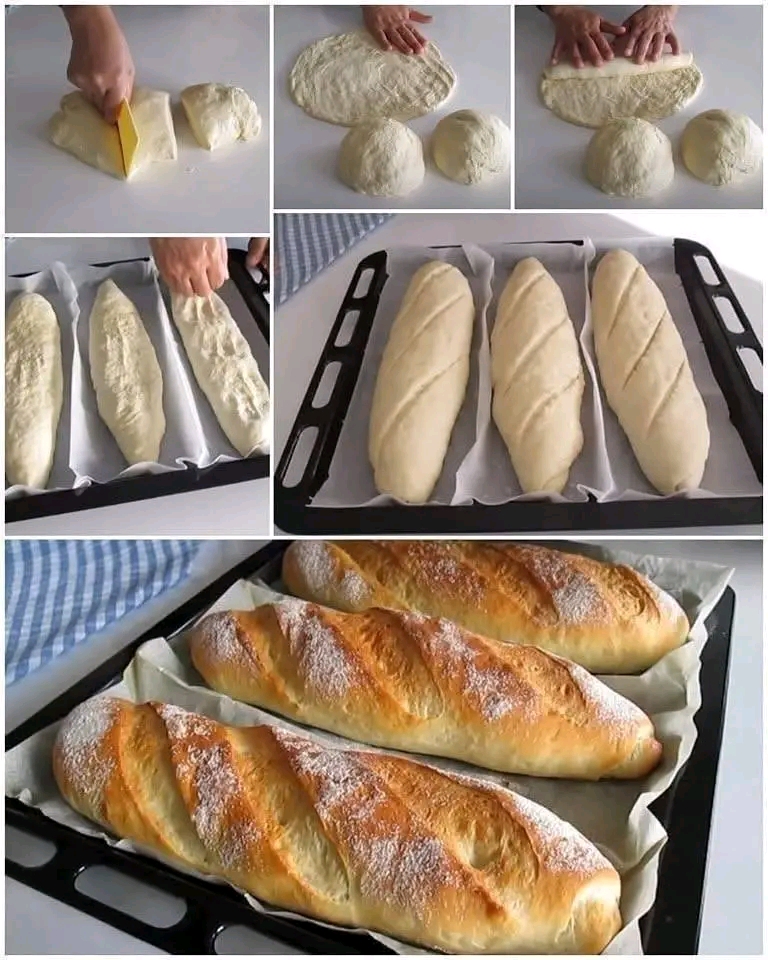
Easy Homemade Bread for Beginners Pane Fatto in Casa
The Easiest Homemade Bread Recipe for Beginners – Soft Inside, Golden Outside, and Perfect Every Time!
### 1\. Introduction
There is nothing quite like the smell of freshly baked homemade bread filling your kitchen. Warm, golden, beautifully crusty on the outside, and soft and fluffy on the inside, this easy homemade bread recipe is perfect for anyone who wants to start baking their own bread.
If you have never made bread before, don’t worry! This beginner-friendly recipe uses simple ingredients, straightforward instructions, and no complicated baking techniques.
With flour, water, yeast, salt, and a little patience, you can prepare a delicious homemade loaf that tastes far better than many store-bought alternatives.
Whether you serve it with breakfast, alongside soup, or as the foundation for your favorite sandwiches, this bread is a wonderful addition to your kitchen.
### 2\. Origin
Homemade bread is one of the oldest and most important foods in human history. Bread-making dates back thousands of years, with early forms of flatbread appearing in ancient civilizations.
Over time, people discovered that fermented dough could produce lighter, softer loaves with a pleasant texture and aroma.
Italy developed a particularly rich bread-making tradition, with regional varieties such as pane casereccio, ciabatta, and pane toscano.
This simple beginner’s loaf is inspired by traditional European homemade bread, combining basic pantry ingredients with an easy preparation method.
### 3\. Cultural Significance
Bread has always represented nourishment, hospitality, family, and togetherness.
In Italian culture, bread is an essential part of everyday meals. It is served alongside pasta, soups, vegetables, cheese, and meat, and is often used to enjoy every last bit of delicious sauce.
In many European households, baking bread at home is also a cherished tradition passed down through generations.
Making your own bread brings back that connection with traditional cooking. It encourages patience, creativity, and appreciation for simple ingredients.
### 4\. Ingredients Quantity
Preparation Time: 15 minutes · Rising Time: 1½–2 hours · Baking Time: 30–35 minutes · Total Time: Approximately 2½–3 hours · Servings: 8–10 slices · Difficulty: Easy
### Ingredients
* 500 g bread flour or all-purpose flour
* 350 ml lukewarm water
* 7 g dry active yeast
* 10 g salt
* 1 teaspoon sugar (optional, to help activate the yeast)
* 1 tablespoon olive oil (optional, for a softer loaf)
### For Finishing
* A little flour for dusting
* Water for brushing the loaf, if desired
### 5\. Optional Additions
You can easily customize this homemade bread according to your taste.
* Olive oil: Adds a slightly richer flavor and softer crumb.
* Mixed seeds: Add sunflower, sesame, flax, or pumpkin seeds.
* Fresh rosemary: Gives the bread a wonderful Mediterranean aroma.
* Garlic: Mix in finely minced garlic for a savory loaf.
* Dried herbs: Oregano, thyme, and basil work beautifully.
* Whole-wheat flour: Replace up to 150 g of the white flour for a heartier texture.
* Olives: Add chopped black or green olives for an Italian-inspired loaf.
* Cheese: Add grated Parmesan for extra savory flavor.
### 6\. Tips for Success
* Check the water temperature: Use lukewarm water, approximately 35–38°C. Water that is too hot can damage the yeast.
* Measure accurately: Baking bread depends on the correct balance of flour and water.
* Don’t add too much flour: The dough should be slightly soft and tacky rather than dry.
* Give the dough enough time: Allow it to rise until approximately doubled in size.
* Knead properly: Kneading helps develop gluten, which gives the bread its structure.
* Create steam: A little steam during the beginning of baking helps develop a beautiful crust.
* Avoid cutting too early: Allow the loaf to cool before slicing so the inside can finish setting.
* Check the bottom: A properly baked loaf should sound hollow when tapped underneath.
### 7\. Instructions
Step 1: Activate the yeast
Pour the lukewarm water into a large mixing bowl. Add the yeast and optional sugar.
Stir gently and let the mixture stand for approximately 5–10 minutes until foamy. If using instant yeast, you can mix it directly with the flour instead.
Step 2: Mix the ingredients
Add the flour and salt to the yeast mixture.
If using olive oil, add it now.
Mix with a wooden spoon until a rough dough forms and no large dry patches of flour remain.
Step 3: Knead the dough
Transfer the dough to a lightly floured work surface.
Knead for approximately 8–10 minutes until the dough becomes smoother, elastic, and slightly tacky.
You can also use a stand mixer fitted with a dough hook for approximately 6–8 minutes.
Step 4: First rise
Place the dough in a lightly greased bowl.
Cover with a clean kitchen towel or plastic wrap and leave it in a warm, draft-free place for approximately 1–1½ hours, or until doubled in size.
Step 5: Shape the loaf
Gently press the dough to release some of the air.
Shape it into a round or oval loaf, depending on your preference.
Place it on a baking tray lined with parchment paper or into a lightly greased loaf pan.
Step 6: Second rise
Cover the shaped dough and allow it to rise for another 30–45 minutes until visibly puffy.
Meanwhile, preheat your oven to 220°C (425°F).
Step 7: Score the bread
Using a sharp knife or bread blade, make one or two shallow cuts across the surface of the loaf.
This allows the bread to expand properly during baking.
Step 8: Bake
Place the bread in the preheated oven.
For a crispier crust, place a heatproof dish containing hot water on the lower oven rack during the first 10–15 minutes of baking.
Bake for approximately 30–35 minutes until the crust is golden brown and the loaf sounds hollow when tapped.
Step 9: Cool and serve
Remove the bread from the oven and transfer it to a wire rack.
Allow it to cool for at least 30–45 minutes before slicing.
Enjoy your freshly baked homemade bread!
### 8\. Description
This homemade beginner’s bread has everything you want in a traditional loaf.
The outside develops a beautiful golden crust, while the inside remains soft, fluffy, and tender. Its mild flavor makes it perfect for both sweet and savory toppings.
Every slice is delicious with butter, olive oil, cheese, homemade jam, or your favorite sandwich fillings.
The best part is that you can enjoy freshly baked bread made with simple ingredients and the satisfaction of preparing it yourself.
### 9\. Nutritional Information
Estimated nutritional values per serving, assuming 10 slices and using the basic recipe without optional olive oil or sugar.
| Nutrient | Amount |
| ————- | ——– |
| Calories | 180 kcal |
| Protein | 6 g |
| Carbohydrates | 36 g |
| Fat | 1 g |
| Fiber | 1.3 g |
| Sugar | 0.2 g |
Values are approximate and vary according to the flour used and slice size.
### 10\. Conclusion
Making homemade bread doesn’t have to be difficult, even if you’re a complete beginner.
This simple recipe demonstrates how a handful of everyday ingredients can become a beautiful, delicious loaf with a golden crust and soft interior.
Once you experience the pleasure of baking your own bread, you may find yourself making it again and again.
There is something truly special about slicing into a warm loaf that you prepared with your own hands.
### 11\. Recommendation
For the best experience, enjoy your homemade bread in different ways:
* Toast a slice and drizzle it with extra virgin olive oil.
* Serve alongside homemade vegetable soup.
* Make delicious sandwiches with eggs, vegetables, or cheese.
* Serve with fresh tomatoes, oregano, and olive oil.
* Enjoy with avocado and your favorite savory toppings.
* Use slightly older slices to prepare homemade croutons.
My recommendation: Bake two loaves at once. Enjoy one fresh and slice the other after cooling, then freeze it in individual portions. You can toast the slices directly from frozen whenever you need them.
### 12\. Embracing Healthful Indulgence
Homemade bread can be part of a balanced eating pattern when enjoyed in portions that suit your nutritional needs.
Preparing bread yourself gives you control over the ingredients and allows you to avoid unnecessary preservatives, artificial flavors, and excessive additives commonly found in some packaged products.
Here are some ways to make this recipe more nutritious:
* Replace part of the white flour with whole-wheat flour to increase fiber.
* Add flaxseeds, chia seeds, or sunflower seeds for additional nutrients.
* Use extra virgin olive oil for a source of unsaturated fat.
* Pair bread with protein-rich foods such as eggs or suitable dairy alternatives.
* Enjoy it alongside vegetables for a more balanced meal.
* Reduce or omit the optional added sugar if desired.
A personal baking note: Traditional homemade bread is not carbohydrate-free, and it contains wheat gluten. If you prefer to avoid white flour or added sugar, you can experiment with alternative flour blends, although the texture and rising behavior will change considerably.
The beauty of homemade bread is that you can adapt it to your preferences, learn new techniques, and enjoy the satisfaction of creating something delicious from scratch.
Freshly baked, simple, affordable, and made with love – sometimes the best bread is the bread you make yourself!