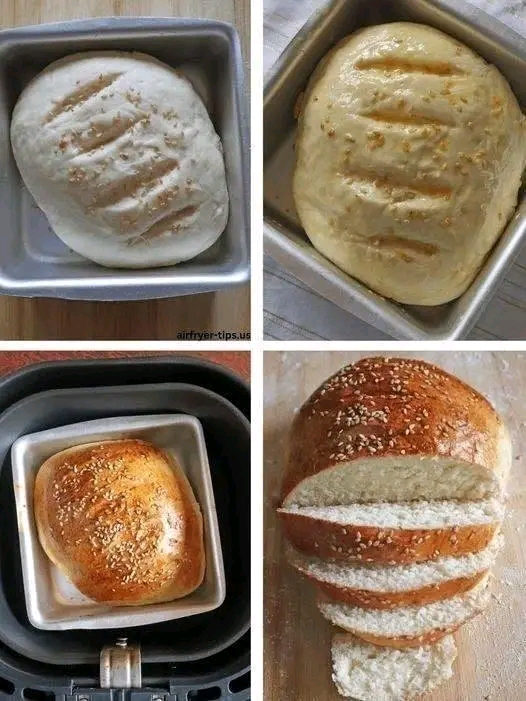
Easy Air Fryer Homemade Bread Cheap, Simple, and Delicious
### 1\. Introduction
Making homemade bread has never been easier! This simple air fryer bread recipe is perfect for anyone who wants fresh, warm bread without buying it from the store. With just a few basic ingredients, you can prepare a soft, fluffy loaf with a lightly golden crust right in your air fryer.
Whether you’re serving it for breakfast, making sandwiches for lunch, or enjoying a warm slice with soup, this recipe is an affordable and practical way to bring homemade goodness into your kitchen. You don’t need an expensive bread machine or a traditional oven—just a few pantry staples and your trusty air fryer.
Preparation Time: 15 minutes Rising Time: 60–90 minutes Cooking Time: 20–30 minutes Total Time: Approximately 1 hour 45 minutes to 2 hours 15 minutes Servings: 6–8 slices
### 2\. Origin
Homemade bread has been a staple food across cultures for thousands of years. Traditionally, bread was baked in wood-fired ovens, clay ovens, and later conventional household ovens.
Air fryer bread is a modern adaptation of this timeless tradition. Air fryers circulate hot air around food, allowing small loaves to bake conveniently without heating a full-sized oven. This approach is especially useful for small households, warm climates, and anyone looking to reduce energy use when baking small portions.
Although the method is modern, the idea remains the same: transform simple ingredients such as flour, water, yeast, and salt into nourishing, delicious bread.
### 3\. Cultural Significance
Bread represents comfort, hospitality, and togetherness in many parts of the world. From European farmhouse loaves to Moroccan khobz, freshly baked bread often accompanies everyday meals and family gatherings.
Making bread at home also connects people with traditional cooking skills. Kneading dough, waiting for it to rise, and enjoying the smell of freshly baked bread can turn a simple kitchen task into a rewarding experience.
Air fryer bread makes this tradition more accessible to people who have limited kitchen space, smaller budgets, or no conventional oven.
### 4\. Ingredients Quantity

Ingredients for one small loaf
* 2 cups (250 g) all-purpose flour
* ¾ cup (180 ml) lukewarm water
* 1 teaspoon instant yeast (3–4 g)
* 1 teaspoon sugar (optional, to help activate the yeast)
* ¾ teaspoon salt
* 1 tablespoon olive oil or vegetable oil
Note: These quantities are a reliable starting point for a small loaf. The exact cooking time depends on your air fryer, the size of your baking tin, and the thickness of the dough.
### 5\. Optional Additions
Customize your homemade bread with a few simple ingredients.
* Herbs: Add dried oregano, rosemary, or thyme for a fragrant loaf.
* Garlic: Mix in minced garlic or garlic powder for extra flavor.
* Seeds: Sprinkle sesame, sunflower, or pumpkin seeds over the top.
* Whole-wheat flour: Replace up to half of the all-purpose flour with whole-wheat flour, adding a little extra water if needed.
* Olive oil: Brush the crust lightly with olive oil before baking.
* Cheese: Add a small handful of grated cheese for a savory loaf.
* Honey: Replace the optional sugar with a teaspoon of honey for a subtly sweet flavor.
### 6\. Tips for Success
* Check your water temperature: Lukewarm water is ideal. Water that is too hot can damage the yeast.
* Measure flour carefully: Too much flour can make the loaf dry and dense. Weighing it is best when possible.
* Knead until smooth: Knead for approximately 8–10 minutes by hand, until the dough becomes elastic.
* Allow enough rising time: Let the dough rise in a warm place until roughly doubled in size.
* Choose the right tin: Use a small, air-fryer-safe baking tin that fits comfortably inside the basket, leaving space for air circulation.
* Avoid overcrowding: The bread needs room for hot air to circulate around the tin.
* Check the center: If the crust browns before the middle is cooked, reduce the temperature and continue baking.
* Cool before slicing: Rest the loaf for at least 15–20 minutes to help the crumb set and prevent a gummy texture.
### 7\. Instructions

Step 1: Mix the ingredients
In a large bowl, combine the flour, instant yeast, salt, and optional sugar. Add the lukewarm water and olive oil. Mix until a rough dough forms.

Step 2: Knead the dough
Transfer the dough to a lightly floured surface. Knead for 8–10 minutes until smooth, soft, and elastic. Add flour sparingly if the dough is very sticky.

Step 3: Let it rise
Place the dough in a lightly oiled bowl, cover it, and leave it in a warm spot for 60–90 minutes, or until doubled in size.

Step 4: Shape the loaf
Gently press out excess air, shape the dough into a round or oval loaf, and place it in a lightly greased, air-fryer-safe tin. Let it rest for another 15–20 minutes.

Step 5: Bake in the air fryer
Preheat the air fryer to 160°C (320°F) if your model recommends preheating. Bake for 20–30 minutes, checking the loaf toward the end. If the top browns too quickly, cover it loosely with foil only if your air fryer manufacturer permits this and the foil can be secured safely.

Step 6: Cool and serve
Check that the center is fully baked. For a thermometer check, aim for approximately 93–96°C (200–205°F) inside. Remove the loaf carefully, cool on a wire rack, and slice once it has rested.
### 8\. Description
This air fryer bread has a tender, fluffy interior and a lightly crisp, golden crust. Its mild flavor makes it versatile enough for sweet or savory toppings.
Enjoy it warm with olive oil, alongside a bowl of soup, toasted for breakfast, or filled with your favorite sandwich ingredients. Because the recipe uses simple pantry staples, it’s easy to prepare whenever you want fresh bread without an extra trip to the bakery.
### 9\. Nutritional Information
Approximate nutrition per slice, assuming 8 slices per loaf:
| Nutrient | Amount |
| ————- | ————- |
| Calories | 125–140 kcal |
| Carbohydrates | 24–27 g |
| Protein | 3–4 g |
| Fat | 2 g |
| Fiber | 1 g |
| Sugar | Less than 1 g |
Values vary according to the flour brand, oil used, loaf size, and slice thickness. These estimates are for the basic recipe without optional toppings.
### 10\. Conclusion
Air fryer homemade bread is an easy, budget-friendly way to enjoy fresh bread at home. With a handful of ingredients and a little patience while the dough rises, you can make a satisfying loaf without turning on a conventional oven.
Once you’ve mastered the basic method, you can experiment with herbs, seeds, whole-wheat flour, and other flavors to create a loaf that suits your household.
### 11\. Recommendation
Serve this bread with scrambled eggs, fresh tomatoes, homemade soup, or a simple olive oil dip. It also makes delicious toast and sandwiches.
For the best results, bake smaller loaves that fit your air fryer comfortably, and keep notes on the temperature and timing that work best for your particular model.
Store cooled bread in an airtight container at room temperature for up to 2–3 days. For longer storage, slice and freeze it, then toast slices straight from frozen as needed.
### 12\. Embracing Healthful Indulgence
Homemade bread can be part of a balanced eating pattern. Preparing it yourself lets you control the ingredients, salt, added sugar, and type of flour used.
For a more fiber-rich loaf, try replacing some of the white flour with whole-wheat flour or adding a tablespoon of seeds. Pair a slice with eggs, hummus, or another protein-rich topping for a more filling meal.
If you prefer to avoid white flour, you can experiment with whole-grain recipes, but remember that changing the flour substantially may require adjustments to the water and kneading time.
The real beauty of homemade bread is its simplicity: affordable ingredients, a fresh-baked aroma, and the satisfaction of making something nourishing with your own hands.