The Ultimate Creamy No Bake Lemon Mousse Dessert Recipe
There is something extraordinarily refreshing about a light, velvety dessert that strikes the absolute perfect balance between rich creaminess and sharp citrus zest. If you are looking for a show-stopping sweet treat that requires zero oven time and completely elevates your dessert game, look no further than this ultimate creamy no-bake lemon mousse. Inspired by the beautifully layered, velvety texture and elegant presentation captured in 1000005883.jpg, this dessert delivers a cloud-like consistency that melts in your mouth instantly. By pairing the natural, intense brightness of freshly squeezed lemon juice with a luxurious whipped cream cream cheese base, this recipe crafts a multi-dimensional citrus experience. Whether you are hosting an upscale dinner party, putting together a summer barbecue menu, or satisfying an afternoon sweet craving, this elegant glass-layered dessert fulfills every requirement.
The secret to achieving the dense, holding loft and ultra-smooth emulsion displayed in the mixing bowls and serving glasses of 1000005883.jpg lies in handling your dairy fats and acidic components with precise care. Many homemade citrus mousses suffer from a watery separation or an unappealing curdled consistency because the cold acid was introduced too aggressively to the cream base. This comprehensive guide walks you through utilizing fresh lemons, mastering the fold-in technique for optimal aeration, stabilizing your whipped base naturally, and styling beautiful individual glass servings. Get ready to transform simple, fresh ingredients into a professional, restaurant-grade citrus masterpiece.
Why This Easy Lemon Mousse Recipe Works
Developing a no-bake mousse that remains remarkably fluffy without relying on heavy gelatin sheets requires an understanding of structural kitchen physics. A flawless mousse depends entirely on trapping millions of microscopic air bubbles inside a stable matrix of fat and sugar. This recipe optimizes these elements to provide a foolproof, cloud-like result every single time.
The Science of Whipping Heavy Cream
Heavy whipping cream acts as the foundational volume builder for this dessert. When you whip heavy cream, you force air into the liquid, while the milk fat molecules align to form a protective wall around the trapped air bubbles, creating a firm foam. This recipe utilizes cream with a high fat content (at least 35%) to ensure that the foam is strong enough to support the added weight of the fresh lemon liquid without collapsing into a liquid puddle.
Stabilizing with Whipped Cream Cheese
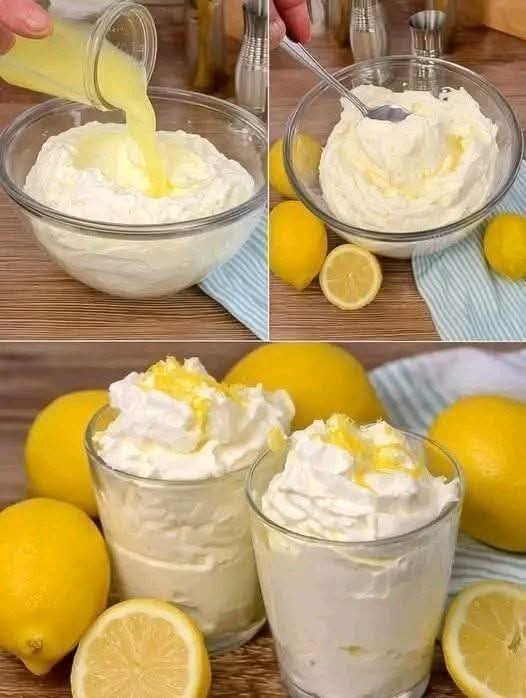
While traditional French mousses rely on whipped raw egg whites for structure, this egg-free version introduces softened cream cheese or mascarpone as a stabilizing anchor. As shown in the upper panels of 1000005883.jpg, blending a solid cream base provides a thick, rich counterweight to the liquid citrus. The natural fats in the cream cheese hold up the aerated whipped cream perfectly, eliminating the need for artificial thickeners or gelatin, while adding a subtle, cheesecake-like tang that complements the lemon beautifully.
The Perfect Acid-to-Fat Ratio
Lemon juice is highly acidic, which means it has the potential to break down dairy proteins if mismanaged. However, when introduced gradually to a deeply whipped, high-fat cream matrix, the acidity actually serves to gently firm up the mixture, acting as a natural setting agent. This recipe precisely balances the volume of fresh juice against the heavy dairy lipids, ensuring the mousse sets into a smooth spoonable consistency that retains its shape beautifully when dolloped into a glass.
Essential Ingredients for an Ultra-Smooth Citrus Dessert
Before pulling out your mixing bowls, it is highly important to select premium, fresh ingredients. Because this no-bake dessert uses a short, clean ingredient list, the quality of each component directly impacts the purity of the final flavor.
Selecting Your Fresh Lemons
Always choose lemons that are bright yellow, plump, and possess a slight give when squeezed gently. Heavy fruits indicate a high volume of internal juice, while a smooth, thin skin makes extracting fresh zest incredibly effortless. Try to buy organic, unwaxed lemons when possible, as you will be utilizing the raw outer layer of the peel to top your finished dessert, as illustrated in the bottom section of 1000005883.jpg.
The Temperature of Your Ingredients
Unlike baking recipes that demand room-temperature dairy, a perfect mousse requires a split-temperature strategy. Your heavy whipping cream must be completely ice-cold, straight from the deepest part of the refrigerator; cold fat molecules trap air much more efficiently and hold their shape longer. Conversely, your cream cheese or mascarpone must be completely softened at room temperature to ensure it blends seamlessly with the sugars without creating tiny, stubborn lumps.
Powdered Sugar vs. Granulated Sugar
This recipe prioritizes sifted powdered sugar (confectioners’ sugar) over standard granulated sugar. Powdered sugar contains a tiny percentage of cornstarch, which acts as an additional subtle stabilizer for the whipped cream. More importantly, powdered sugar dissolves instantly into cold dairy without requiring heat, guaranteeing that your final mousse possesses an ultra-silky, completely grit-free mouthfeel.
Step-by-Step Instructions: Whipping the Perfect Mousse
Follow these detailed, step-by-step actions carefully to achieve the exact uniform creaminess and elegant presentation captured so beautifully in 1000005883.jpg. Take your time during the folding phase to preserve the maximum amount of trapped air.
Step 1: Zesting and Juicing the Lemons
Thoroughly wash and dry 3 large lemons. Using a fine microplane or grater, zest the outer yellow skin of the lemons, being careful to avoid the bitter white pith underneath. Set the fresh zest aside in a small bowl. Cut the lemons in half and extract 1/2 cup of fresh lemon juice. Pass the juice through a fine-mesh sieve to completely remove any hidden seeds or large pulp pieces, ensuring a smooth liquid stream like the one poured in 1000005883.jpg.
Step 2: Beating the Cream Cheese Base
In a large mixing bowl, combine 8 ounces of completely softened cream cheese and 1 cup of sifted powdered sugar. Using a hand mixer or a stand mixer fitted with the paddle attachment, beat the mixture on medium-high speed for 3 to 4 minutes. Scrape down the sides of the bowl frequently with a silicone spatula. The mixture should become completely smooth, creamy, and free of any visible graininess. Stir in 1 tablespoon of your reserved lemon zest.
Step 3: Whipping the Heavy Cream to Stiff Peaks
In a separate, chilled glass or stainless steel bowl, pour 1 and 1/4 cups of cold heavy whipping cream. Beat the cream on medium speed, gradually increasing to high speed as it thickens. Continue whipping until the cream forms stable, stiff peaks that hold their shape perfectly when you lift the beaters out of the bowl. Be careful not to over-whip, or the cream will break and turn into butter.
Step 4: Emulsifying the Fresh Lemon Juice
Return to your cream cheese bowl. With your mixer running on a low speed, slowly stream your 1/2 cup of fresh lemon juice directly into the sweetened cream cheese, exactly as depicted in the top-left pane of 1000005883.jpg. Once all the juice is added, use a spoon or a whisk to gently mix the liquid into the dairy until it forms a uniform, thick, and highly glossy citrus cream, matching the top-right pane of 1000005883.jpg.
Step 5: Folding for Cloud-Like Aeration
Add one-third of your stiffly whipped heavy cream into the lemon-cream cheese mixture. Using a large silicone spatula, gently cut down through the center of the bowl, sweep around the bottom, and fold the mixture over itself. This lightens the dense base. Add the remaining whipped cream and continue folding using a gentle figure-eight motion just until no white streaks remain. Never stir or whisk during this step, as aggressive movements will deflate the trapped air bubbles, thinning out your mousse.
Step 6: Portioning and Chilling the Dessert
Spoon the airy lemon mousse evenly into individual serving glasses, glass tumblers, or dessert bowls, creating a beautifully piled, textured top layer similar to the finished product in 1000005883.jpg. Alternatively, you can transfer the mousse into a piping bag fitted with a star tip for a highly stylized presentation. Garnish the top of each glass generously with a sprinkle of your remaining fresh lemon zest or a thin slice of lemon. Place the filled glasses into the refrigerator to chill for at least 2 hours before serving, allowing the cool fats to lock in the final firm texture.
Professional Presentation and Styling Techniques
Creating a beautiful visual presentation enhances the overall dining experience. Use these professional styling tips to make your homemade lemon mousse look exactly like the enticing display featured in 1000005883.jpg.
Creating High-Contrast Garnishes
- Fresh Berry Complement: Top each yellow-tinted glass with a single fresh raspberry, a glossy blackberry, or a sprig of fresh mint. The deep red or vibrant green contrast against the pale cream color looks strikingly beautiful.
- Textured Biscuit Base: For a delightful texture contrast, crush a few graham crackers, shortbread cookies, or vanilla wafers and drop a thin layer of crumbs into the bottom of each glass before piping in the lemon mousse. This creates a deconstructed lemon meringue pie aesthetic.
- Candied Lemon Peels: Simmer thin strips of lemon peel in a simple sugar syrup for fifteen minutes, then roll them in granulated sugar. Placing a crystalline candied peel on top adds a beautiful chew and an artisan bakery finish.
Clean Glass Presentation
When spooning or piping your mousse into narrow serving glasses, it is easy to accidentally smudge the inner walls of the glass. To keep your presentation clean and professional, use a long-handled spoon to drop the mixture directly into the center of the glass base, or utilize a piping bag to fill the vessels from the bottom up without touching the upper edges.
Nutritional Overview and Structural Adjustments
This creamy lemon mousse provides a satisfying, high-fat dessert option that can be easily modified to fit various modern lifestyle choices and dietary requirements.
| Ingredient Component | Role in Mousse Structure | Ideal Substitution Alternative |
|---|---|---|
| Heavy Whipping Cream | Builds volume and air retention | Chilled coconut whipping cream (dairy-free) |
| Cream Cheese | Provides stability and body tang | Full-fat Mascarpone cheese or thick Greek yogurt |
| Powdered Sugar | Sweetens and aids stability | Powdered monk fruit sweetener or erythritol |
| Fresh Lemon Juice | Delivers core flavor and sets fats | Fresh lime juice, passion fruit juice, or key lime juice |
| Fresh Lemon Zest | Infuses aromatic essential oils | Pure lemon extract (use sparingly if substituting) |
If you are looking to create a lower-calorie or higher-protein alternative, you can substitute the cream cheese with a well-strained, full-fat Greek yogurt or skyr. Keep in mind that using yogurt will yield a slightly lighter, more fluid texture than the sturdy structure displayed in 1000005883.jpg, but it will retain that signature sour citrus bite perfectly.
Storing and Freezing Your No-Bake Mousse Cups
Because this mousse is stabilized naturally through cold dairy fats rather than gelatin, keeping it properly chilled up until the moment it is served preserves its signature texture.
Refrigeration Timelines
Keep your lemon mousse cups covered loosely with a sheet of plastic wrap inside the refrigerator if you are not serving them immediately. They will maintain their perfect, fluffy lift and pristine flavor for up to three to four days. The paper-thin layer of plastic wrap prevents the delicate dairy cream from absorbing any stray odors from other ingredients inside your fridge.
Freezing for a Frozen Treat Experience
This mousse recipe freezes beautifully, transforming into a luxurious, semi-freddo or ice-cream-like dessert. To freeze it, wrap your individual serving dishes tightly in plastic wrap and heavy foil, or freeze the mousse in a single silicone loaf mold for up to two months. When you are ready to enjoy it, simply transfer the mousse from the freezer to the refrigerator for 20 to 30 minutes to allow it to soften slightly into a luscious, spoonable frozen custard.
Frequently Asked Questions (FAQs)
Why did my lemon mousse turn out runny instead of fluffy?
A runny mousse is typically caused by one of three things: over-mixing the ingredients during the folding step, which accidentally knocks out all the trapped air; using heavy cream with less than 35% milk fat, which cannot hold a stiff peak; or incorporating the lemon juice into the cream cheese while it was still warm. Ensure your cream is ice-cold and your folding movements are slow and gentle.
Can I use this mousse recipe as a cake filling?
Yes, absolutely. Because the combination of cream cheese and heavy whipped cream sets up quite firmly once chilled, this lemon mousse makes an exceptional, stable filling for layered sponge cakes, tarts, or cream puffs. For maximum stability when stacking heavy cake layers, ensure you chill the assembled cake for at least 4 hours before slicing.
Is it possible to use bottled lemon juice for this recipe?
While it is technically possible, it is highly discouraged. Bottled lemon juice lacks the vibrant, lively punch of fresh fruit and often carries a bitter, artificial aftertaste due to added preservatives. Furthermore, omitting fresh fruit means you lose out on the fresh zest, which contains the essential aromatic oils necessary to give this dessert its incredible bakery-quality aroma.
Conclusion: An Effortless, Elegant Crowd-Pleaser
Mastering the creation of a luxurious, no-bake lemon mousse is an incredibly rewarding achievement for any home cook or digital publisher. By combining the natural structural strength of whipped heavy cream and softened cream cheese with the vibrant acidity of fresh lemons, you create a dessert that radiates culinary elegance while requiring absolutely no cooking. The simple commitment to gentle folding and careful ingredient temperature management guarantees a flawless, cloud-like performance every single time.
The next time you want to delight your family or impress dinner guests with a bright, refreshing treat, pull out your lemons, gather your mixing bowls, and replicate the gorgeous, cream-topped masterpieces shown so beautifully in 1000005883.jpg. With its exquisite texture contrast, vibrant aesthetic, and perfect sweet-tart profile, this easy lemon mousse is guaranteed to earn a permanent spot at the top of your favorite dessert recipe collection.