The Ultimate Guide to Homemade Pickled Crisp Summer Vegetable Salad
As the warm weather settles in, our bodies naturally crave meals that are light, refreshing, and vibrant. Spending hours over a hot stove loses its appeal, making crunchy, chilled side dishes the true stars of the season. If you are searching for a foolproof way to preserve the crisp textures of garden-fresh produce while delivering a tangy punch of flavor, a master quick-pickle salad is the perfect solution.
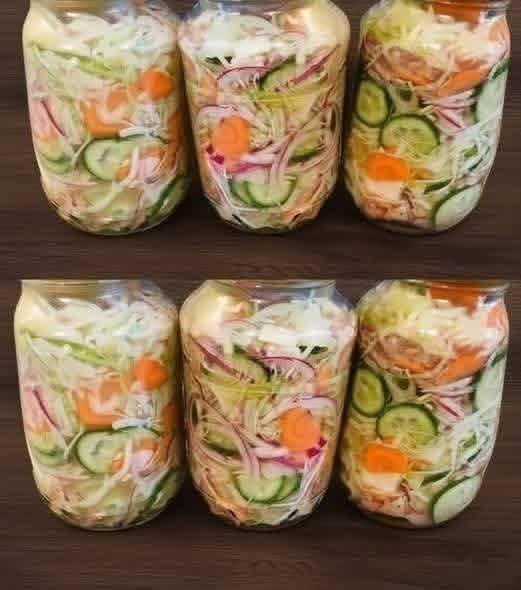
This crunchy pickled vegetable salad is an absolute triumph of texture and taste. As you can see in the rows of neatly packed glass jars in 1000005808.jpg, this recipe layers finely shredded cabbage, crisp cucumber rounds, vibrant carrots, and slivers of red onion in a bright, seasoned vinegar brine. It delivers a perfect balance of sweet, salty, and acidic notes that complement any main course. In this ultimate guide, we will explore the science behind quick-pickling, share the best techniques for keeping your vegetables incredibly crunchy, and walk you through a step-by-step recipe to build your own gorgeous jars at home.
The Science of Quick Pickling: Fast Flavor with No Canning Required
For many home cooks, the word “pickling” brings to mind images of massive boiling pots, specialized canning racks, and meticulous vacuum-sealing protocols. While traditional fermentation and hot-water-bath canning are fantastic for long-term pantry storage, quick-pickling (also known as refrigerator pickling) offers a simple, accessible alternative for everyday meals.
Quick-pickling relies on a basic chemical reaction between the acetic acid in vinegar and the cellular structure of your vegetables. Instead of waiting weeks for natural fermentation to occur, a heated vinegar brine rapidly permeates the sliced vegetables, infusing them with flavor in a matter of hours. Because these jars are stored safely in the refrigerator rather than a cellar, you can skip the complex sterilization steps required for shelf-stable canning while enjoying a brighter, fresher vegetable flavor.
Selecting and Preparing Your Vegetables for Ultimate Crunch
To achieve the gorgeous, multi-colored layers visible in the jars of 1000005808.jpg, selection and cutting techniques are paramount. The goal is to ensure every forkful offers a satisfying, audible crunch.
The Cabbage: The Structural Base
Green cabbage forms the robust foundation of this salad. It handles a vinegar brine beautifully without becoming soggy or limp over time. For the best mouthfeel, remove the tough outer leaves and the dense inner core. Use a sharp chef’s knife or a mandoline slicer to shred the cabbage into thin, uniform ribbons.
Cucumbers and Carrots: Color and Shape Contrast
As displayed in 1000005802.jpg‘s neighboring file 1000005808.jpg, slicing your vegetables into distinct geometric shapes creates a stunning visual mosaic inside the glass.
- Cucumbers: Opt for thin-skinned, low-seed varieties like English or Persian cucumbers. Slice them into medium-thick rounds so they maintain their structural integrity inside the liquid.
- Carrots: Peel your carrots and slice them into thin, vibrant coins. Carrots are naturally dense, so slicing them relatively thin ensures they soften just enough to chew comfortably while retaining a distinct bite.
Red Onions: The Aromatic Slicing Rule
Red onions add a beautiful pop of purple and a sharp, sweet bite to the mix. To ensure they integrate seamlessly with the shredded cabbage, cut the onion in half from root to stem, peel away the skin, and slice them into paper-thin half-moons.
The Secret to Long-Lasting Vegetable Crispness
The biggest pitfall when pickling high-moisture vegetables like cabbage and cucumbers is water dilution. Vegetables are naturally packed with water; if you place them directly into a brine, they will slowly purge their internal moisture, which dilutes your beautifully seasoned vinegar and leaves the vegetables rubbery. To prevent this and lock in an exceptional crunch, employ the salting and sweating method:
- Draw Out the Moisture: Place your shredded cabbage, sliced cucumbers, and onions into a large colander set over a bowl. Sprinkle them generously with coarse sea salt or kosher salt and toss thoroughly to coat.
- Let It Sweat: Let the vegetables sit undisturbed at room temperature for 30 to 45 minutes. You will notice a significant amount of water pooling at the bottom of the bowl.
- Rinse and Express: Rinse the vegetables quickly under cold water to remove excess surface salt, then dump them onto a clean kitchen towel. Roll up the towel and gently squeeze to express as much remaining moisture as possible. This step leaves the vegetable cell walls primed to snap crisply when bitten.
Step-by-Step Refrigerator Pickled Vegetable Salad Recipe
This recipe yields enough to fill several wide-mouth glass jars, precisely like the stunning display shown in 1000005808.jpg.
Ingredients:
- 1/2 medium head of green cabbage, finely shredded
- 2 medium English or Persian cucumbers, sliced into rounds
- 2 medium carrots, peeled and sliced into thin coins
- 1 medium red onion, sliced into paper-thin half-moons
- 2 tablespoons kosher salt or coarse sea salt (for sweating the vegetables)
For the Master Pickling Brine: - 2 cups white vinegar (or apple cider vinegar for a fruitier profile)
- 1 cup filtered water
- 1/2 cup granulated white sugar
- 1 tablespoon sea salt
- 1 teaspoon whole black peppercorns
- 2 cloves garlic, peeled and smashed (optional)
- 1 teaspoon mustard seeds or a sprig of fresh dill (optional)
Directions:
Step 1: Sweat Your Vegetables
In a large colander, combine your finely shredded cabbage, cucumber rounds, and thin red onion slices. Sprinkle with 2 tablespoons of coarse salt, tossing thoroughly with your hands to distribute it evenly. Set the colander over a bowl or sink and let the vegetables sweat for 30 to 45 minutes to purge excess water.
Step 2: Prepare the Brine
While the vegetables are releasing their moisture, combine the white vinegar, filtered water, granulated white sugar, sea salt, black peppercorns, and any optional aromatics (like garlic or mustard seeds) in a medium stainless steel saucepan. Bring the mixture to a gentle boil over medium-high heat, stirring occasionally until the sugar and salt are completely dissolved. Once boiling, remove the pan from the heat and let the brine cool slightly for 5 to 10 minutes so it doesn’t cook the vegetables upon contact.
Step 3: Rinse and Dry the Produce
Rinse the salted vegetables briefly under cold running water to wash away the excess surface salt. Transfer the mixture to a clean dish towel or a salad spinner and dry them thoroughly. Toss the crisp carrot coins into the mix with the cabbage, cucumbers, and onions, combining the colors evenly.
Step 4: Pack the Jars
Gather several clean, wide-mouth glass jars. Using tongs or clean hands, pack the colorful vegetable mixture tightly into the jars, pressing down gently to fit as much as possible while leaving about half an inch of headspace at the top, mimicking the packed structure seen in 1000005808.jpg.
Step 5: Submerge and Liquid Cool
Carefully pour the warm pickling brine over the packed vegetables in each jar, ensuring the liquid completely submerges the produce. If any air bubbles are trapped along the sides, gently tap the jar on the counter or slide a clean butter knife down the inside edge to release them. Wipe the rims dry with a paper towel and screw the lids on firmly.
Step 6: Chill and Rest
Let the jars sit undisturbed on your countertop until they cool down to room temperature. Once cooled, transfer the jars directly into your refrigerator. While you can dive into the salad after just 2 hours of chilling, the flavors develop beautifully if allowed to rest overnight. Always serve chilled.
Perfect Pairings: How to Enjoy Your Pickled Salad
This vibrant, acidic side dish acts as a wonderful palate cleanser, cutting beautifully through rich, savory, or fatty main courses.
Backyard Barbecues and Grilled Meats
There is no better companion for a smoky, grilled dinner than a cold, tangy pickled salad. Serve it alongside charred burgers, grilled chicken skewers, or smoky barbecued ribs. The bright acidity balances the heavy, smoky fats beautifully.
Tacos and Wraps
Use this crisp salad as a crunchy topper for your favorite street-style tacos, pulled pork sliders, or Mediterranean falafel wraps. It adds a satisfying textural contrast and a splash of bright color to every bite.
Grain Bowls and Summer Picnics
Incorporate a few generous spoonfuls of this pickled medley into your weekday grain bowls featuring quinoa, brown rice, or roasted sweet potatoes. Because it travels incredibly well without wilting, it is also an ideal option for packing into coolers for beach trips and park picnics.
Storage and Longevity Guidelines
Because this is a refrigerator method, understanding the lifespan of your pickled salad ensures you enjoy it at peak quality.
- Refrigeration Requirement: This salad is not shelf-stable. It must be kept stored in the refrigerator at all times when not being actively served.
- Optimal Shelf Life: Thanks to the preservative properties of the vinegar brine, your pickled salad will stay exceptionally crisp, fresh, and delicious for up to 3 to 4 weeks.
- Serving Hygiene: To prevent introducing unwanted bacteria into the jars, always use a clean fork or tongs to fish out your desired portions. Never double-dip utensils directly into the master jar.
Conclusion
The striking visual beauty of a multi-layered pickled vegetable salad, as demonstrated in the pristine jars of 1000005808.jpg, proves that simple techniques can yield incredible results. By mastering the core principle of quick-pickling and employing the non-negotiable salting method to draw out excess vegetable water, you ensure your salad maintains an elite, mouthwatering crunch from the first forkful to the very last.
Whether you keep a rolling stock of these jars in your refrigerator to brighten up weeknight dinners, use them to elevate your weekend backyard barbecues, or gift them to fellow food-loving friends, this simple preparation is a joyful celebration of summer’s bounty. Keep your brine balanced, pack your jars tightly, and enjoy the bright, refreshing satisfaction of a perfectly crafted refrigerator pickle classic.