The Ultimate Ultra Fluffy Milk Bread Recipe How to Bake the Perfect Tender Loaf
Few baking achievements match the deep satisfaction of pulling a perfectly golden, high-rising loaf of bread from your home oven. While artisanal sourdoughs and rustic crusty boules have their unique charm, there is a special place in the baking world for an ultra-fluffy, cotton-soft sandwich bread. If you have ever struggled with homemade bread turning out dense, heavy, or dry the next day, mastering the art of milk bread will completely transform your kitchen routine.
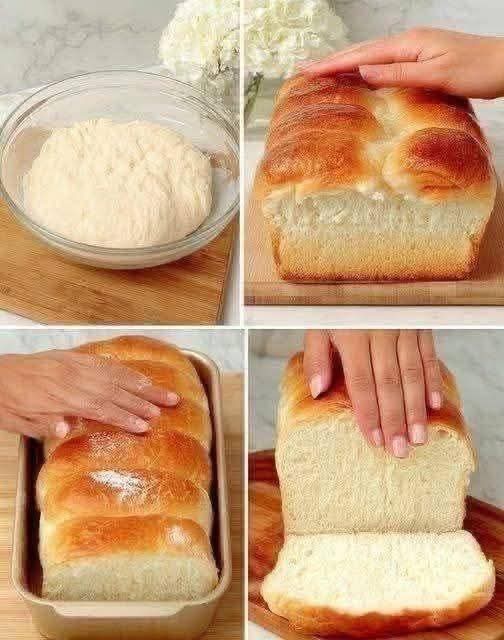
The incredible baking process captured in the multi-paneled graphic 1000005738.jpg showcases the structural journey of this exquisite loaf. In the top-left panel of 1000005738.jpg, we see a smooth, pillowy yeast dough resting in a glass bowl during its initial rise. The top-right and bottom-left panels reveal the baked masterpiece: a beautifully golden, glossy, multi-domed loaf that springs back gently when lightly pressed by a hand. Finally, the bottom-right pane highlights the ultimate reward—a clean slice demonstrating an incredibly tight, cotton-soft interior crumb structure. This comprehensive guide will walk you through the precise baking science, advanced techniques, and step-by-step instructions required to execute this ultra-fluffy bread flawlessly at home.
The Science of Softness: Understanding the Tangzhong Method
To achieve the extraordinary shreddable texture and long-lasting freshness characteristic of premium milk bread, bakers rely on a simple scientific technique known as Tangzhong. Originating in Asian baking traditions, this method addresses the natural tendency of starchy baked goods to dry out over time.
Gelatinizing Starches for Maximum Moisture
Tangzhong involves taking a small percentage of the flour and liquid (milk or water) from the recipe and cooking them together in a small saucepan over medium heat before assembling the main batter. Heating the flour to roughly 149°F (65°C) causes the starches in the grain to gelatinize. In this gelatinized state, the flour starches absorb up to twice as much liquid as they would when mixed cold. This extra moisture is chemically trapped within the starch structure, meaning it will not evaporate in the oven during the baking cycle.
Long-Lasting Freshness Without Preservatives
Because the Tangzhong mixture locks in high levels of hydration, the final loaf retains its soft, moist texture naturally for days after baking. In standard bread recipes, starch molecules gradually recrystallize post-bake, a process called retrogradation, which causes the bread to go stale. The trapped moisture from the gelatinized paste disrupts this crystallization, keeping your sliced loaf as remarkably pillowy and tender as the one shown in 1000005738.jpg without needing any synthetic shelf-life extenders.
Complete Ingredients Checklist for Your Fluffy Loaf
Before starting, ensure your milk and egg are brought to room temperature, as cold ingredients can slow down yeast fermentation and alter your rising schedule.
For the Tangzhong Paste
- 2 tablespoons (20g) of unbleached bread flour
- 2 tablespoons of water
- 4 tablespoons of whole milk
For the Main Dough Matrix
- 2.5 cups (300g) of unbleached bread flour (bread flour is essential for strong gluten development)
- 2 tablespoons of granulated white sugar
- 1.25 teaspoons of instant dry yeast
- 0.5 teaspoons of fine sea salt
- 0.5 cups of whole milk, room temperature
- 1 large egg, room temperature
- 3 tablespoons (42g) of unsalted butter, softened to room temperature
For the Perfect Glossy Finish
- 1 egg beaten with 1 tablespoon of milk (for the pre-bake egg wash)
- 1 tablespoon of melted butter (for brushing immediately post-bake)
Step-by-Step Mixing, Kneading, and Proofing Guide
Replicating the gorgeous, uniform volume shown in 1000005738.jpg requires building a strong, elastic gluten structure while respecting the fermentation windows.
1. Cooking the Starter Paste
In a small saucepan, whisk together the 2 tablespoons of bread flour, water, and 4 tablespoons of whole milk until completely smooth. Place the pan over medium-low heat, stirring continuously with a heatproof spatula. Within 2 to 3 minutes, the liquid will thicken into a translucent, pudding-like paste. Scrape the paste into a small bowl and let it cool completely to room temperature before adding it to your yeast mixture.
2. Kneading the Main Dough Matrix
In the bowl of a stand mixer fitted with a dough hook, combine the bread flour, granulated sugar, instant dry yeast, and fine sea salt. Pour in the room-temperature whole milk, the beaten egg, and your cooled Tangzhong paste. Mix on low speed for 2 to 3 minutes until a shaggy, cohesive dough begins to pull away from the sides of the bowl.
With the mixer running on medium-low, add the softened unsalted butter one tablespoon at a time, allowing each piece to fully incorporate into the gluten matrix before adding the next. Once the butter is fully absorbed, increase the mixer speed to medium and knead for 8 to 10 minutes. The dough will transform from a sticky mass into an incredibly smooth, shiny, and highly elastic ball, matching the clean appearance of the proofing dough in the top-left pane of 1000005738.jpg. Shape the dough into a taut ball, place it into a lightly greased glass bowl, cover with a damp cloth, and let it proof in a warm spot for 60 minutes, or until doubled in size.
Shaping and the Long, Slow Bake
The iconic multi-domed silhouette visible in the pan in 1000005738.jpg is achieved through a specific rolling and layering method that creates uniform tension across the loaf.
The Rolling Technique
Gently punch down your proofed dough to release any large pockets of carbon dioxide gas. Turn the dough onto a lightly floured work surface and divide it into three or four equal portions using a bench scraper. Roll each portion into a smooth ball, cover with plastic wrap, and let them rest for 15 minutes to relax the gluten.
Take one dough ball and use a rolling pin to flatten it into a long, flat oval. Fold the left third of the oval over the center, then fold the right third over that, creating a neat, narrow three-ply strip. Roll the strip up tightly from the bottom end into a clean cylinder. Repeat this rolling process for each portion of dough.
The Second Proof and Bake
Arrange the rolled cylinders side-by-side inside a greased 8.5×4.5-inch loaf pan, ensuring the seams face downward, as shown in the bottom-left pane of 1000005738.jpg. Cover the pan loosely and let the dough rise for a second time for 45 to 50 minutes, or until the highest points of the dough domes reach just above the rim of the baking tin.
Preheat your oven to 350°F (175°C). Using a pastry brush, gently apply a thin, even coat of your prepared egg wash across the entire top surface of the risen dough. Slide the pan onto the center rack of your oven and bake for 30 to 35 minutes. If the top crust browns too quickly around the 20-minute mark, loosely tent a piece of aluminum foil over the pan. Your bread is perfectly baked when the crust turns a rich mahogany gold and an instant-read thermometer inserted into the absolute center reads 195°F (90°C). Remove the pan from the oven and immediately brush the hot crust with a thin layer of melted butter to lock in a glossy, delicate shine.
Professional Slicing and Preservation Tips
To preserve the featherlight interior crumb structure displayed on the cutting board in 1000005738.jpg, handle the cooling process with care.
Slicing with Precision
Never slice into a loaf of milk bread while it is hot from the oven. Hot bread contains trapped steam that is still setting the interior gluten cells. Cutting it prematurely will crush the fragile crumb, turning what should be a fluffy slice into a gummy texture. Allow the loaf to rest in the pan for 10 minutes, then invert it onto a wire cooling rack to reach room temperature. When ready to serve, use a long, sharp serrated bread knife, sawing gently back and forth without pressing down firmly. This technique ensures clean, professional cuts that highlight the beautiful, tight crumb texture captured in the bottom-right panel of 1000005738.jpg.
Proper Storage Methods
To maintain the structural softness of your bread, store the remaining loaf in an airtight plastic bread bag or a tightly sealed container at room temperature for up to 4 to 5 days. Avoid storing homemade bread in the refrigerator, as cold environments accelerate starch retrogradation, drying out the crumb. For long-term enjoyment, slice the loaf completely, wrap the individual pieces tightly in plastic wrap, and store them in a heavy-duty freezer bag for up to 3 months, thawing slices in your toaster as needed.
Conclusion: A Masterpiece of Home Baking
Baking a flawless, ultra-fluffy loaf of milk bread is an incredibly rewarding milestone that brings professional bakery quality directly to your home kitchen. By utilizing the scientific principles of the Tangzhong starter paste, allowing your dough to knead into a strong elastic matrix, and shaping your loaf with uniform tension, you can easily replicate the stunning results shown in 1000005738.jpg. The beautiful balance of a glowing, golden-brown crust and a melt-in-your-mouth interior makes this recipe an absolute joy to bake and share. Prepare your baking station, enjoy the meditative process of kneading, and savor the magnificent aroma of fresh, fluffy sandwich bread warming your entire home.