Ultra Moist Chocolate Loaf Cake with Glossy Ganache Recipe
When it comes to satisfying a deep, undeniable chocolate craving, nothing beats a classic, dependable chocolate cake. However, many traditional recipes require multi-layered assemblies, delicate frosting techniques, and hours of intensive kitchen work. If you are looking for a dessert that delivers maximum cocoa intensity with an effortlessly elegant presentation, the ultimate solution is a rich, dense Chocolate Loaf Cake. Baking a chocolate cake in a standard loaf pan streamlines the process into an approachable everyday luxury while trapping essential moisture inside the crumb structure.
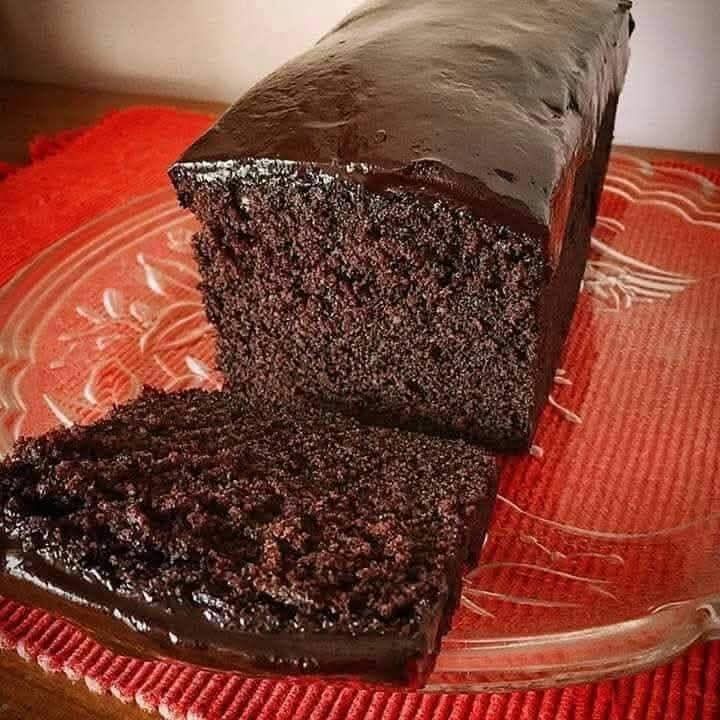
As beautifully showcased in the image 1000005689.jpg, this spectacular loaf features an ultra-moist, tender, and uniform interior crumb paired with a decadent, glass-like chocolate ganache glaze cascading over the top. It provides the perfect balance of a rustic, homemade look with a professional bakery-style finish. In this comprehensive baking guide, we will explore the science of keeping chocolate cakes moist, the role of premium cocoa powder, a foolproof step-by-step recipe, and expert kitchen secrets to ensure your glazed loaf turns out brilliantly every single time.
The Science of Moisture: Why This Loaf Remains Tender For Days
The most common pitfall when baking a chocolate cake—especially in a concentrated loaf pan—is dryness. Cocoa powder is naturally highly drying because it contains starches that absorb liquid during the baking process. To counteract this and achieve the velvety, luxurious texture displayed in 1000005689.jpg, this recipe relies on a specific combination of moisturizing agents.
The Role of Vegetable Oil vs. Butter
While butter provides a wonderful nostalgic flavor, vegetable oil is the ultimate secret weapon for long-lasting moisture in chocolate baking. Oil remains a liquid at room temperature, whereas butter solidifies. By utilizing a high-quality neutral vegetable oil, we ensure that the gluten strands remain coated and flexible, yielding a cake that feels incredibly soft, tender, and moist to the bite even three or four days after it has been baked.
Soursop or Buttermilk: The Acidic Secret
Introducing an acidic dairy product like buttermilk, sour cream, or plain yogurt plays a dual role in our batter. First, the natural acidity breaks down tight gluten networks, tenderizing the crumb structure instantly. Second, it reacts beautifully with our leavening agents, releasing carbon dioxide bubbles that help the dense loaf rise uniformly without losing its satisfying, fudge-like density.
Choosing Your Cocoa Powder: Natural vs. Dutch-Process
Your choice of cocoa powder will heavily dictate both the final color and the flavor profile of your loaf cake. Understanding the difference is crucial for achieving that deep, dark appearance highlighted in 1000005689.jpg.
Natural Cocoa Powder
Natural cocoa powder is made from roasted cocoa beans that are ground into a fine powder. It is naturally quite acidic, sharp, and features fruity, complex chocolate notes. Because it is acidic, it must be paired with baking soda to ensure proper rising. While it delivers an authentic, bright chocolate flavor, the color of the final cake will lean toward a lighter, warm reddish-brown.
Dutch-Process Cocoa Powder
Dutch-process cocoa powder has been treated with an alkaline solution to neutralize its natural acidity. This chemical alteration mellows the flavor, removing any sharp bitterness and yielding a smooth, intensely rich, and earthy chocolate taste reminiscent of a classic dark biscuit. It also darkens the cocoa dramatically. To achieve the deep, midnight-dark crumb color seen in the sliced portion of 1000005689.jpg, a high-quality Dutch-process cocoa powder is highly recommended.
Essential Kitchen Tools for Success
To replicate the clean, flawless presentation and smooth glaze application shown in the guide image, ensure you have these essential baking tools ready on your counter.
- An 8.5×4.5-Inch Standard Loaf Pan: The ideal size for creating a tall, beautifully domed chocolate loaf cake. Using a pan that is too large will cause the cake to spread thin and dry out faster.
- Parchment Paper: Essential for creating a “sling.” Lining your pan with parchment allows you to lift the delicate, glazed cake out cleanly without disturbing the fragile edges.
- A Fine-Mesh Sifter: Cocoa powder is notoriously prone to clumping. Sifting your dry ingredients is a mandatory step to prevent unmixed pockets of bitter cocoa throughout your baked crumb.
- A Wire Cooling Rack: Crucial for allowing the loaf to cool completely. Glazing a warm cake will cause the ganache to run right off the sides instead of setting into a thick, beautiful blanket.
Ingredients You Will Need
Assemble these simple, high-quality ingredients to create a chocolate masterpiece that tastes even better than it looks.
For the Rich Chocolate Loaf Cake:
- 1 and 1/2 cups All-Purpose Flour: Provides the perfect structural foundation.
- 1 cup Granulated Sugar: Sweetens and helps lock in moisture.
- 1/2 cup Dutch-Process Cocoa Powder: Sifted, for maximum dark chocolate flavor.
- 1 teaspoon Baking Powder and 1/2 teaspoon Baking Soda: Our dual leavening agents.
- 1/2 teaspoon Fine Sea Salt: Essential for balancing the sweetness and intensifying the cocoa notes.
- 2 Large Eggs: At room temperature, to bind the batter efficiently.
- 1/2 cup Whole Buttermilk or Plain Yogurt: Adds richness and tenderizes the gluten.
- 1/2 cup Neutral Vegetable Oil: (Canola, sunflower, or corn oil work perfectly).
- 1/2 cup Hot Brewed Coffee or Boiling Water: The absolute secret to blooming cocoa powder and intensifying the chocolate flavor.
For the Ultra-Glossy Chocolate Ganache:
- 1/2 cup Semisweet Chocolate Chips or Finely Chopped Baking Chocolate: Forms the rich base of the glaze.
- 1/3 cup Heavy Whipping Cream: Creates a smooth, pourable consistency.
- 1 tablespoon Light Corn Syrup or Honey: The ultimate bakery secret for achieving that brilliant, mirror-like gloss seen in 1000005689.jpg.
Step-by-Step Instructions: From Bowl to Plate
Follow these detailed baking steps carefully to achieve a picture-perfect chocolate loaf cake with an immaculate finish.
Step 1: Prepare the Oven and Pan
Preheat your oven to 350°F (175°C) and position your oven rack in the center. Lightly grease your loaf pan with butter or cooking spray, then line it with a strip of parchment paper, leaving an inch of overhang on the long sides to act as handles later on.
Step 2: Whisk the Dry Base
In a large mixing bowl, combine the all-purpose flour, granulated sugar, sifted Dutch-process cocoa powder, baking powder, baking soda, and fine sea salt. Whisk vigorously for a full minute to ensure the leavening agents and cocoa are distributed uniformly through the flour.
Step 3: Combine the Wet Elements
In a separate medium bowl, whisk together the eggs, vegetable oil, and buttermilk until completely smooth and homogenous.
Step 4: Mix and Bloom with Coffee
Pour the wet egg-and-oil mixture into the bowl of dry ingredients. Using a silicone spatula or a wooden spoon, fold gently until just combined. The batter will appear quite thick. Slowly pour in the hot brewed coffee or boiling water, whisking gently until a smooth, thin, and pourable batter forms. The hot liquid activates and “blooms” the cocoa powder, releasing trapped aromatic oils for a vastly superior chocolate experience.
Step 5: Bake to Perfection
Pour the thin chocolate batter directly into your prepared loaf pan. Bake in the preheated oven for 45 to 55 minutes. To test for doneness, insert a wooden toothpick into the exact center of the loaf. It should come out clean or with a few moist crumbs attached—if there is wet batter on the toothpick, bake for an additional 3 to 5 minutes.
Step 6: Cool Completely
Remove the loaf from the oven. Let it rest inside the hot pan for 10 to 15 minutes to allow the structure to firm up. Using the parchment paper handles, gently lift the cake out of the pan and transfer it onto a wire cooling rack. Allow it to cool completely to room temperature before glazing.
Step 7: Craft the Glossy Ganache
Place the chopped chocolate or chocolate chips into a small, heat-safe glass bowl. In a small saucepan over medium heat, bring the heavy whipping cream and corn syrup just to a simmer (do not let it boil). Pour the hot cream directly over the chocolate. Let it sit completely undisturbed for 2 minutes to melt the chocolate gently, then whisk from the center outward until a smooth, thick, and highly glossy glaze forms.
Step 8: Glaze and Set
Slowly pour the warm ganache directly down the center ridge of your cooled chocolate loaf cake, allowing it to naturally cascade down the sides in thick, elegant ribbons, perfectly replicating the look of 1000005689.jpg. Let the glaze set at room temperature for 20 to 30 minutes before transferring the loaf onto a decorative glass platter. Slice cleanly with a sharp knife and serve!
Pro Baking Tips for a Flawless Finish
- The Power of Coffee: Do not worry—your cake will not taste like coffee! The addition of hot coffee simply deepens and highlights the natural earthy tones of the cocoa powder, making the chocolate taste far more robust and profound.
- Don’t Overmix: Once you pour the hot liquid into your batter, mix only until the flour pockets disappear. Overmixing overworks the flour proteins, leading to a tough, rubbery cake structure rather than a melt-in-your-mouth crumb.
- Achieve the Perfect Slice: To get clean, sharp slices like the one displayed in the foreground of 1000005689.jpg, wipe your knife blade clean with a warm, damp paper towel between every single cut. This prevents the sticky ganache from muddying up the beautiful interior crumb.
Creative Recipe Variations to Try
Once you have perfected this foundational chocolate loaf, consider adding these fun flavor twists to customize your baking routine.
The Double Chocolate Crunch
Fold 1/2 cup of mini semi-sweet chocolate chips into the finished batter right before pouring it into the loaf pan. The chips melt into rich, gooey pockets throughout the cake, providing an extra layer of texture.
The Chocolate Orange Zest Loaf
Whisk the freshly grated zest of one large orange directly into your granulated sugar before mixing the dry base. The bright, citrus oils cut through the rich cocoa beautifully, creating a classic, sophisticated flavor pairing.
The Salted Caramel Drizzle
Right after pouring your glossy chocolate ganache over the top of the loaf, drizzle a few tablespoons of warm, homemade salted caramel sauce in a zigzag pattern across the top. Sprinkle a few flakes of Maldon sea salt over the wet glaze for a modern, gourmet touch.
Nutritional Breakdown (Per Slice)
This recipe yields approximately 10 generous slices.
| Nutrient | Amount Per Serving |
|---|---|
| Calories | 310 kcal |
| Total Fat | 15g |
| Saturated Fat | 5g |
| Cholesterol | 40mg |
| Sodium | 190mg |
| Total Carbohydrates | 42g |
| Dietary Fiber | 2g |
| Sugars | 26g |
| Protein | 4g |
Conclusion: The Ultimate Chocolate Indulgence
This Ultra-Moist Chocolate Loaf Cake is a magnificent testament to the idea that home baking can be simple, stress-free, and profoundly elegant all at once. By replacing butter with oil and utilizing hot coffee to bloom your premium cocoa powder, you guarantee an incredibly moist, uniform crumb structure that stays fresh for days. As demonstrated so beautifully in 1000005689.jpg, finishing the loaf with a rich, mirror-like chocolate ganache elevates a humble afternoon tea cake into a show-stopping dessert worthy of any celebratory table. Whether you are slicing it up for a casual weekend treat or presenting it as a formal dinner conclusion, this effortless recipe is guaranteed to capture the hearts of chocolate lovers everywhere. Dust off your favorite loaf pan, whip up a batch of glossy ganache, and enjoy a pure, decadent slice of bliss today!