No-Knead Multi Seed Glass Bowl Bread The Easiest Homemade Loaf Recipe
There is something deeply satisfying about the aroma of freshly baked bread wafting through a kitchen. For many home bakers, however, the traditional bread-making process can feel incredibly intimidating. Hours spent laboring over a counter kneading sticky dough, complex scoring techniques, and the fear of a flat, dense loaf often keep people relying on store-bought alternatives. What if you could bypass the stress entirely and create a artisanal, rustic loaf packed with nutritious seeds using just a simple mixing bowl and a spoon?
Enter the No-Knead Multi-Seed Glass Bowl Bread. As beautifully captured in the step-by-step image 1000005684.jpg, this revolutionary baking method eliminates the need for intense physical labor and specialized equipment. By utilizing a high-hydration dough and baking directly within a heat-safe glass bowl, you create a self-contained oven environment that yields a perfectly soft, airy crumb structure on the inside and a golden, seed-encrusted crust on the outside. In this comprehensive guide, we will break down the science of no-knead fermentation, explore the nutritional benefits of adding whole seeds to your crumb, and walk through a foolproof recipe designed for beginners and seasoned bakers alike.
The Magic of No-Knead Baking: How Time Does the Work
To understand why this recipe works so beautifully without a single minute of traditional kneading, we have to look at the chemistry of bread dough. In standard bread recipes, mechanical kneading is used to cross-link two essential proteins found in wheat flour: gliadin and glutenin. When combined with water and worked by hand, these proteins align to form a strong, elastic network called gluten. This gluten network acts like a series of tiny balloons, trapping the carbon dioxide gas bubbles produced by your yeast, allowing the bread to rise.
With the no-knead method shown in 1000005684.jpg, we completely substitute physical labor with time and high water content. When a wet dough is allowed to ferment slowly over several hours, the water molecules move naturally between the flour proteins, aligning them into a stable gluten structure on their own. This passive fermentation process allows the enzymes within the flour to break down complex starches into simple sugars more efficiently. Not only does this create an incredibly light and airy interior crumb, but it also develops a deeper, more complex flavor profile that rivals artisanal sourdough.
Why Bake Bread Directly in a Glass Bowl?
The visual demonstration in 1000005684.jpg highlights one of the most innovative aspects of this recipe: mixing, rising, and baking the bread all within the same heat-safe glass dish. This approach offers several unique advantages for the home baker.
- Minimized Cleanup: Traditional bread baking requires mixing bowls, proofing baskets, a clean countertop for kneading, and a baking sheet or Dutch oven. This method streamlines everything into one vessel, minimizing cleanup and keeping your countertops entirely mess-free.
- Perfect Structural Support: High-hydration no-knead doughs can occasionally be difficult to handle because they are wet and loose. By proofing and baking the dough directly inside a glass bowl, the walls of the bowl provide constant structural support, forcing the dough to expand upwards rather than spreading out flat on a baking sheet.
- Excellent Heat Distribution: Quality borosilicate glass distributes heat remarkably evenly. As the bread bakes, the glass vessel helps cook the exterior layers gently, building a uniform, thin, golden crust all the way around the loaf without burning the bottom.
Elevating Your Loaf: The Nutritional Power of Seeds
What truly sets this particular loaf apart is the generous inclusion of a multi-seed blend mixed straight into the wet dough and sprinkled across the top crust, as seen in the slicing sequence of 1000005684.jpg. Incorporating seeds doesn’t just add a delightful, nutty crunch and rustic visual appeal; it drastically elevates the nutritional density of your daily bread.
Flaxseeds (Linseeds)
Flaxseeds are an absolute powerhouse of alpha-linolenic acid (ALA), a plant-based omega-3 essential fatty acid. When mixed into the moist environment of our no-knead dough, flaxseeds absorb water and form a slight gel-like coating, which helps retain interior moisture during the baking process, ensuring your bread stays soft and fresh for days.
Sunflower Seeds
Sunflower seeds provide a robust, nutty flavor profile that intensifies beautifully when toasted in the oven’s heat. They are rich in vitamin E, a powerful fat-soluble antioxidant that supports skin health and immune function, alongside essential minerals like magnesium and selenium.
Sesame Seeds
Whether you choose white or black varieties, sesame seeds bring a distinct aroma and crisp texture to the outer crust. They are packed with healthy fats, dietary fiber, and plant sterols that support cardiovascular health, while providing a stunning contrast against the golden-brown baked top.
Ingredients You Will Need
To replicate the beautiful, seed-studded loaves shown in 1000005684.jpg, assemble these simple, wholesome ingredients.
- 3 and 1/4 cups All-Purpose Flour or Bread Flour: Bread flour provides a slightly higher protein content, yielding a bit more chew, while all-purpose flour creates a lighter, tender crumb.
- 1 and 1/2 cups Lukewarm Water: Around 100°F to 105°F (38°C to 40°C). Water that is too hot will kill your yeast, while cold water will drastically slow down the rise time.
- 1 teaspoon Active Dry Yeast or Instant Yeast: A small amount is all that is required for a slow, steady fermentation.
- 1 and 1/2 teaspoons Fine Sea Salt: Essential for regulating yeast activity and bringing out the natural wheat flavors.
- 1 tablespoon Honey or Maple Syrup: Provides a hint of sweetness and serves as an immediate food source to activate the yeast quickly.
- 1/4 cup Raw Sunflower Seeds: Divided between the dough mixture and the crust topping.
- 2 tablespoons Whole Flaxseeds: Mixed directly into the dough base.
- 2 tablespoons Sesame Seeds: Used primarily for a crunchy, aromatic topping on the crust.
Step-by-Step Instructions: From Bowl to Table
Follow these steps carefully to master the wet-mix technique and beautiful presentation captured in the 1000005684.jpg guide.
Step 1: Activate the Yeast
In a small cup or bowl, combine the lukewarm water, honey, and yeast. Stir gently and let it sit undisturbed for 5 to 7 minutes. You will know your yeast is healthy and active when a thick, frothy, tan layer of foam develops across the surface of the water.
Step 2: Mix the Dry Base
In a large, oven-safe glass bowl (ensure it is rated for temperatures up to 425°F/220°C), whisk together the flour, sea salt, flaxseeds, and half of the sunflower seeds. Mixing the seeds thoroughly into the dry flour ensures they distribute evenly throughout the dough rather than clumping together at the bottom.
Step 3: Combine into a Sticky Dough
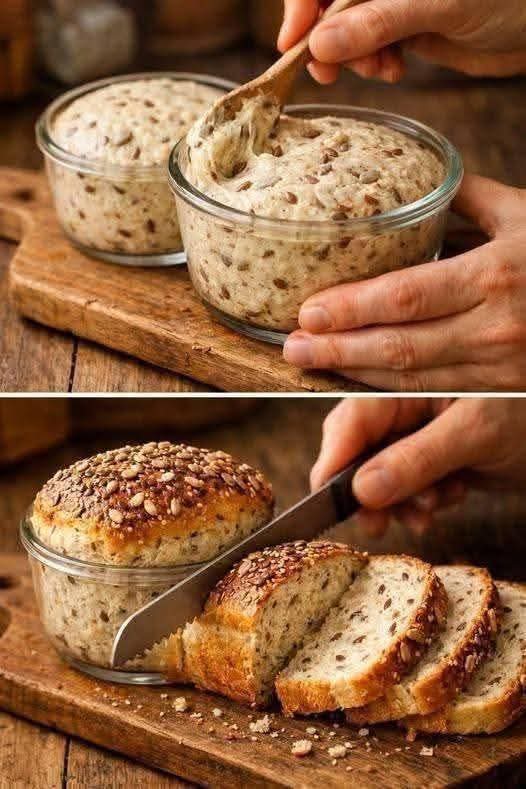
Pour the activated yeast mixture directly into the glass bowl with the dry ingredients. Using a sturdy wooden spoon or a silicone spatula, mix the ingredients together thoroughly. As demonstrated in the top panel of 1000005684.jpg, you are looking for a thick, wet, and shaggy dough texture that clings easily to your spoon. There is no need to worry about smoothing it out; just ensure there are no pockets of dry flour left at the bottom of the bowl.
Step 4: The Long Bulk Rise
Scrape down the sides of the glass bowl. Cover the bowl tightly with plastic wrap or a damp kitchen towel to trap the internal moisture. Place the bowl in a warm, draft-free spot in your kitchen and let it rise for 2 to 3 hours. During this period, the dough will expand dramatically, double in size, and develop a beautiful, bubbly, airy surface texture.
Step 5: Add the Crust Topping
Once the dough has fully expanded, remove the plastic wrap. The dough will be highly delicate and full of air pockets. Gently brush the top surface with a teaspoon of water or oil, then generously scatter the remaining sunflower seeds and sesame seeds evenly over the top, recreating the dense, textured crust seen in the lower panel of 1000005684.jpg.
Step 6: Bake to Golden Perfection
Place the glass bowl directly into a cold oven, then turn the temperature setting to 400°F (205°C). Allowing the glass bowl to heat up gradually alongside the oven prevents thermal shock to the glass and gives the yeast one final burst of activity, known as “oven spring,” resulting in a taller loaf. Bake for 40 to 45 minutes until the crust turns deep golden-brown and the seeds are fragrant and perfectly toasted.
Step 7: Cool and Slice Cleanly
Remove the bowl from the oven and let the bread rest inside the glass for 10 minutes. Run a thin butter knife gently around the inner perimeter to release the edges, then turn the loaf out onto a wire cooling rack. Allow the bread to cool completely for at least 30 minutes before slicing. As shown in the lower portion of 1000005684.jpg, slicing through a cooled loaf ensures clean, uniform slices with an intact, beautifully aerated interior crumb structure.
Pro Baking Tips for No-Knead Success
- Check Your Glassware Rating: Always verify that your glass mixing bowl is explicitly labeled as oven-safe or borosilicate glass. Standard decorative glass bowls can shatter under intense oven heat. Brands like Pyrex or Anchor Hocking are excellent choices for this specific technique.
- Adjusting for Sticky Dough: If your kitchen environment is naturally humid, your dough might appear slightly wetter than the texture shown in 1000005684.jpg. Feel free to dust the top surface with an extra tablespoon of flour before adding your seeds to help give the crust a uniform, sturdy structure.
- Listen to the Loaf: Want to verify your bread is fully baked inside without cutting into it? Tap the bottom crust firmly with your knuckles. If it sounds completely hollow, your bread is perfectly baked and ready to cool.
Delicious Recipe Variations to Explore
Once you have mastered the foundational seed loaf, you can easily alter the mix-ins to create entirely unique flavor experiences for your household.
The Savory Herb and Cheese Bowl
Fold 1/2 cup of cubed sharp cheddar cheese, a teaspoon of dried rosemary, and a half-teaspoon of garlic powder directly into the flour mixture before adding your liquid. The cheese cubes melt during baking, creating gooey pockets of savory flavor throughout the crumb.
The Sweet Cranberry Walnut Loaf
Omit the savory seeds entirely. Instead, fold in 1/3 cup of dried cranberries, 1/3 cup of chopped raw walnuts, and an extra tablespoon of honey into the wet dough. This variation makes for an incredible breakfast toast when paired with whipped cream cheese or sweet butter.
The Hearty Rye and Caraway Classic
Substitute 1 cup of your white flour with 1 cup of dark rye flour, and add a tablespoon of whole caraway seeds to the dry mixture. This creates a deeply aromatic, traditional European-style loaf that pairs wonderfully with warm winter soups and sliced deli meats.
Nutritional Breakdown (Per Slice)
This recipe yields approximately 12 generous slices.
| Nutrient | Amount Per Serving |
|---|---|
| Calories | 185 kcal |
| Total Fat | 4.5g |
| Saturated Fat | 0.5g |
| Cholesterol | 0mg |
| Sodium | 290mg |
| Total Carbohydrates | 30g |
| Dietary Fiber | 2.5g |
| Sugars | 1.5g |
| Protein | 6g |
Conclusion: Redefining Homemade Bread
The No-Knead Multi-Seed Glass Bowl Bread completely redefines what it means to bake at home. By stripping away the labor-intensive steps of traditional bread-making and replacing them with the hands-off magic of time and hydration, anyone can achieve bakery-quality results right in their own kitchen. The stunning visual progression in 1000005684.jpg proves that you do not need expensive tools or a culinary degree to create a striking, nutrient-dense loaf with a perfectly tender interior and an ultra-crunchy, seed-encrusted crust. Whether you are slicing it fresh for morning avocado toast or using it to scoop up a hearty Sunday stew, this incredibly simple technique is guaranteed to become a permanent favorite in your weekly baking routine. Grab your favorite glass bowl, mix up a quick shaggy dough tonight, and enjoy the effortless reward of homemade artisanal bread tomorrow!