Ultimate Cheesy Garlic Potato Stacks Recipe The Perfect Crispy Side Dish
When it comes to ultimate comfort food, potatoes consistently claim the crown. Whether mashed, roasted, or fried, they are the versatile canvas of the culinary world. However, if you are looking to elevate your side dish game to gourmet levels without spending hours in the kitchen, there is one preparation that stands above the rest: Cheesy Garlic Potato Stacks. This spectacular dish takes the best elements of a classic potato gratin—creamy interiors, rich garlic flavor, and a bubbly golden cheese crust—and reimagines them into perfectly portioned, elegant individual towers.
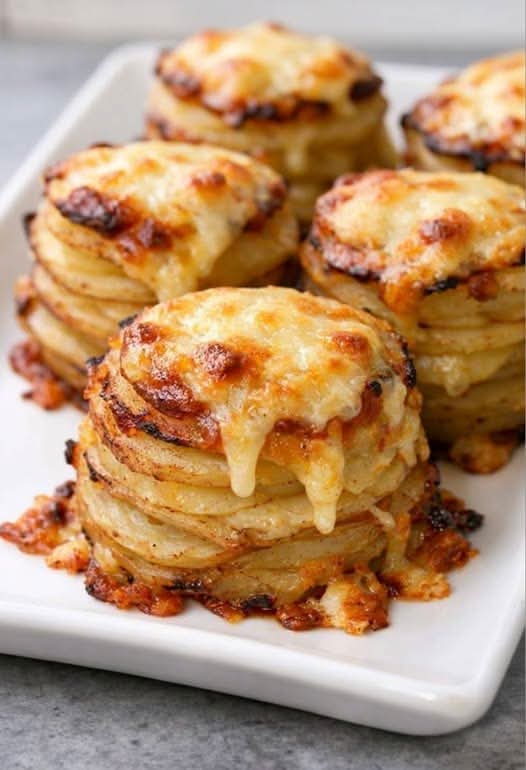
As captured beautifully in the image 1000005674.jpg, these potato stacks feature paper-thin slices layered carefully, baked until the edges turn golden-brown and crispy, and finished with a generous crown of melted, caramelized cheese. They are sophisticated enough to serve at a high-end dinner party, yet simple enough to become a staple for your cozy family Sunday roasts. In this comprehensive guide, we will dive deep into the science of choosing the right potato, the essential tools you need to achieve those perfect layers, a foolproof step-by-step recipe, and expert culinary tips to ensure your potato stacks turn out flawlessly every single time.
Why You Will Love This Cheesy Garlic Potato Stacks Recipe
There is a reason this specific presentation has taken the culinary world by storm. It offers a unique sensory experience that traditional potato bakes simply cannot match. When you bake potatoes in individual stacks using a standard muffin tin, you maximize the surface area exposed to the heat of the oven. This creates an incredible contrast in textures that makes every single bite exciting.
The exterior edges of each micro-thin potato slice become incredibly crispy, almost resembling a premium hand-cooked kettle chip. Meanwhile, the interior layers remain protected, steaming gently in a mixture of melted butter, heavy cream, infused fresh garlic, and aromatic herbs. This creates a melt-in-your-mouth, velvety texture on the inside that beautifully balances the crunch of the outer ridges. Combined with the gooey, savory topping of melted cheese seen in 1000005674.jpg, this dish delivers an absolute explosion of textures and comforting flavors.
The Science of the Perfect Potato: Which Variety to Choose
Before you grab the first bag of potatoes you see at the grocery store, it is important to understand that the variety of potato you choose will heavily dictate the final texture of your stacks. Potatoes generally fall into three categories: starchy, waxy, and all-purpose. For this specific recipe, your choice matters immensely because we need a balance of structural integrity and creamy tenderness.
Russet Potatoes: The King of Crispiness
Russet potatoes are high-starch, low-moisture potatoes. When sliced thin and baked, their high starch content allows the edges to crisp up beautifully, while the interiors absorb the butter and cream efficiently. If your ultimate goal is a stack with maximum crunch on the outside and a fluffy, light interior, Russets are an excellent choice. However, because they break down easily, you must ensure your cream mixture has enough binding power to hold the towers together.
Yukon Gold Potatoes: The Creamy Champion
Yukon Golds are medium-starch, all-purpose potatoes, and they are widely considered the absolute best choice for making garlic potato stacks. They possess a naturally rich, buttery flavor and a dense, smooth texture. When sliced thinly, Yukon Golds hold their shape remarkably well throughout the long baking process. They absorb the garlic-infused cream without becoming grainy or mushy, resulting in a luxurious, velvety interior that mimics a high-end scalloped potato dish.
Avoid Waxy Potatoes
Varieties like Red Bliss or fingerling potatoes have low starch and high moisture content. While they are fantastic for potato salads or boiling because they hold their shape perfectly, they do not crisp up well in the oven and will not absorb the cream and butter matrix properly. Stick to Yukon Golds or Russets to achieve the magnificent results displayed in 1000005674.jpg.
Essential Kitchen Tools for Success
To replicate the professional, uniform layers seen in the recipe image, having the right kitchen tools on hand will make your prep work much faster and your final presentation far more consistent.
- A Mandoline Slicer: While you can technically use a sharp chef’s knife, a mandoline slicer is the ultimate secret weapon for this recipe. It allows you to slice your potatoes to a precise, uniform thickness (ideally between 1/16 and 1/8 of an inch). Uniform thickness ensures that every layer of the potato stack cooks at the exact same rate, preventing raw centers or burnt edges.
- A Standard 12-Cup Muffin Tin: A non-stick muffin pan is essential for keeping your potato towers standing tall. As the potatoes bake and soften, they naturally want to lean or slide apart. The individual cups of a muffin tin provide the perfect structural support, forcing the slices to compress downward into a neat, compact cylinder.
- A Pastry Brush: You will use this to generously coat the individual muffin cups with melted butter or oil, ensuring easy removal once the stacks are fully baked.
- A Small Whisk and Saucepan: For gently warming your cream, butter, and garlic together to infuse the flavors evenly before pouring the mixture over your potato layers.
Ingredients You Will Need
To create these restaurant-quality cheesy garlic potato stacks, you will need a handful of simple, high-quality ingredients that combine to create a deeply satisfying flavor profile.
For the Potato Base:
- 3 lbs Yukon Gold Potatoes: Medium-sized potatoes work best, as their diameter fits perfectly inside standard muffin tin cups.
- 4 tablespoons Unsalted Butter: Melted, used for rich flavor and to promote crispiness.
- 3 tablespoons Heavy Whipping Cream: Adds a touch of luxurious moisture to keep the inside layers tender.
- 4 cloves Fresh Garlic: Finely minced or pressed (avoid garlic powder here for the best aromatic results).
- 1 teaspoon Fresh Thyme Leaves: Finely chopped (rosemary or oregano also work beautifully).
- 1 teaspoon Fine Sea Salt: Crucial for drawing out moisture and enhancing the natural potato flavors.
- 1/2 teaspoon Freshly Cracked Black Pepper: Adds a subtle, warming bite.
For the Cheese Topping:
- 1 cup Gruyère or Sharp Cheddar Cheese: Freshly shredded. Gruyère provides a classic, nutty, gourmet flavor that melts perfectly.
- 1/2 cup Freshly Grated Parmesan Cheese: Adds a salty, umami-rich crust to the exterior of the stacks.
Step-by-Step Instructions: How to Build the Perfect Stacks
Follow these detailed steps carefully to achieve the stunning contrast of the crispy edges and gooey cheese topping showcased in 1000005674.jpg.
Step 1: Prep Your Oven and Pan
Preheat your oven to 375°F (190°C). Position your oven rack in the center position to ensure even heat distribution. Take your 12-cup muffin tin and use a brush to generously coat the bottom and sides of each cup with a little bit of the melted butter. This creates a non-stick barrier and helps crisp up the bottom layers of your potatoes.
Step 2: Slice the Potatoes
Scrub your Yukon Gold potatoes thoroughly under cold water. You can choose to peel them or leave the skins on; leaving the skins on adds a rustic look and extra texture to the crispy edges. Using your mandoline slicer adjusted to roughly 1/8-inch thickness, carefully slice all the potatoes into uniform rounds. Place the slices into a large mixing bowl.
Step 3: Infuse the Aromatics
In a small saucepan over low heat, combine the remaining melted butter, heavy cream, minced fresh garlic, and chopped thyme leaves. Heat gently for 2 to 3 minutes just until the garlic becomes highly fragrant, making sure the butter does not brown. Remove from heat and stir in the sea salt and freshly cracked black pepper.
Step 4: Toss and Coat
Pour the warm garlic-herb cream mixture directly over the bowl of sliced potatoes. Using your hands or a pair of tongs, gently toss the potato slices until every single round is thoroughly coated in the butter and cream mixture. Ensure that individual slices aren’t stuck tightly together, so the seasoning distributes perfectly between the layers.
Step 5: Stack Them Up
Pick up a handful of potato slices and begin stacking them into the prepared muffin cups. Layer them one by one, filling each cup slightly above the rim, as the potatoes will shrink down considerably as they bake and lose moisture. Try to place larger slices at the bottom and center, saving smaller slices for the top of the stack. If there is any leftover garlic cream at the bottom of your mixing bowl, spoon it evenly over the tops of the assembled stacks.
Step 6: The First Bake (Covered)
Cover the muffin tin tightly with a sheet of aluminum foil. This traps the steam escaping from the potatoes, ensuring that the interior layers cook through completely and become incredibly tender without the tops burning. Bake in the preheated oven for 30 minutes.
Step 7: The Second Bake (Uncovered)
Carefully remove the aluminum foil. You will notice the potato stacks have compressed downward. Return the uncovered tin to the oven and bake for an additional 15 to 20 minutes. During this stage, the edges of the potato slices will begin to turn a beautiful golden brown and become delightfully crispy.
Step 8: Add the Cheese and Broil
In a small bowl, mix the shredded Gruyère (or cheddar) and grated Parmesan cheese together. Carefully remove the muffin tin from the oven and divide the cheese blend generously across the top of each potato stack. Return the pan to the oven, or turn on your oven’s broiler to high. Broil for 3 to 4 minutes, watching very closely, until the cheese is completely melted, bubbling, and features beautiful deep golden-brown spots, just like the gorgeous visualization in 1000005674.jpg.
Step 9: Rest and Serve
Remove the pan from the oven and let the potato stacks rest inside the muffin tin for 5 to 10 minutes. This resting period allows the cheese to set slightly and the interior starches to cool down just enough to lock the layers together. Run a thin offset spatula or a butter knife carefully around the edges of each cup to release them, lift them out gently, and arrange them on your serving platter.
Expert Tips for the Ultimate Potato Stacks
- Mind the Squeeze: When placing the potato stacks into the serving platter, handle them gently. If you notice a stack is leaning slightly, you can gently press it back into alignment with a spatula while the cheese is still warm and pliable.
- Do Not Skimp on Salt: Potatoes absorb an incredible amount of salt. If you under-season the cream mixture, your stacks will taste bland despite all the garlic and cheese. Make sure to taste your cream mixture before pouring it over the potatoes; it should taste distinctly savory.
- Freshly Shred Your Cheese: Avoid using pre-packaged shredded cheese from the grocery store. Pre-shredded cheeses are coated in cellulose and anti-caking agents, which prevent them from melting smoothly. Shredding a block of Gruyère or sharp cheddar by hand yields that ultra-gooey, professional cheese pull seen in 1000005674.jpg.
Flavor Variations to Try
Once you master the base recipe, you can easily customize these garlic potato stacks to match whatever main course you are serving.
The Loaded Bacon Stack
Stir 1/4 cup of finely crumbled cooked bacon and a tablespoon of chopped fresh chives into your cream mixture before coating the potatoes. Top with sharp cheddar cheese and a dollop of sour cream right before serving for a gourmet twist on a loaded baked potato.
The Mediterranean Infusion
Substitute the butter with a high-quality extra virgin olive oil. Infuse the oil with minced garlic, dried oregano, and lemon zest. Top the stacks with a mixture of crumbled feta cheese and mozzarella for a bright, tangy flavor profile that pairs excellently with roasted lamb or grilled chicken.
The Truffle Luxury
For an ultra-luxurious side dish perfect for the holidays, drizzle a teaspoon of high-quality white truffle oil into your butter and cream mixture. Pair it with aged Gruyère and a sprinkle of fresh Italian flat-leaf parsley at the very end to create an unforgettable, earthy flavor experience.
Nutritional Breakdown (Per Serving)
This recipe yields 6 servings (2 potato stacks per serving).
| Nutrient | Amount Per Serving |
|---|---|
| Calories | 280 kcal |
| Total Fat | 16g |
| Saturated Fat | 10g |
| Cholesterol | 45mg |
| Sodium | 480mg |
| Total Carbohydrates | 28g |
| Dietary Fiber | 3g |
| Sugars | 2g |
| Protein | 8g |
Conclusion: The Ultimate Side Dish Upgrade
Cheesy Garlic Potato Stacks are the ultimate marriage of culinary technique and pure comfort food. By taking humble ingredients like potatoes, garlic, cream, and cheese, and utilizing the structure of a simple muffin tin, you create a side dish that delivers an exceptional contrast of crispy and creamy textures. As displayed in 1000005674.jpg, the stunning visual appeal of individual golden towers topped with melted, caramelized cheese will instantly elevate any dinner table. Whether you are hosting an elegant holiday gathering or simply elevating your weekend comfort food routine, this recipe is guaranteed to impress your guests and leave everyone asking for seconds. Whip out your mandoline slicer, fire up your oven, and prepare to experience potatoes like never before!