The Ultimate Guide to Making Perfect Homemade Sesame Flatbread
There is nothing quite like the aroma of freshly baked bread wafting through your home. It fills every room with a sense of warmth, comfort, and culinary nostalgia. While many home cooks feel intimidated by yeast doughs, baking artisan-quality bread at home is incredibly achievable with the right technique. Among the world’s most beloved baked goods, traditional golden sesame flatbread stands out as a versatile, flavorful masterpiece that anyone can master.
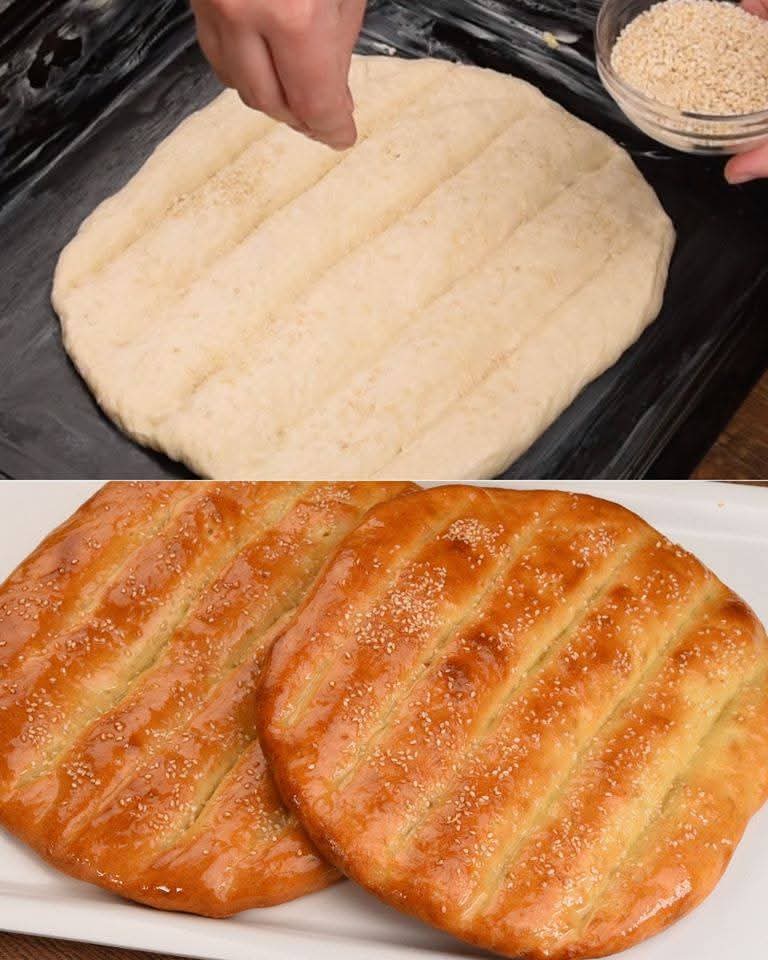
As shown in the process image 1000005548.jpg, this bread transitions from a simple, hand-shaped dough into a stunning, deeply golden, glossy flatbread with characteristic vertical indentations and a generous dusting of toasted sesame seeds. The final result yields a beautifully soft interior surrounded by a crisp, shiny crust that pairs perfectly with hearty family dinners, fresh dips, or a simple smear of butter. In this comprehensive guide, we will break down the science of making the perfect flatbread, walk through an easy-to-follow recipe, and share expert baking secrets to ensure your loaves turn out picture-perfect every single time.
Why You Should Make Flatbread from Scratch
Baking bread at home offers benefits that go far beyond what you can buy in a grocery store aisle. Commercial breads are often loaded with preservatives, artificial dough conditioners, and excess sugar to prolong shelf life. When you bake your own flatbread from scratch, you retain total control over the ingredients, ensuring a wholesome and natural product for your family.
Beyond health considerations, the culinary experience of home baking is unmatched. Homemade flatbread has a superior texture—soft and pillowy on the inside with a delightful chew. The flavor developed during the natural fermentation process gives it a rich, authentic taste that store-bought varieties simply cannot replicate. Furthermore, it is an incredibly budget-friendly staple made from basic pantry items that costs pennies per loaf to produce.
Understanding the Ingredients: The Science of Bread Making
To achieve the beautiful rise and golden crust visible in 1000005548.jpg, it helps to understand how each ingredient functions within the dough. Baking is a science, and every component plays a critical role in the final texture and appearance of your bread.
The Foundation: Flour and Water
Flour provides the structural framework for your flatbread. When wheat flour is mixed with water, two proteins—gliadin and glutenin—combine to form gluten. Gluten creates an elastic network that traps the carbon dioxide gas produced by the yeast, allowing the dough to rise and expand. For a soft yet chewy flatbread, unbleached all-purpose flour or bread flour works best. The water activates the yeast and hydrates the protein and starch molecules. Using warm water, ideally between 105°F and 110°F, is essential to wake up the yeast without killing it.
The Leavening and Flavor: Yeast, Sugar, and Salt
Active dry yeast or instant yeast serves as the leavening agent. Yeast consumes sugars and releases carbon dioxide gas and alcohol as byproducts, a process known as fermentation. Adding a small amount of granulated sugar or honey to the yeast mixture provides instant food for the yeast, speeding up the activation process. Salt is equally vital; it does not just add flavor, but it also tightens the gluten structure and regulates the yeast activity, preventing the dough from rising too quickly and collapsing.
The Secret to Tenderness and Shine: Fat and Glaze
Incorporating olive oil or softened butter into the dough coats the gluten strands, shortening them slightly. This results in a more tender crumb, preventing the flatbread from becoming excessively tough or rubbery. The brilliant, reflective sheen on the baked loaves in 1000005548.jpg is achieved through a simple egg wash or a starch-water glaze brushed onto the dough immediately before baking. This glaze locks in moisture and caramelizes rapidly under the high heat of the oven, producing a stunning presentation.
Step-by-Step Homemade Sesame Flatbread Recipe
This foolproof recipe yields two large, beautiful flatbreads. It requires minimal active time and uses standard kitchen equipment. Follow these steps carefully to achieve the exact look and texture featured in the reference photo 1000005548.jpg.
Ingredients Needed
For the Dough:
- 4.5 cups unbleached all-purpose flour (or bread flour)
- 1 packet (2.25 teaspoons) active dry yeast
- 1.5 cups warm water (105°F–110°F)
- 1 tablespoon granulated sugar
- 1.5 teaspoons fine sea salt
- 3 tablespoons extra virgin olive oil (plus extra for greasing)
For the Topping and Glaze: - 1 large egg beaten with 1 tablespoon of water (or 2 tablespoons of warm milk)
- 3 tablespoons raw hulled sesame seeds
Step 1: Activating the Yeast
In a large mixing bowl or the bowl of a stand mixer, combine the warm water, granulated sugar, and active dry yeast. Stir gently and let the mixture sit undisturbed for 5 to 10 minutes. As the yeast wakes up, it will begin to foam and bubble. If your mixture does not become frothy, your water may have been too hot, or your yeast may be expired. In this case, discard the mixture and start fresh to ensure your bread rises correctly.
Step 2: Mixing and Kneading the Dough
Once the yeast is nice and foamy, add the olive oil and sea salt to the bowl. Gradually add the flour, one cup at a time, stirring with a wooden spoon or using the dough hook attachment on your mixer. Keep mixing until a cohesive, slightly sticky dough forms and clears the sides of the bowl.
Turn the dough out onto a lightly floured clean work surface. Knead the dough firmly by hand for 8 to 10 minutes (or 5 to 6 minutes in a stand mixer). To knead by hand, push the dough away from you with the heels of your hands, fold it back over itself, turn it 90 degrees, and repeat. The dough is ready when it transitions from shaggy and rough to completely smooth, supple, and elastic. It should spring back slowly when poked with a finger.
Step 3: The First Rise
Shape the kneaded dough into a smooth ball. Lightly oil a large, clean bowl with a teaspoon of olive oil and place the dough inside, turning it once to coat all sides with oil. Cover the bowl securely with plastic wrap or a clean, damp kitchen towel to prevent a dry skin from forming on the dough. Place the bowl in a warm, draft-free spot in your kitchen. Allow the dough to rise for roughly 1 to 1.5 hours, or until it has fully doubled in size.
Step 4: Shaping and Creating the Signature Ridges
Once doubled, gently punch down the dough to release the built-up gases. Turn it out onto your work surface and divide it into two equal portions. Shape each portion into a smooth round ball.
Line a large baking sheet with parchment paper or grease it thoroughly with oil or butter, as displayed in the top panel of 1000005548.jpg. Place a dough ball onto the baking sheet and use the palms of your hands to gently press and stretch it out into a large oval or rounded flatbread shape, roughly half an inch in thickness.
To create the classic rustic appearance shown in the image, use the sides of your fingers or the edge of your hand to press deep, vertical lines into the dough, leaving equal spaces between each ridge. Press firmly down to the baking sheet without tearing completely through the dough. These indentations prevent the flatbread from ballooning up like a pita pocket in the oven, keeping it flat and uniformly textured.
Step 5: The Second Rise
Cover the shaped flatbreads loosely with a lightweight kitchen towel. Let them rest for 20 to 30 minutes at room temperature. This second rise allows the gluten to relax and the dough to puff up slightly around the indentations, which accentuates the beautiful ridged pattern during the baking process. While the dough rests, preheat your oven to 425°F (220°C). A fully preheated, hot oven is crucial for achieving an immediate oven spring and a crisp crust.
Step 6: Glazing and Adding Sesame Seeds
Just before baking, gently reinforce the vertical indentations with your fingers if they puffed up too much during the rest. Using a pastry brush, generously coat the entire surface of the flatbread with your egg wash or milk glaze. Be thorough, ensuring the wash gets into the ridges for uniform coloring.
As demonstrated in the top section of 1000005548.jpg, take a handful of raw sesame seeds and sprinkle them evenly across the top of the glazed dough. The wet glaze acts as a natural glue, locking the sesame seeds in place so they do not fall off after baking.
Step 7: Baking to Golden Perfection
Slide the baking sheet into the center rack of your preheated oven. Bake at 425°F for 15 to 20 minutes. Keep a close eye on the oven during the last few minutes of baking. The flatbreads are finished when they develop a rich, deep golden-brown color and a glossy exterior, perfectly mirroring the finished loaves in the bottom panel of 1000005548.jpg. When you tap the bottom of a loaf, it should sound slightly hollow. Remove the flatbreads from the oven and transfer them immediately to a wire cooling rack to prevent the bottom crusts from turning soggy.
Pro Tips for the Best Homemade Flatbread
Achieving bakery-standard results requires attention to detail. Keep these expert baking tips in mind to maximize your success:
- Weigh Your Flour: Cup measurements can vary wildly depending on how tightly packed the flour is. For the most accurate results, use a digital kitchen scale. One cup of all-purpose flour averages 120 grams.
- Create a Warm Proofing Environment: If your kitchen is cool, your dough will rise slowly. You can create an ideal proofing box by placing your covered bowl inside an unlit oven alongside a large pan of boiling water. The trapped steam creates a warm, humid environment perfect for yeast.
- Don’t Skimp on the Glaze: The glossy, caramelized look seen in 1000005548.jpg relies heavily on the glaze. For a deeper mahogany color, use a whole egg beaten with a splash of heavy cream. For a vegan alternative, brush the dough with a mixture of maple syrup and warm water.
- Experiment with Toppings: While sesame seeds offer a classic, nutty flavor profile, you can customize your flatbread. Try adding nigella seeds, poppy seeds, flaky sea salt, or a sprinkle of za’atar seasoning to vary the flavor.
How to Serve and Store Your Flatbread
This golden sesame flatbread is at its absolute peak when served warm, just a few minutes out of the oven. Slice it into thick strips following the natural vertical ridges to make perfect dipping pieces. It serves as an incredible accompaniment to Mediterranean mezze platters, loaded hummus, Tzatziki, or warm garlic herb oils. It is also sturdy enough to be split open for gourmet sandwiches or used as a quick, thick crust for artisan homemade flatbread pizzas.
If you have leftovers, allow the flatbread to cool completely to room temperature before storing. Wrap the bread tightly in plastic wrap or place it in an airtight container to keep it soft. It will store beautifully at room temperature for up to 3 days. To revive the crisp crust and pillowy texture, avoid the microwave, which can make yeast breads rubbery. Instead, reheat individual slices in a 350°F oven or a toaster oven for 3 to 5 minutes until warmed through. For long-term storage, wrap the flatbread in foil, place it in a heavy-duty freezer bag, and freeze for up to three months. Thaw at room temperature and warm in the oven before serving.
Conclusion
Baking bread at home is a deeply rewarding culinary art form. By transforming humble ingredients like flour, water, and yeast into the stunning, aromatic loaves shown in 1000005548.jpg, you bring an authentic, artisanal touch to your family table. The distinct vertical ridges, glossy finish, and perfectly toasted sesame seeds elevate this flatbread from a simple side dish to the star of any meal. Gather your ingredients, follow the steps, and enjoy the unmatched satisfaction of slicing into your own fresh, warm, homemade flatbread.