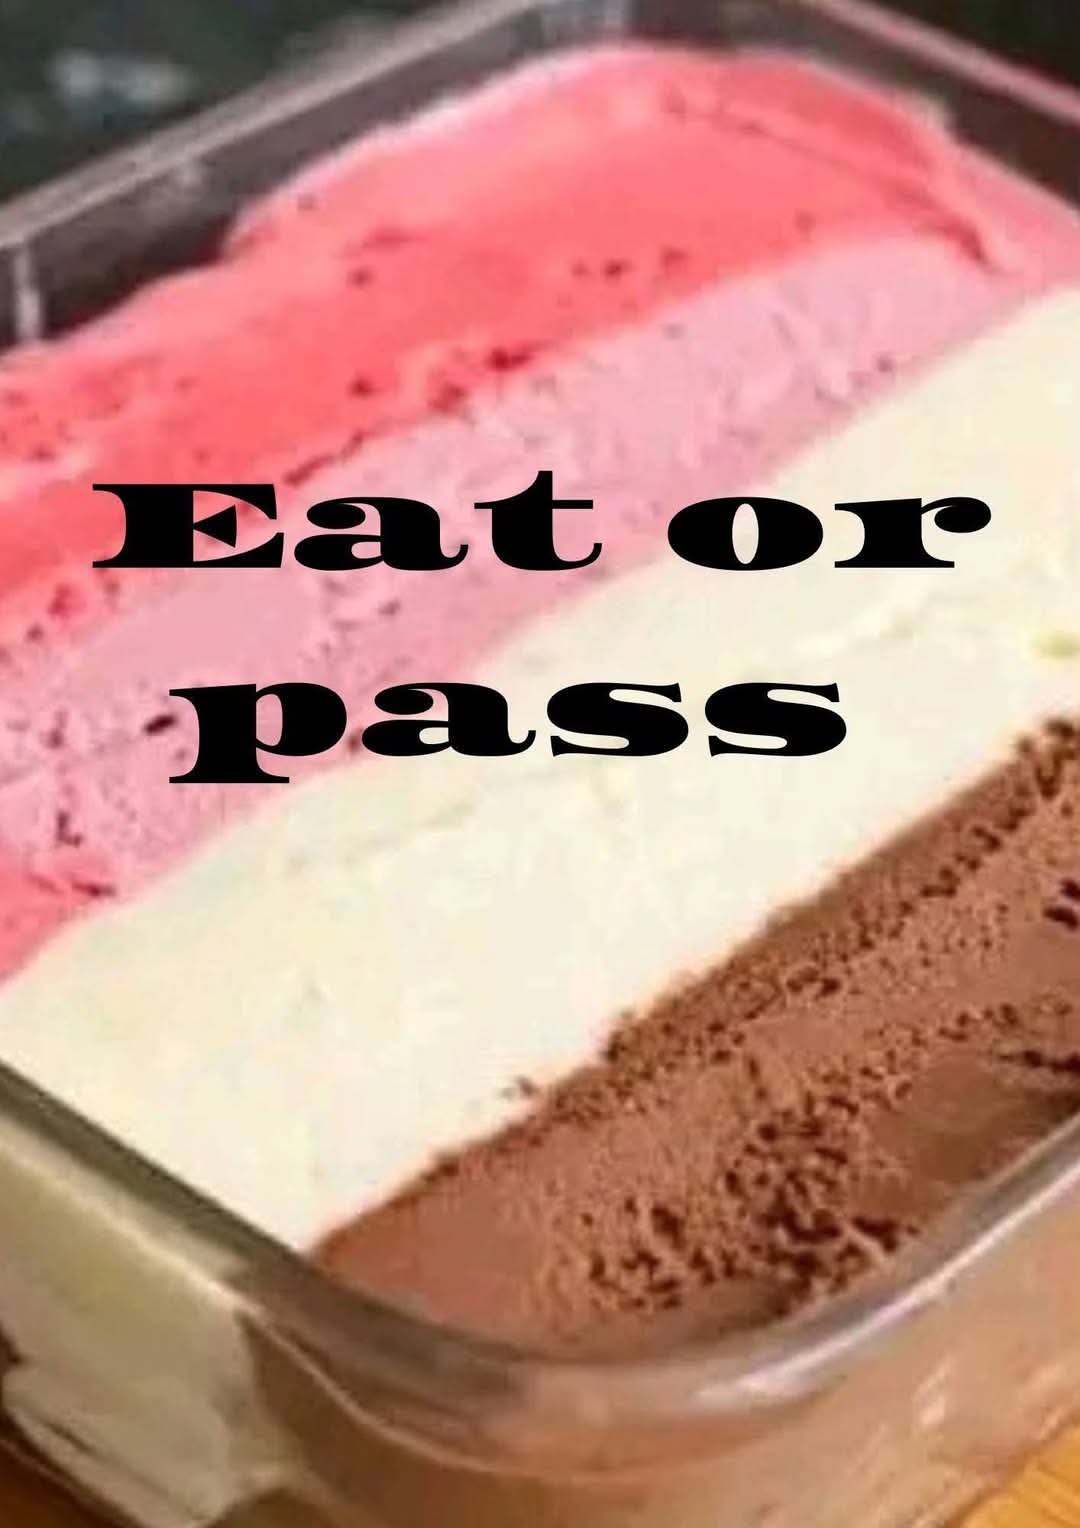
Who doesn’t love Neapolitan ice cream? With its signature trio of strawberry, chocolate, and vanilla, this timeless treat delivers the best of all worlds in every bite. Creamy, sweet, and nostalgic, Neapolitan ice cream is the go-to dessert when you just can’t decide on a single flavor.
And while it’s easy to buy a tub from the store, making your own homemade Neapolitan Ice Cream is a fun, satisfying project—no churning or fancy equipment required. This version starts with a simple whipped cream base and separates into three flavored layers, each one creamy, sweet, and perfectly indulgent.
Whether you’re impressing guests, cooling off on a hot day, or giving the kids a dessert to remember, this layered ice cream is a show-stopper. Best of all, it’s completely customizable and freezer-friendly.
🛒 Ingredients – What You’ll Need
For the ice cream base:
600 ml whipping cream (cold, full-fat for best results)
1 can (14 oz) sweetened condensed milk
1 tsp vanilla extract
For the chocolate layer:
3 tbsp unsweetened cocoa powder
1–2 tbsp milk (optional, for smoother blending)
For the strawberry layer:
1/2 cup fresh or frozen strawberries (pureed)
1–2 tbsp sugar, to taste
A few drops of red or pink food coloring (optional, for color boost)
Optional toppings: mini chocolate chips, chopped strawberries, sprinkles
🍦 Equipment You’ll Need
Hand or stand mixer
Mixing bowls (3 total)
Spatula
Loaf pan or freezer-safe container
Plastic wrap or lid
Blender or food processor (for strawberries)
⏱️ Time & Yield
- Prep Time: 25 minutes
- Chill Time: 6–8 hours or overnight
- Total Time: ~8 hours
- Yield: About 1.5 quarts
- Servings: 6–8 scoops
👩🍳 How to Make Neapolitan Ice Cream – Step-by-Step
Step 1: Whip the Cream
Pour the cold whipping cream into a mixing bowl. Using a hand mixer or stand mixer, whip until stiff peaks form—about 3–4 minutes.
Step 2: Fold in Condensed Milk & Vanilla
Gently fold in the sweetened condensed milk and vanilla extract with a spatula. This is your creamy base.
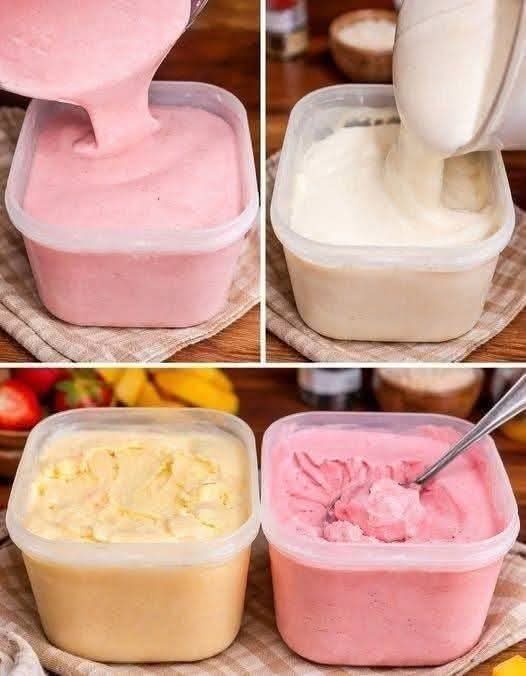
Step 3: Divide into Three Flavors
Split the ice cream base evenly into three bowls.
For the Vanilla Layer:
This one’s done! Leave one bowl as-is for the classic vanilla flavor.
For the Chocolate Layer:
Add cocoa powder to the second bowl. Mix until fully blended. Add a bit of milk if it’s too thick to stir easily.
For the Strawberry Layer:
Blend or puree your strawberries with sugar until smooth. Stir into the third bowl. Add a drop of red food coloring if you want a brighter hue.
Step 4: Layer in the Pan
In a loaf pan or freezer-safe dish, gently spoon the strawberry layer into the bottom and smooth it out. Next, add the chocolate layer, followed by the vanilla layer on top. Smooth each layer with a spatula as you go.
Tip: For neater layers, freeze each one for 30–60 minutes before adding the next.
Step 5: Freeze
Cover the pan with plastic wrap or a lid and freeze for at least 6–8 hours or overnight until firm.
Step 6: Scoop and Serve!
Let the ice cream sit at room temperature for 5–10 minutes before scooping for the best texture. Serve in cones, bowls, or make an old-fashioned ice cream sandwich!
💡 Tips & Tricks for Perfect Neapolitan Ice Cream
Use full-fat cream – This creates the rich, creamy texture you love.
Don’t overmix – After whipping the cream, gently fold in ingredients to keep the volume.
Sweeten your fruit – If strawberries are tart, a little sugar balances the flavor.
Freeze each layer briefly – Helps avoid colors and flavors blending.
Add chunks or swirls – Try mini chocolate chips in chocolate, diced berries in strawberry, or caramel swirls in vanilla.
❄️ How to Store
Keep the ice cream covered in a freezer-safe container. It’ll last for up to 2 weeks—if it doesn’t disappear first! For best texture, allow it to sit at room temp for a few minutes before serving.
🥄 Serving Ideas
Make this Neapolitan treat extra fun with these serving suggestions:
Classic scoops in sugar cones or waffle bowls
Ice cream sandwiches using cookies or brownies
Sundae bar with chocolate sauce, whipped cream, and sprinkles
Layered milkshake – blend one flavor at a time for a colorful drink
Ice cream cake – freeze into a cake pan, then slice and serve
🧁 Kid-Friendly, Crowd-Friendly & Totally Customizable
Neapolitan ice cream is one of those timeless desserts that appeals to all ages. Kids love the color and flavor variety, while adults enjoy the nostalgia. And best of all, you can make it your own:
Try raspberry, mocha, and almond for a gourmet twist
Use matcha, mango, and coconut for tropical vibes
Go bold with blueberry, caramel, and peanut butter
It’s a choose-your-own-flavor adventure in frozen dessert form!
🌈 Fun Fact: Where Did Neapolitan Ice Cream Come From?
Neapolitan ice cream is said to have originated in the late 1800s, inspired by Italian immigrants from Naples, who brought with them their love of layered and colorful desserts. The trio of chocolate, vanilla, and strawberry was chosen to reflect America’s most popular flavors at the time—and over a century later, they still reign supreme.
❤️ Final Thoughts
This Homemade Neapolitan Ice Cream brings all the joy of the original—but made from scratch, it’s even creamier, fresher, and more delicious. It’s a perfect project to make with kids, a nostalgic dessert for summer nights, and a beautiful freezer treat that’ll impress at any gathering.
Creamy vanilla. Sweet strawberry. Rich chocolate. All in one dreamy scoop.
So grab your mixing bowls and treat yourself to a dessert that’s stood the test of time—made better with your own hands.
Did you try this recipe?
Tag your photos with #HomemadeNeapolitanLove or drop a comment below. I’d love to hear how you customized your layers!
More Recipes You Might Like
-
Homemade No Churn Ice Cream Recipe Creamy Easy, and Delicious
Homemade No-Churn Ice Cream Recipe: Creamy, Easy, and Delicious Introduction Nothing beats the taste of homemade ice cream, especially when it’s incredibly creamy, requires no ice cream machine, and can be made with just a few simple ingredients. This homemade no-churn ice cream recipe is perfect for anyone who loves frozen desserts but wants an…
-

Hearty Lentil Vegetable Soup Recipe A Healthy, Comforting Bowl of Goodness
Hearty Lentil Vegetable Soup Recipe: A Healthy, Comforting Bowl of Goodness Introduction When it comes to nutritious comfort food, few dishes can compete with a hearty lentil vegetable soup. Packed with protein-rich lentils, colorful vegetables, and flavorful herbs, this wholesome soup is the perfect meal for chilly evenings, busy weekdays, or whenever you’re craving something…
-
Moist Fruit Cake Recipe The Ultimate Homemade Fruit Cake Guide
Moist Fruit Cake Recipe: The Ultimate Homemade Fruit Cake Guide Introduction A moist fruit cake is one of the most beloved traditional desserts around the world. Packed with sweet dried fruits, juicy raisins, and colorful fruit pieces, this cake delivers a rich flavor and tender texture that makes it perfect for holidays, family gatherings, celebrations,…