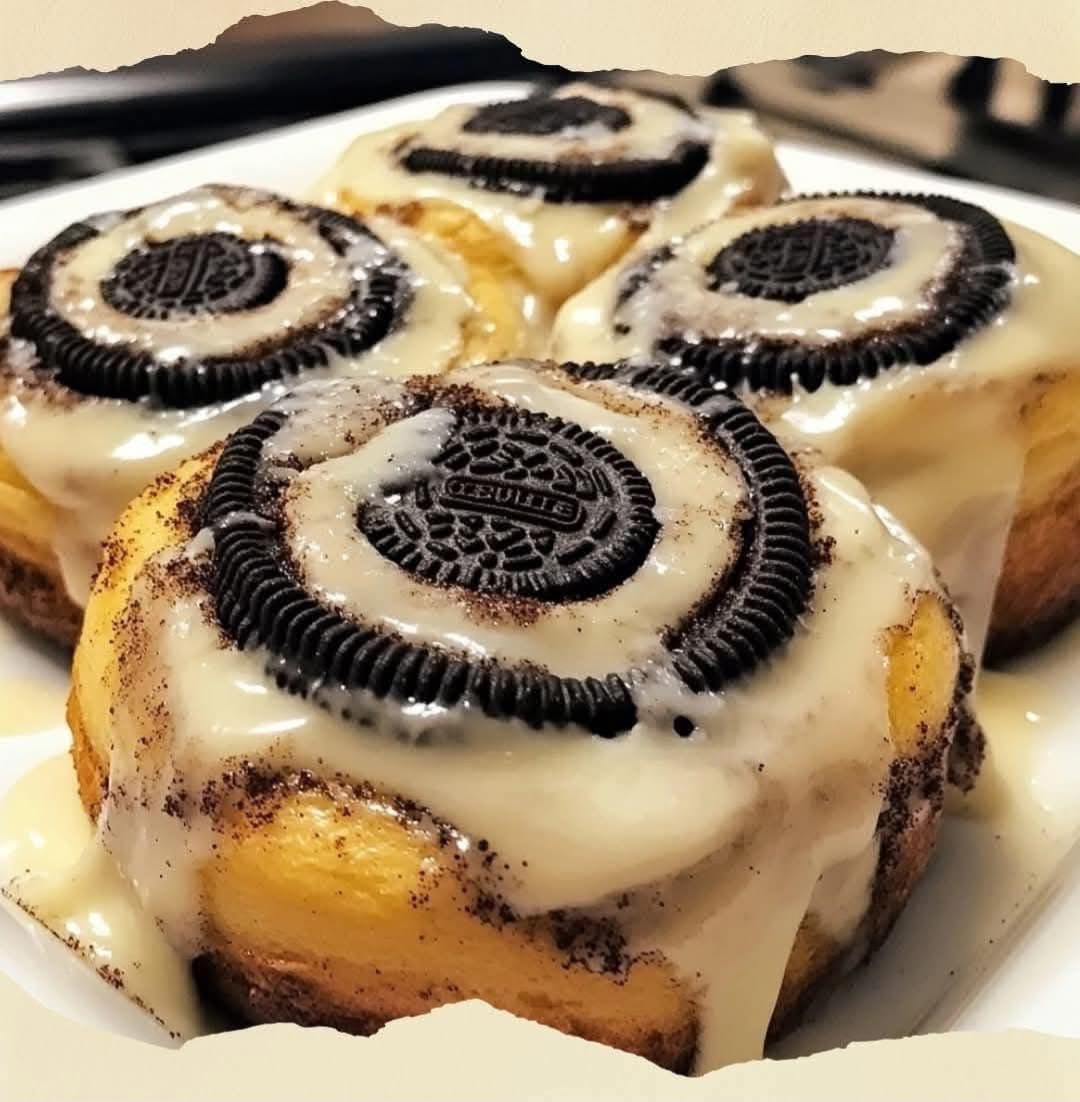
If you love cinnamon rolls and Oreos, then these Oreo Stuffed Cinnamon Rolls are about to become your new favorite indulgence! This simple yet irresistible recipe combines the soft, gooey texture of cinnamon rolls with the rich, chocolatey crunch of Oreos. The result? A decadent, bakery-worthy treat that’s perfect for breakfast, dessert, or a sweet snack.
What makes this recipe even better is how quick and easy it is to make—using refrigerated cinnamon rolls cuts down on prep time, while the Oreo filling adds a fun, unexpected twist. Whether you’re making these for a family brunch, a holiday treat, or just because you deserve something sweet, these stuffed rolls will not disappoint!
Why This Recipe Works
✔ Minimal Effort, Maximum Flavor – Using store-bought cinnamon rolls saves time without sacrificing taste.
✔ Oreo Lovers’ Dream – The crushed Oreos create a rich, chocolatey filling that melts into the rolls as they bake.
✔ Perfect Texture – The soft, pillowy cinnamon rolls contrast beautifully with the crunchy Oreo bits.
✔ Customizable – Add chocolate drizzle, extra crushed Oreos, or even whipped cream for an over-the-top treat.
Ingredients
For the Rolls:
1 can (8-count) refrigerated cinnamon rolls (with icing)
10 Oreo cookies, crushed (about 1 cup)
2 tablespoons melted butter
For the Filling:
1/4 cup (50 g) granulated sugar
1 teaspoon ground cinnamon
For the Topping (Optional):
Extra Oreo crumbs
Chocolate drizzle (melted chocolate or chocolate syrup)
Whipped cream
How to Make Oreo Stuffed Cinnamon Rolls
Step 1: Preheat the Oven
Preheat your oven to 375°F (190°C). Lightly grease a baking dish or line it with parchment paper to prevent sticking.
Step 2: Prepare the Cinnamon Rolls
Open the can of refrigerated cinnamon rolls and separate them. Set aside the icing packet for later.
Using your hands or a rolling pin, gently flatten each roll to create more space for the filling.
Step 3: Make the Oreo Filling
In a small bowl, mix the crushed Oreos with melted butter until well combined.
Spoon about 1-2 tablespoons of the Oreo mixture into the center of each flattened cinnamon roll.
Step 4: Stuff and Shape the Rolls
Carefully fold the edges of the cinnamon roll dough over the Oreo filling, pinching to seal the filling inside.
Roll each stuffed dough piece back into a ball shape to help maintain a round, fluffy texture while baking.
Step 5: Coat in Cinnamon Sugar
In a small bowl, mix together the granulated sugar and cinnamon.
Roll each stuffed cinnamon roll in the cinnamon sugar mixture, coating them evenly.
Step 6: Bake the Rolls
Place the stuffed cinnamon rolls into the prepared baking dish, leaving a little space between each one.
Bake for 15-20 minutes, or until the rolls are golden brown and cooked through.
Step 7: Add the Icing and Toppings
Remove the rolls from the oven and drizzle the included icing over the top while they’re still warm.
For an extra touch, sprinkle with additional crushed Oreos or drizzle with melted chocolate or chocolate syrup.
If you’re feeling indulgent, add a dollop of whipped cream before serving!
Tips + Tricks & More for Recipe Success
✔ Use Double-Stuf Oreos – If you love extra creaminess, use Double-Stuf Oreos for an even richer filling.
✔ Try Different Oreo Flavors – Switch it up by using Golden Oreos, Mint Oreos, or Peanut Butter Oreos for unique variations.
✔ Make Them Extra Gooey – For a softer, gooier center, slightly underbake the rolls by 1-2 minutes.
✔ Don’t Skip the Cinnamon Sugar Coating – This step adds extra flavor and texture, making these rolls even more delicious!
✔ Serve Warm – These are best enjoyed fresh and warm, but you can also reheat leftovers in the microwave for 10-15 seconds.
Serving Suggestions
These Oreo Stuffed Cinnamon Rolls are delicious on their own, but here are a few fun ways to serve them:
☕ With a Hot Beverage – Pair them with a cup of coffee, hot cocoa, or a glass of milk for a comforting treat.
🍦 With Ice Cream – Serve warm rolls with a scoop of vanilla ice cream for an indulgent dessert.
🍓 With Fresh Fruit – Balance the sweetness by serving with sliced strawberries or raspberries.
Storage & Reheating
Storing:
Keep leftovers in an airtight container at room temperature for up to 2 days, or refrigerate for up to 5 days.
Reheating:
Microwave for 10-15 seconds for a warm, gooey texture.
Reheat in a toaster oven at 300°F (150°C) for 5 minutes to maintain a slightly crispy edge.
Final Thoughts
These Oreo Stuffed Cinnamon Rolls are a must-try for any dessert lover! The combination of soft, sweet cinnamon dough and rich Oreo filling makes them a standout treat that’s easy to make and guaranteed to impress. Whether you’re making them for a weekend brunch, a special occasion, or just because you’re craving something sweet, these rolls will hit the spot every time!
More Articles You Might Like
-

The Ultimate Guide to Homemade Pickled Crisp Summer Vegetable Salad
The Ultimate Guide to Homemade Pickled Crisp Summer Vegetable Salad As the warm weather settles in, our bodies naturally crave meals that are light, refreshing, and vibrant. Spending hours over a hot stove loses its appeal, making crunchy, chilled side dishes the true stars of the season. If you are searching for a foolproof way…
-
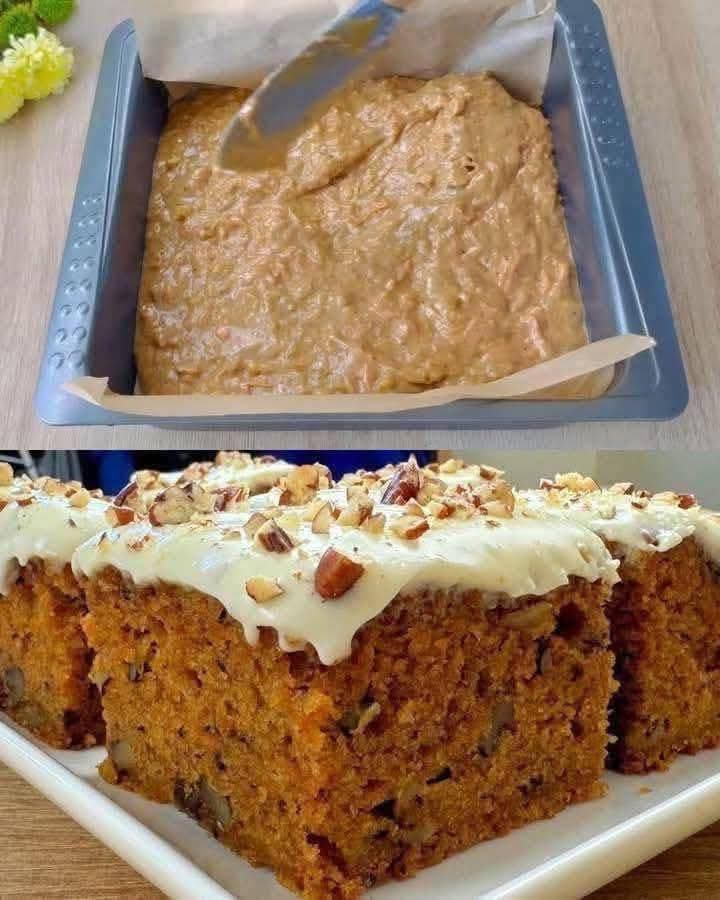
The Ultimate Classic Carrot Cake with Cream Cheese Frosting
The Ultimate Classic Carrot Cake with Cream Cheese Frosting When it comes to traditional baking, few desserts evoke the same sense of warmth, nostalgia, and pure comfort food indulgence quite like a perfectly baked carrot cake. A truly great carrot cake is a study in textures and balanced flavors—it should be incredibly moist, tightly packed…
-
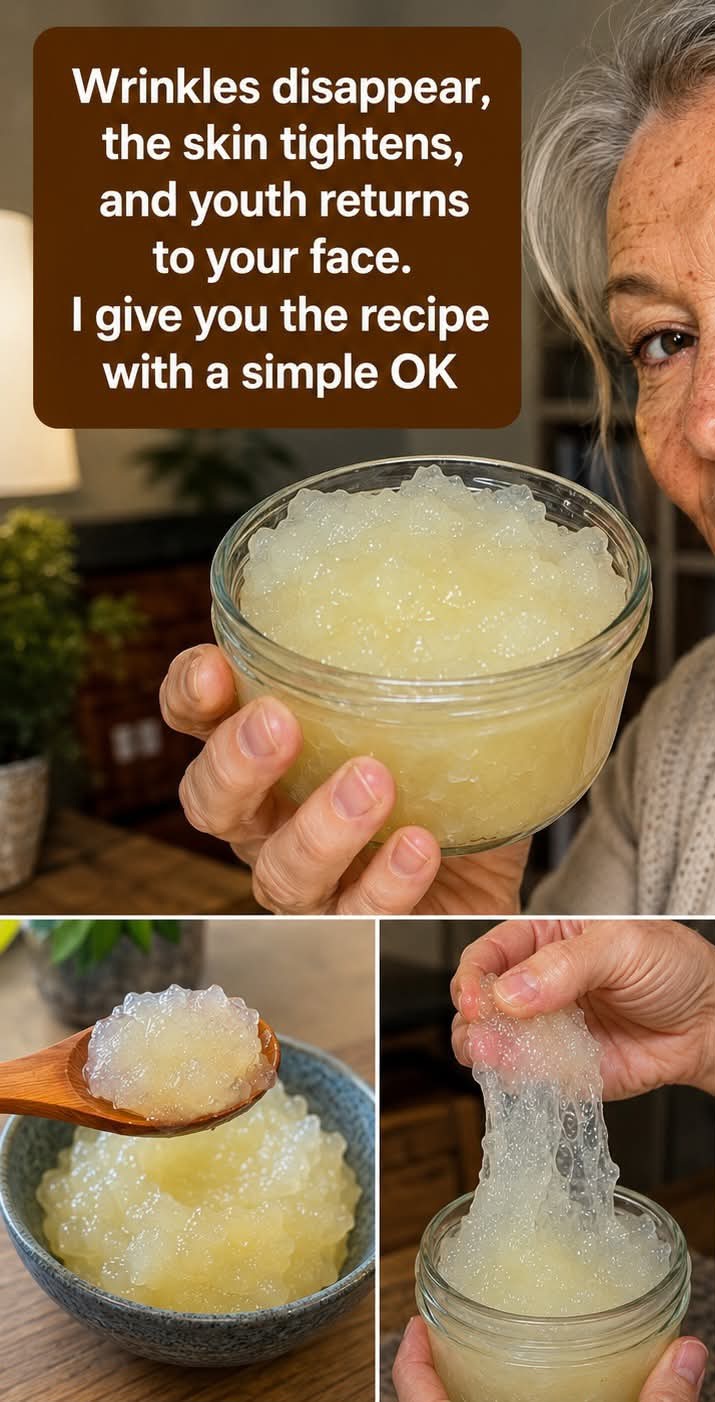
The Science of Sea Moss Gel for Aging Skin Fact vs Fiction
The Science of Sea Moss Gel for Aging Skin Fact vs Fiction As the years pass, maintaining a radiant, firm, and smooth complexion becomes a primary goal for many skincare enthusiasts. The natural aging process, combined with environmental stressors like sun exposure and pollution, gradually depletes our skin’s underlying structural framework. Recently, viral trends on…