Orchids are a stunning addition to any home, with their delicate blooms and graceful appearance. But to maintain these beautiful plants and ensure they thrive, you need to understand their unique needs. Whether you’re a beginner or have some experience with orchids, these expert tips from a master orchid grower will help you achieve vibrant, long-lasting flowers. Let’s dive in!
1. Choose the Right Orchid
The first step in orchid care is choosing the right variety for your skill level and growing conditions. While orchids are often perceived as delicate, there are varieties that are easier to care for than others. For beginners, Phalaenopsis orchids, also known as moth orchids, are a great choice due to their resilience and relatively simple care needs.
Before purchasing any orchid, be sure to research its specific needs—such as light, temperature, and watering preferences—so that you can set it up for success.
2. Perfect the Potting Mix
Orchids are unique in that they don’t thrive in standard potting soil. Instead, they need a well-draining potting mix that allows air to reach their roots. A typical orchid mix includes ingredients like bark, perlite, and sphagnum moss, which mimic the conditions they would naturally grow in, such as trees or rocks where the roots can breathe.
Avoid using soil meant for other plants, as it can retain too much moisture and suffocate the orchid’s roots. Regularly check your potting mix to ensure it isn’t breaking down into too fine of a texture, which can reduce drainage.
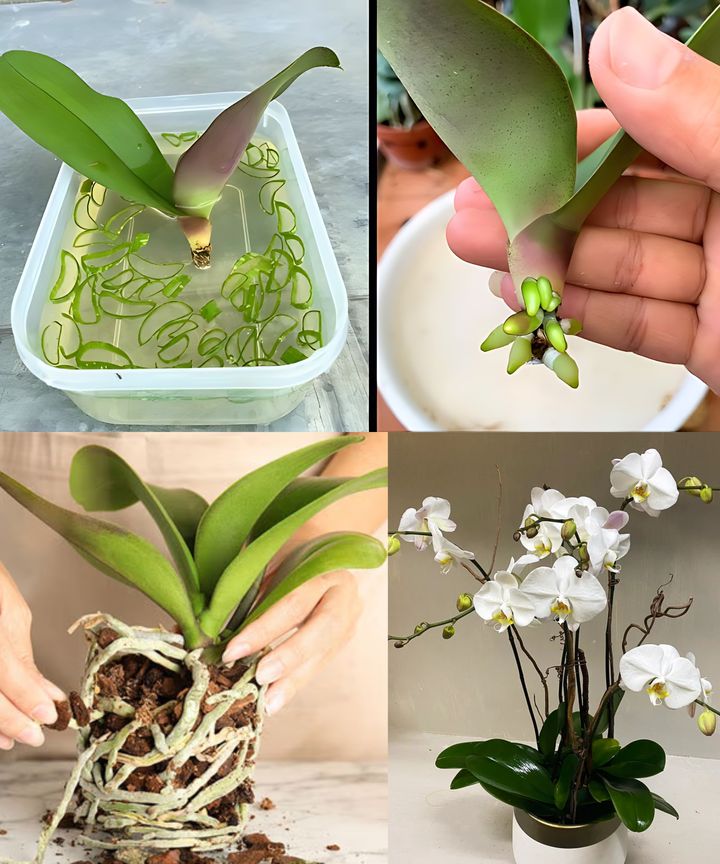
3. Potting and Repotting
To promote healthy growth, orchids need pots that allow for good drainage. When selecting a pot, look for one with several holes at the bottom. You’ll also want to choose a container that’s just slightly larger than the root ball to prevent water from accumulating.
Repotting should occur every 1-2 years, ideally after your orchid finishes blooming. This will prevent the roots from becoming cramped and allow the plant to continue thriving. When repotting, be sure to gently remove any dead or rotting roots and replace the old potting mix with fresh material.
4. Water Wisely
Watering orchids is an art! Too much water can lead to root rot, while too little can cause dehydration. The best way to determine when to water is to feel the potting mix. If it feels dry to the touch, it’s time to water. Typically, this will be about once a week, but it can vary depending on your orchid’s environment.
Use room-temperature rainwater, distilled water, or dechlorinated tap water. Orchids are sensitive to chemicals like chlorine, so avoid using untreated tap water if possible. When watering, ensure that the pot drains well and doesn’t leave standing water, as this can lead to root rot.
5. Maintain Humidity and Airflow
Orchids love humidity, but they also need proper airflow to prevent fungal and bacterial growth. Ideally, humidity levels should be between 50-70%. If your home is on the dry side, you can increase humidity by using a humidity tray (a shallow tray filled with water and pebbles), a room humidifier, or by grouping plants together, as they will create a micro-environment of higher humidity.
A fan can also be helpful to circulate the air around your orchids, ensuring that moisture doesn’t build up on their leaves or flowers.
6. Provide Proper Light and Temperature
Light and temperature are key to orchid health. Orchids need bright, indirect light, which you can find in an east or south-facing window. Avoid placing them in direct sunlight, as this can scorch the leaves. If the light is too weak, your orchid may not bloom properly.
Temperature plays a crucial role in blooming. Orchids prefer daytime temperatures between 65-75°F (18-24°C) and nighttime temperatures between 55-65°F (13-18°C). Be mindful of temperature fluctuations, as orchids don’t like drastic changes.
7. Feed and Fertilize
Like any plant, orchids need nutrients to grow and bloom. Use a 20-20-20 orchid fertilizer, which has a balanced ratio of nitrogen, phosphorus, and potassium. Dilute the fertilizer to half strength and apply it every two weeks during the spring and summer growing season. In the fall and winter, reduce fertilizing to once a month.
Every so often, it’s important to flush your orchid’s pot with plain water to remove any built-up salts or fertilizers that could accumulate in the potting mix.
8. Prune and Maintain
Pruning is an important part of orchid care. Once the blooms have faded, you’ll want to prune the flower spike. For Phalaenopsis orchids, you can cut the spike above a node (small bump) to encourage a new flower stalk. If the spike turns brown, you should cut it back to the base.
Additionally, regularly dust the leaves with a damp cloth to remove debris and keep them looking healthy. Also, check your orchids for pests like aphids, mealybugs, or spider mites. If you spot pests, treat them with insecticidal soap or neem oil.
9. Manage Pests
While orchids are generally resistant to pests, they’re not immune. Common orchid pests include mealybugs, scale insects, and spider mites. To keep them at bay, inspect your orchids regularly for any signs of pests.
If pests are detected, treat your plant with insecticidal soap or neem oil, both of which are safe for orchids and effective at controlling pests. You should also consider isolating new plants for a few weeks before introducing them to your collection, ensuring that you don’t accidentally introduce pests to healthy plants.
10. Observe and Be Patient
Lastly, patience is key when it comes to orchids. These plants may take time to adjust to their new environment or to bloom again. Monitor their leaf color, root health, and flower production for signs of any issues. Yellowing leaves or slow growth could be signs of overwatering or improper light conditions. Be patient, as orchids can take time to adapt to changes in their care routine.
With consistent care and attention, your orchids will reward you with stunning blooms year after year.
Conclusion
Orchids may seem intimidating, but with the right care and attention, they can thrive in your home, providing beautiful blooms that brighten any space. By choosing the right orchid variety, maintaining proper humidity, light, and temperature, and feeding your orchids with the right nutrients, you’ll be well on your way to becoming an orchid care pro! 🌸
More Articles You Might Like
-

Demystifying Hand Numbness and Tingling Understanding Tenosynovitis and Nerve Compression
Demystifying Hand Numbness and Tingling Understanding Tenosynovitis and Nerve Compression Experiencing a sudden or chronic sensation of numbness and “pins and needles” in your hands or feet can be both disruptive and concerning. In the digital space, these common neurological symptoms are frequently used as hooks to drive social media engagement. A clear example of…
-

The Reality Behind Viral Sublingual Health Trends Science vs Clickbait
The Reality Behind Viral Sublingual Health Trends Science vs Clickbait In the age of social media, health hacks and wellness shortcuts frequently go viral, promising monumental physiological shifts with minimal effort. A prominent example of this phenomenon is captured in the image 1000005836.jpg, which features a striking visual of a brown powder placed under a…
-

The Ultimate Garden Vegetable Soup A Comforting Nutrient Dense Classic
The Ultimate Garden Vegetable Soup A Comforting Nutrient Dense Classic When the seasons shift or you are simply craving a clean, home-cooked meal that nourishes from the inside out, nothing satisfies quite like a pot of rustic vegetable soup. Combining an array of fresh garden produce into a steaming, golden broth creates a comforting experience…