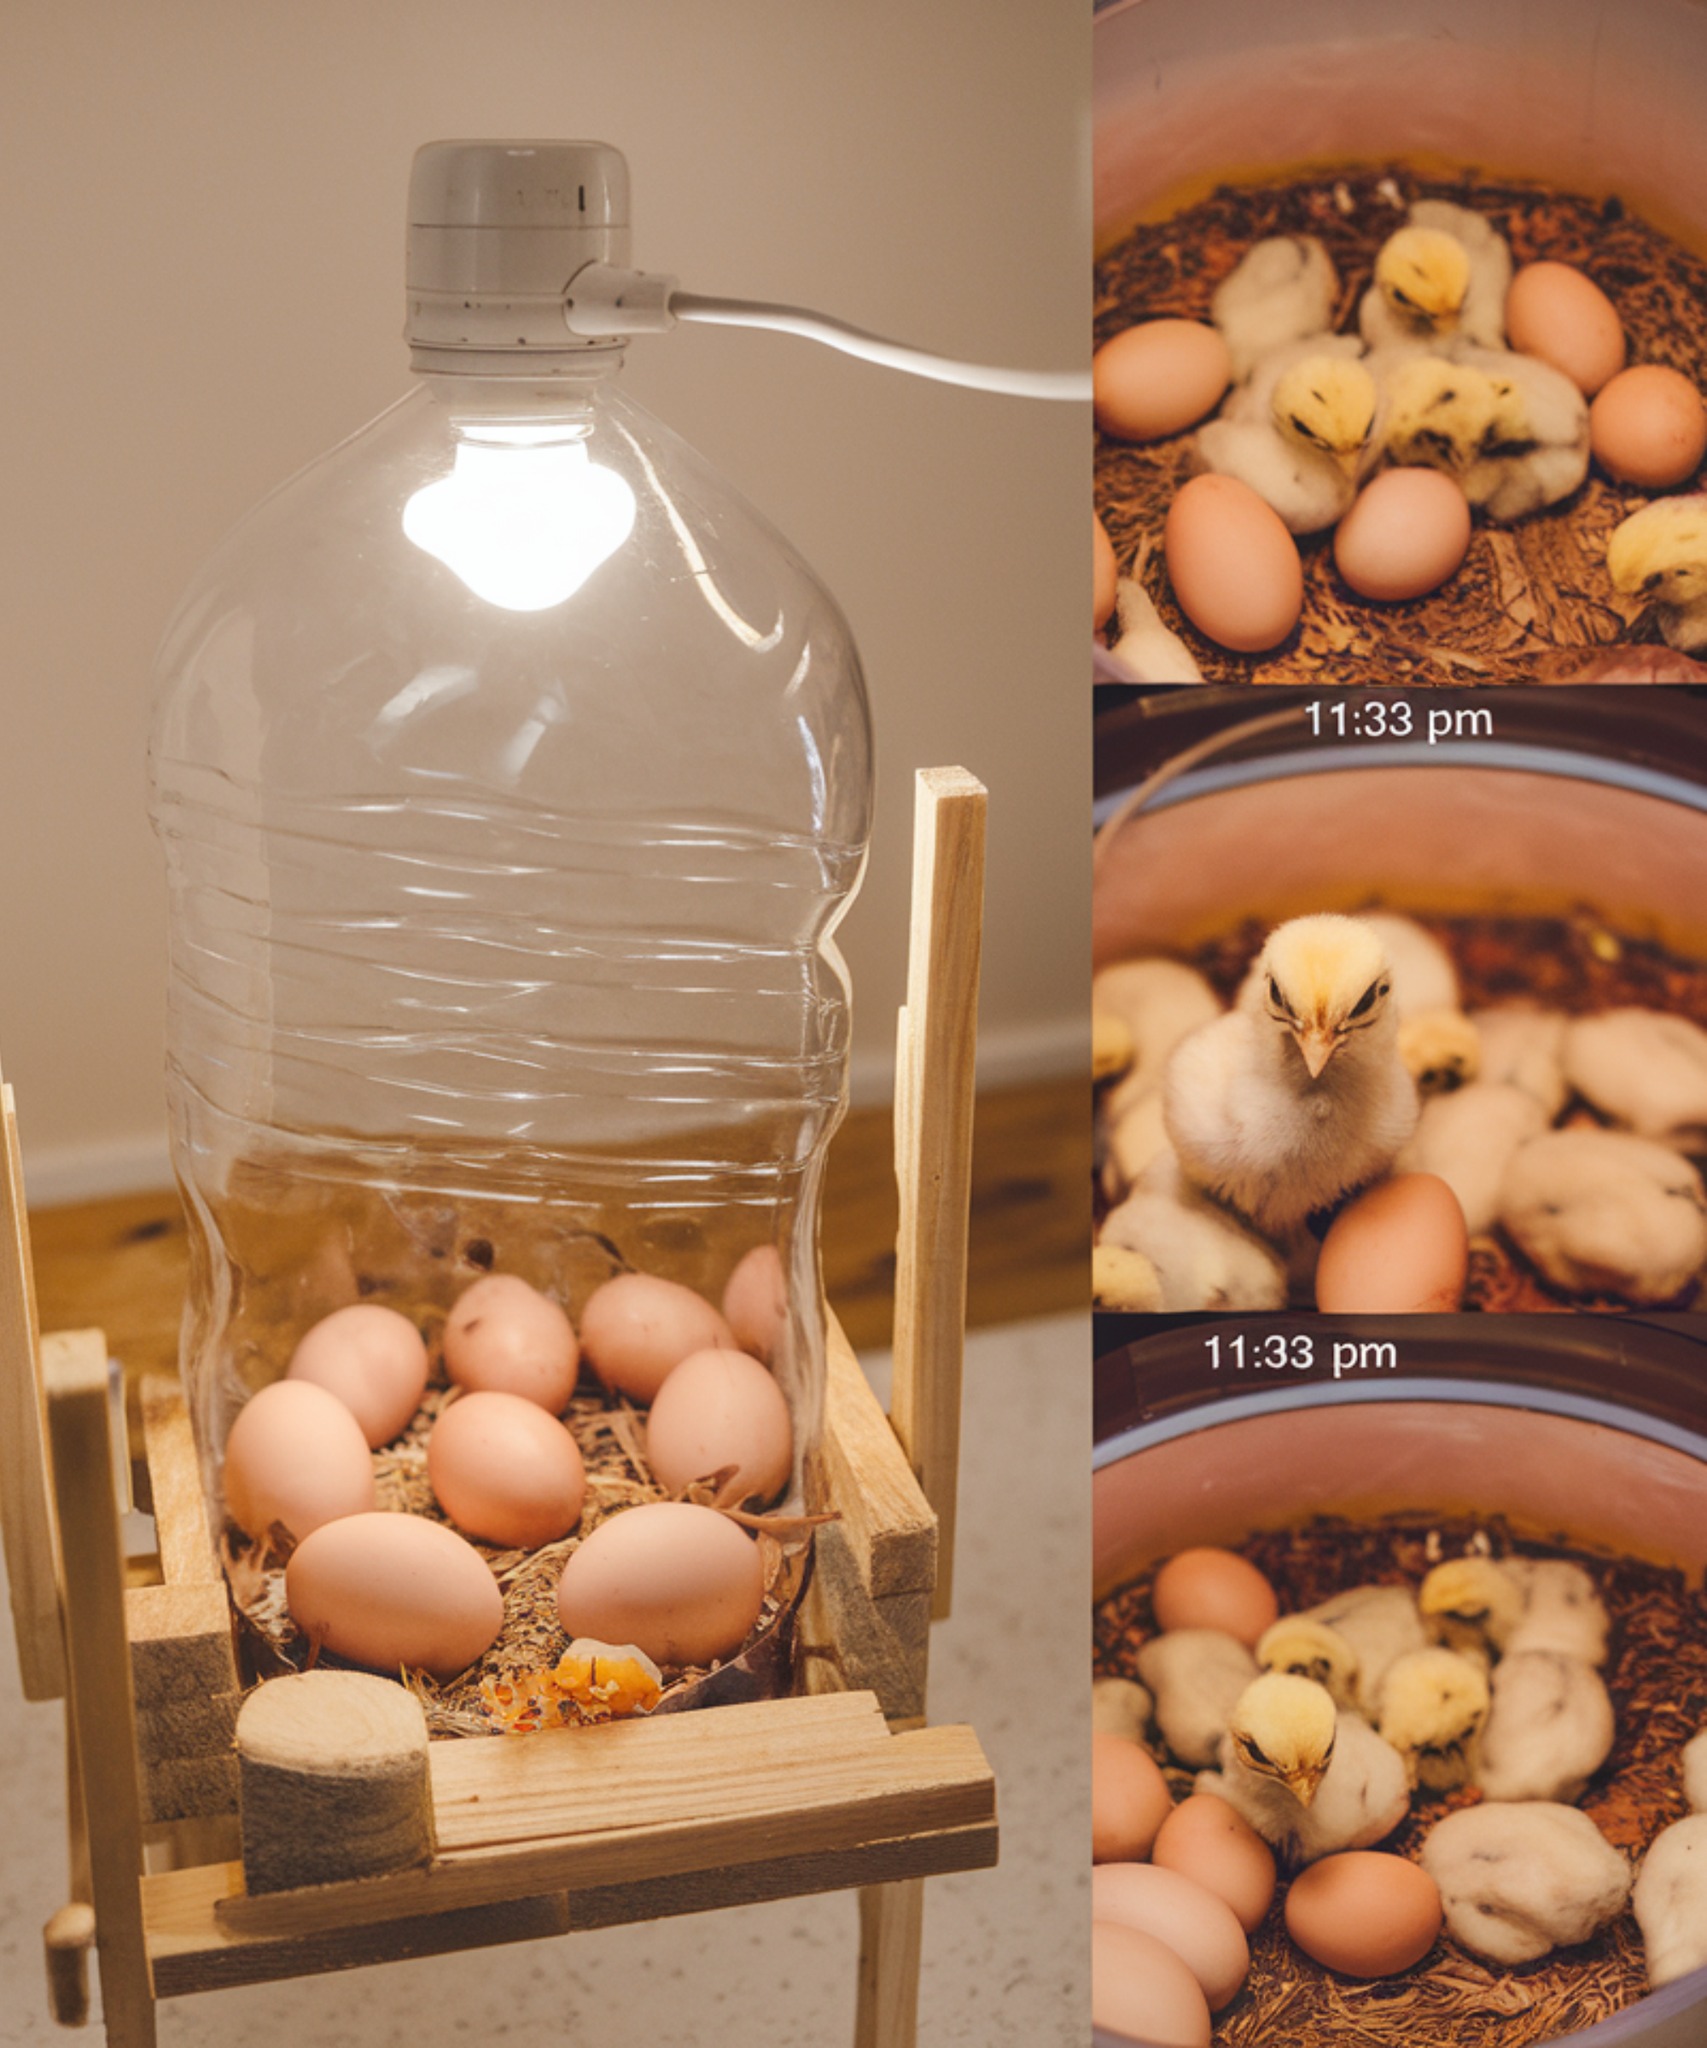
Building a homemade egg incubator can be an exciting and rewarding project, especially for those who want to try incubating eggs without spending money on an expensive commercial incubator. With a few simple materials, including a plastic water bottle, you can create an incubator that provides the necessary warmth and humidity for eggs to hatch successfully. Here’s how to build your own egg incubator using a water bottle.
Materials Needed:
5-liter or larger plastic bottle
Small light bulbs or heat lamps
Thermometer and hygrometer
Egg carton or foam for stabilization
Scissors, drill, and other cutting tools
Tape or glue for sealing
Wire (optional) for hanging the light bulbs or heat source
Steps to Build Your Homemade Egg Incubator:
1. Preparing the Bottle:
Clean the Plastic Bottle: Start by thoroughly cleaning your 5-liter (or larger) plastic bottle to ensure no residual contaminants are left. Wash it inside and out with soap and warm water, and dry it completely.
Cut the Bottle: Lay the bottle on its side and mark an area to cut open, which will serve as the door to your incubator. Make the cut large enough to allow easy access to the eggs. Use scissors or a utility knife to carefully cut the opening in the narrower side of the bottle.
2. Setting Up the Heat Source:
Install the Light Bulb or Heat Lamp: Choose a small light bulb or heat lamp that can provide the necessary warmth for the eggs to incubate. Install it at the top or along the sides of the bottle, making sure it’s secure and does not come into contact with the plastic to prevent melting.
Maintain the Right Temperature: Ensure that the temperature stays around 99.5°F (37.5°C) for optimal incubation. You can adjust the light bulb or heat lamp’s position to achieve this constant temperature. Use a thermometer placed inside the bottle to keep an accurate read on the temperature.
3. Ensuring Egg Stability:
Place Foam or Egg Carton Inside: To keep the eggs stable and prevent them from rolling around, place a layer of foam or an egg carton inside the bottle. Make sure it’s positioned in such a way that the eggs won’t shift during turning. An egg carton can work wonders to gently cradle the eggs, ensuring even warmth around them.
4. Temperature and Humidity Monitoring:
Install a Thermometer and Hygrometer: A thermometer will allow you to track the temperature, and a hygrometer will help you monitor the humidity levels inside the incubator. This is especially important for ensuring the best environment for the eggs.
Humidity during Incubation: Aim for a humidity level between 45-55% during the main incubation period.
Humidity during the Final Days: For the last three days before hatching, increase the humidity to 65-75% to help with the hatching process.
5. Ventilation:
Create Ventilation Holes: To ensure proper airflow, use a drill or scissors to make a few small holes in the bottle. This allows fresh air to circulate and prevents excessive moisture buildup, which can harm the eggs.
6. Manually Turning the Eggs:
Turn the Eggs Regularly: It’s essential to turn the eggs at least three times a day to ensure even development of the embryo. You can do this manually by gently rotating each egg. This prevents the embryo from sticking to the shell and ensures proper growth.
Safety Tips:
Monitor Heat Sources: It’s important to keep a close eye on the heat source to avoid overheating the incubator. Excess heat can cause damage to the eggs or even lead to the incubation failure.
Keep Out of Reach of Children and Pets: Because you’ll be using light bulbs or heat lamps, which can get hot, place the incubator in an area where it’s not accessible to children or pets to ensure safety.
Conclusion: The Exciting World of Egg Incubation
Building a homemade egg incubator is an affordable and satisfying way to engage in the world of poultry and hatching. Whether you’re incubating chicken, duck, or quail eggs, this DIY project offers both educational value and a hands-on approach to animal husbandry. By following these steps, you can ensure a warm and stable environment for the eggs, and with some patience, you’ll soon experience the joy of seeing your first baby chicks (or other birds) hatch.
Not only does it offer the thrill of hatching eggs, but it also connects you with nature, teaches responsibility, and gives you the opportunity to learn more about the lifecycle of animals. Have fun with this project, and enjoy your adventure in the world of egg incubation!
More Articles You Might Like
-

Cheesy Beef Taco Shells
Cheesy Beef Taco Shells are crispy, golden taco shells filled with seasoned ground beef, melted cheese, diced tomatoes, herbs, and a rich creamy taco-style sauce. They are warm, flavorful, easy to serve, and perfect for family dinners, game day snacks, party trays, taco night, or anytime you want a fun comfort-food meal that feels satisfying…
-

Cheesy Chicken Ranch Wraps
Cheesy Chicken Ranch Wraps are warm, creamy, and loaded with tender chicken, melted cheese, ranch-style sauce, herbs, and a golden toasted tortilla. They are easy to make, quick to serve, and perfect for lunch, dinner, meal prep, game day snacks, or a simple family meal that tastes rich and comforting. These wraps are filled with…
-
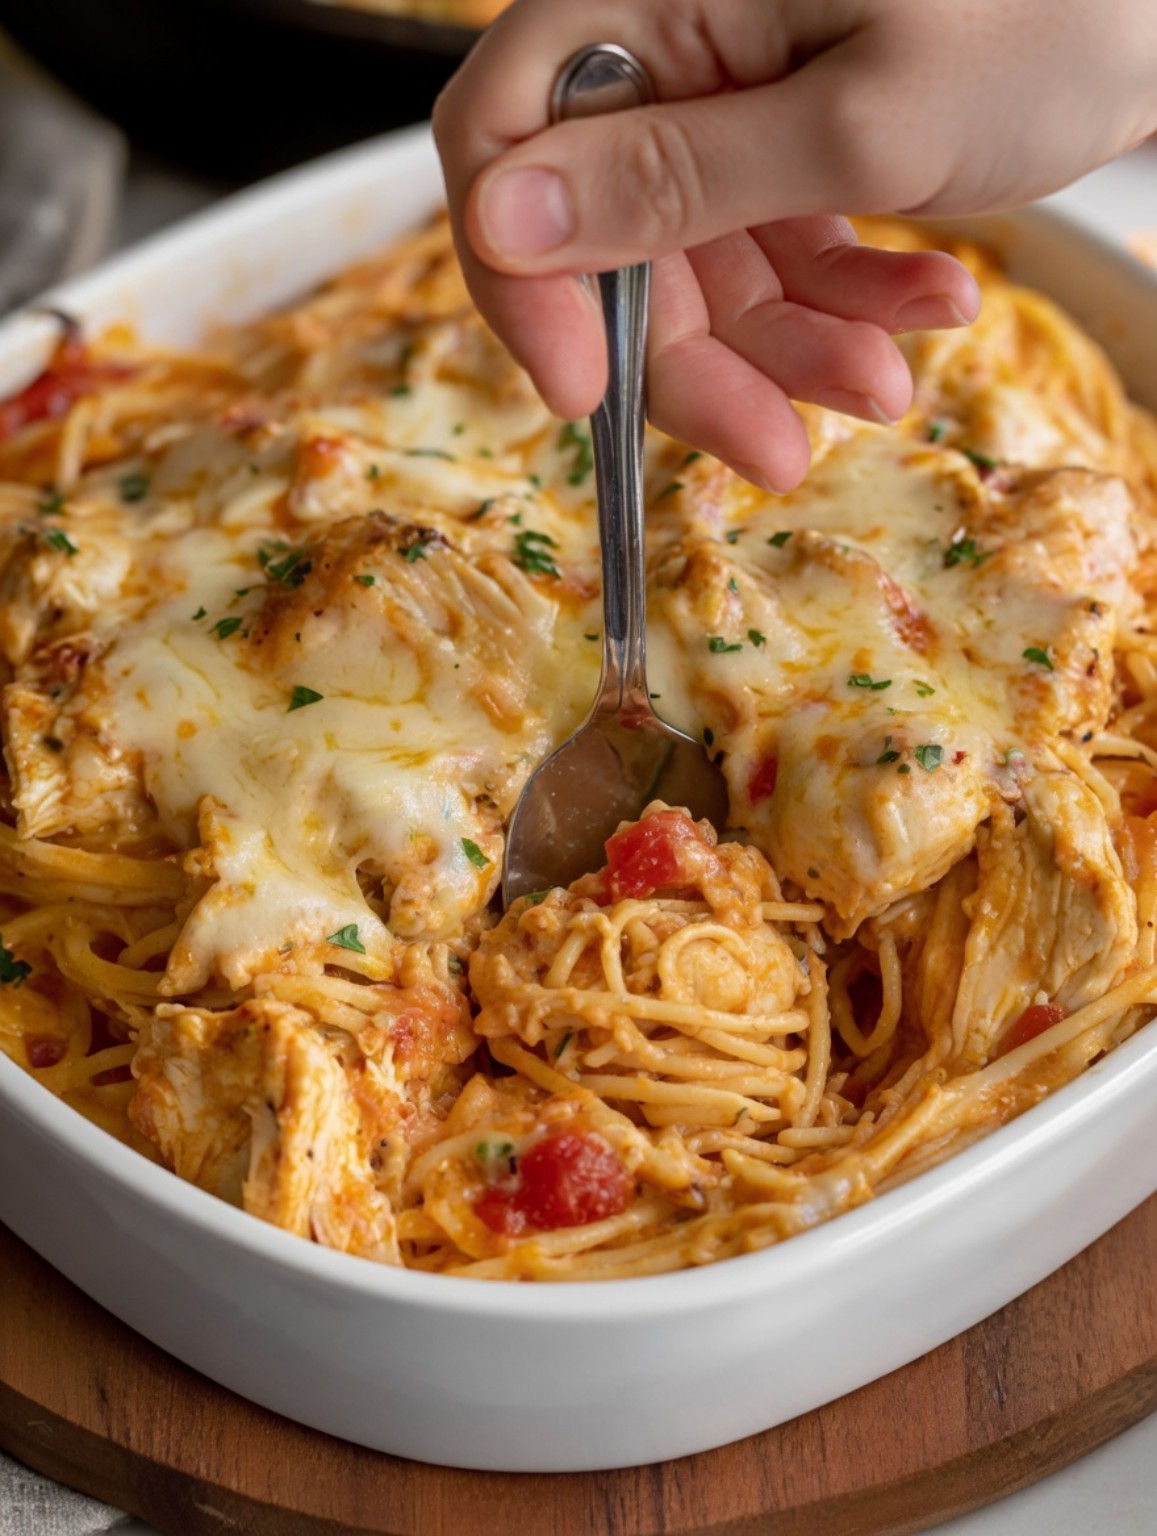
Cheesy Chicken Spaghetti Bake
Cheesy Chicken Spaghetti Bake is a creamy, saucy, and comforting baked pasta casserole made with tender spaghetti, juicy chicken pieces, tomatoes, garlic, herbs, cream, and a thick layer of melted cheese. It is warm, filling, family-friendly, and perfect for weeknight dinners, potlucks, meal prep, or cozy comfort-food meals. This recipe brings together the best parts…