Why spend money on store-bought cheese when you can make your own fresh, creamy, and delicious cheese at home with just a few simple ingredients? With this easy recipe, you’ll transform 1 liter of milk into 1 kg of fresh cheese in just 5 minutes. Plus, you can customize the flavor to your liking with herbs and spices!
Ingredients
1 liter (4 cups) whole milk – Fresh and unprocessed milk works best for a richer cheese.
2 tablespoons lemon juice (or white vinegar) – Acts as the acid to curdle the milk and separate the curds from the whey.
1/2 teaspoon salt – For seasoning.
10 g butter (optional) – Adds creaminess for a softer texture.
Herbs or spices (optional) – Customize with fresh herbs like dill, parsley, or chives, or use spices like paprika or garlic powder for a unique twist.
Instructions
Heat the Milk
Pour the whole milk into a saucepan and place it over medium heat.
Stir occasionally to prevent the milk from scorching at the bottom. Heat the milk until it begins to steam but doesn’t boil (around 80°C/176°F).
Add the Acid
Once the milk is hot, remove it from the heat.
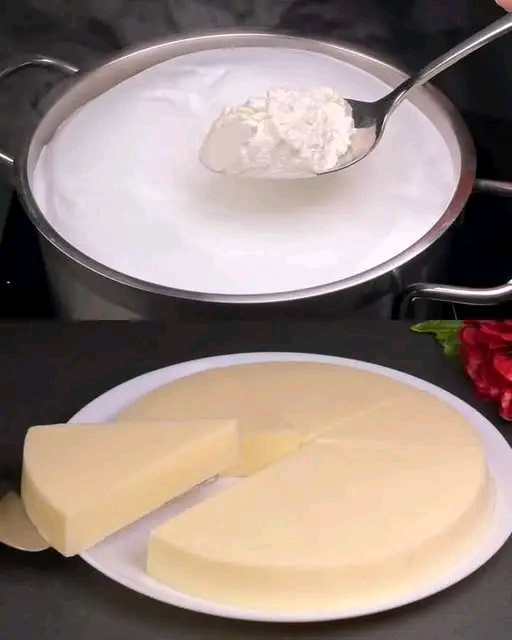
Gradually add the lemon juice or vinegar while stirring gently. You’ll notice the milk curdling as the curds (solid bits) separate from the whey (liquid).
Let the mixture sit for 1-2 minutes to allow the curds to form fully.
Strain the Curds
Line a colander with a cheesecloth or clean kitchen towel and place it over a bowl to catch the whey.
Pour the curdled milk mixture into the colander, allowing the whey to drain off.
Gather the edges of the cheesecloth and gently squeeze out the remaining liquid. Be careful not to press too hard, as this may result in a dry cheese.
Season and Mix
Transfer the strained curds to a bowl.
Add the salt and butter (if using), mixing until smooth. If you want to flavor your cheese, now is the time to add your herbs or spices.
Shape and Serve
For a simple, rustic look, leave the cheese as is.
Alternatively, press it into a mold for a firmer shape. Place it in the fridge for 30 minutes to set.
Slice, crumble, or spread your fresh cheese and enjoy!
Tips for Success
Use Whole Milk: Skim or low-fat milk won’t yield the same creamy results.
Customize Flavor: Experiment with different herbs and spices to create unique flavors. Garlic, dill, chives, or chili flakes are excellent choices.
Save the Whey: The leftover whey is packed with nutrients! Use it in smoothies, soups, or bread recipes.
For Creamy Cheese: Adding butter or a splash of cream during the mixing step will make your cheese softer and more spreadable.
Serving Ideas
Breakfast Spread: Serve on toast or bagels with a drizzle of honey or a sprinkle of black pepper.
Salads: Crumble over fresh salads for a tangy, creamy addition.
Snacks: Pair with crackers, olives, and nuts for a quick cheese platter.
Cooking: Use in stuffed vegetables, omelets, or pasta dishes.
Storage
Refrigerate: Store your homemade cheese in an airtight container in the fridge for up to 5 days.
Freeze: For longer storage, freeze the cheese for up to 2 months. Thaw in the refrigerator before use.
Why This Recipe Works
The secret to this quick and easy cheese lies in the interaction between the acid (lemon juice or vinegar) and the milk proteins. The acid causes the proteins to coagulate, forming curds and separating from the whey. The butter and optional herbs enhance the texture and flavor, creating a versatile cheese that’s perfect for both sweet and savory dishes.
Conclusion
Making your own cheese is not only cost-effective but also a rewarding experience. With just a few pantry staples, you can create a fresh, creamy cheese that’s versatile and free from preservatives. Whether you enjoy it as a simple snack or incorporate it into your favorite recipes, this 5-minute homemade cheese will quickly become a household favorite. So, grab a pot, and get ready to impress your family with your culinary skills!