🎉🥜
A Sweet Party Showstopper That Steals the Spotlight Every Time
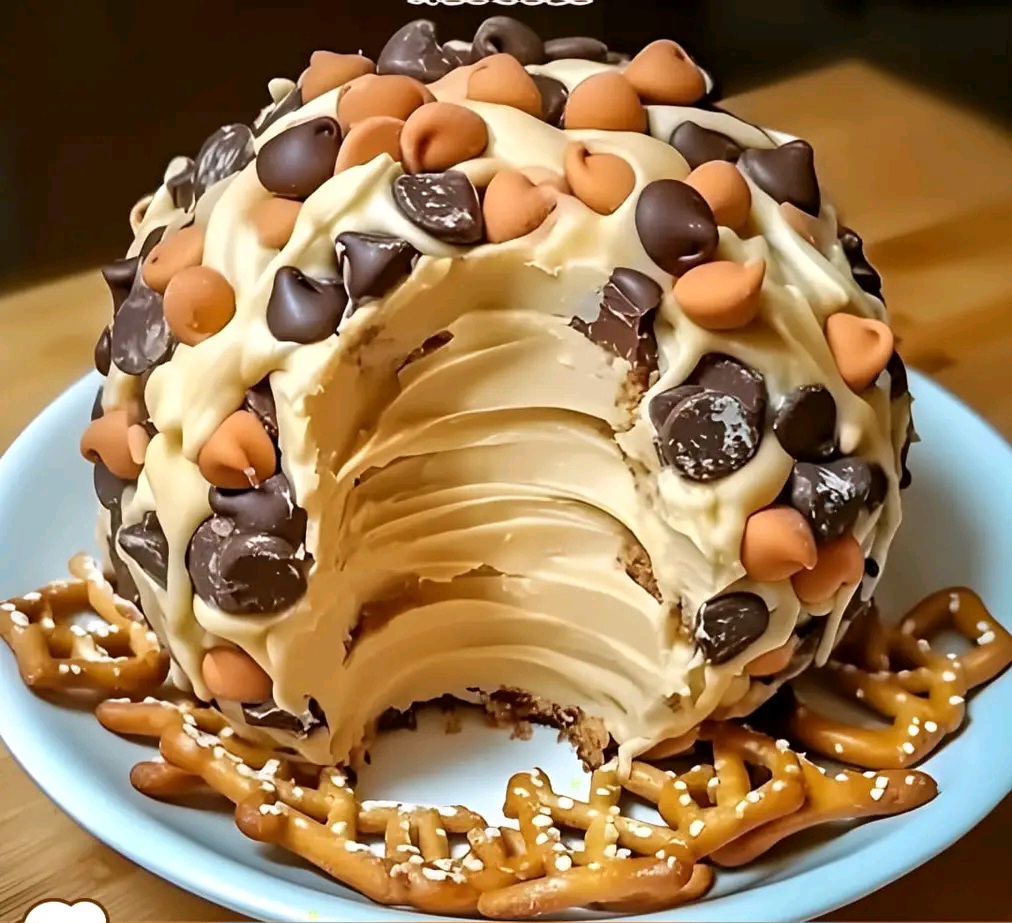
If you’ve ever been torn between serving a dessert or a fun party snack—this recipe brings the best of both worlds. The Reese’s Cheese Ball is a creamy, dreamy peanut butter confection that rolls into a perfect sphere of sweet indulgence. Wrapped in a coating of chopped chocolate chips, mini Reese’s pieces, or crumbled peanut butter cups, it’s an absolute crowd-pleaser.
Whether you’re hosting a holiday gathering, birthday party, potluck, or just having a few friends over, this dessert is guaranteed to be the center of attention on any table. Think of it as a dessert version of the classic cheese ball—but instead of crackers, guests will be dipping cookies, pretzels, and fruit. One bite, and you’ll be hooked!
🧡 Why This Reese’s Cheese Ball Works
It’s easy to see why this dessert cheese ball is so beloved. Here’s what makes it shine:
Minimal ingredients: Only a handful of pantry staples are needed.
Quick to assemble: No baking involved, and it’s ready in minutes (though chilling enhances flavor).
Crowd favorite: Peanut butter and chocolate is a universal hit.
Make-ahead friendly: Perfect for prepping a day before a party.
Fun to serve: It’s interactive and exciting—guests love digging into a dessert cheese ball.
🛒 Ingredients You’ll Need
This recipe keeps it simple and classic, while still delivering huge flavor. Feel free to get creative with toppings and mix-ins!
🥣 Main Ingredients:
8 oz cream cheese, softened
1/2 cup creamy peanut butter (not natural-style; use something like Jif or Skippy for best texture)
1/2 cup powdered sugar
1/4 cup brown sugar
1 teaspoon vanilla extract
1/2 cup mini chocolate chips
🍫 For the Coating:
1/2 cup chopped mini Reese’s pieces
1/4 cup mini chocolate chips
Optional: crumbled mini peanut butter cups, crushed Oreos, or sprinkles
👩🍳 How to Make the Reese’s Cheese Ball
Step 1: Mix the Base
In a large mixing bowl, use a hand mixer to beat together the softened cream cheese and peanut butter until smooth and fluffy. This creates a rich, creamy base.
Step 2: Sweeten the Deal
Add the powdered sugar, brown sugar, and vanilla extract. Beat again until fully incorporated and no lumps remain.
Step 3: Stir in Chocolate Chips
Fold in the mini chocolate chips using a spatula or wooden spoon. They add just the right amount of texture and chocolatey crunch throughout.
Step 4: Form the Ball
Lay a sheet of plastic wrap on the counter. Spoon the mixture onto the center and shape it roughly into a ball using a spatula. Wrap the plastic tightly and mold it into a more defined sphere.
Step 5: Chill
Refrigerate the cheese ball for at least 2 hours, or ideally overnight. This helps it firm up, making it easier to coat and serve.
Step 6: Coat the Ball
Once chilled and firm, unwrap the cheese ball and roll it in your chopped coating mixture. Press the Reese’s pieces and mini chips gently into the surface to ensure they stick evenly.
Step 7: Serve It Up!
Place your Reese’s Cheese Ball on a serving plate surrounded by sweet and salty dippers. Serve immediately, or refrigerate again until ready to present.
🥄 Perfect Dipper Ideas
Here’s where the fun really starts. This peanut butter cheese ball is versatile—you can serve it with a mix of sweet and salty treats to balance flavors:
Chocolate graham crackers
Vanilla wafers
Mini pretzels or pretzel sticks
Apple slices
Strawberries
Shortbread cookies
Ritz crackers (for a sweet-salty combo)
Marshmallows on skewers
🧠 Tips & Tricks for Success
Use full-fat cream cheese – For the richest, creamiest result.
Avoid natural peanut butter – The oil separation makes it harder to form a stable ball.
Chill thoroughly – Don’t skip the chill time. It helps the ball hold shape and enhances flavor.
Customize your coating – Go wild with toppings like crushed peanuts, toffee bits, or drizzled chocolate.
Serve with variety – Offering both fruits and cookies gives guests lots of pairing options.
🎉 Make-Ahead & Storage
The Reese’s Cheese Ball is a party planner’s dream:
Make-Ahead: Assemble and refrigerate the cheese ball up to 2 days in advance (just hold off on rolling in the coating until just before serving for the freshest look).
Storage: Wrap tightly and store leftovers in the fridge for up to 5 days. It will soften slightly but remain delicious.
Freezing? Not recommended, as cream cheese can become grainy once thawed.
🍽️ Serving Suggestions
Want to really impress your guests? Here are a few festive ways to plate your cheese ball:
Serve it on a wooden board surrounded by fresh berries, cookies, and chocolates for a dessert charcuterie look.
Drizzle melted chocolate or caramel over the top for an elegant touch.
Add little flags or skewers for easier dipping at a party.
It’s also a fun holiday idea: roll it in red and green M&Ms for Christmas, pastels for Easter, or candy corn bits for Halloween.
💡 Flavor Variations
Once you’ve mastered the basic Reese’s version, try changing it up!
Nutella Cheese Ball – Swap peanut butter for Nutella and roll in chopped hazelnuts.
S’mores Cheese Ball – Add mini marshmallows and graham cracker crumbs inside and out.
Pumpkin Spice Cheese Ball – Mix in pumpkin puree and cinnamon for a fall twist.
Each variation offers its own flavor explosion and can be tailored to fit the occasion.
❤️ Why You’ll Fall in Love With This Recipe
The Reese’s Cheese Ball isn’t just another dessert—it’s a celebration. It’s a nostalgic throwback to peanut butter and chocolate treats from childhood, reimagined in an elegant, party-friendly form.
It’s one of those recipes that looks impressive, but takes very little effort. You can whip it up with pantry staples, mold it in minutes, and watch it disappear even faster.
The balance of creamy peanut butter, tangy cream cheese, sweet chocolate, and crunchy coating makes it truly irresistible.
Final Thoughts: Sweet, Simple, and a Showstopper
Whether it’s for a birthday bash, family holiday, or a girls’ night in, this Reese’s Cheese Ball dessert will be the hit of the table. It’s no-bake, no-fuss, and guaranteed to get rave reviews. You’ll find yourself coming back to it again and again—changing toppings, playing with dipper ideas, and loving how quickly it comes together.
So go ahead—print it, save it, share it. And most importantly, make it. Because everyone deserves a little peanut butter bliss in their life. 🥜🍫✨
More Articles You Might Like
-

Texas Toast Sloppy Joes: The Crunchy, Cheesy Upgrade You Didn’t Know You Needed
There’s something timeless about sloppy joes. For generations, this saucy, savory, and slightly sweet ground beef sandwich has been a go-to comfort food in American kitchens. It’s quick, filling, and family-friendly—perfect for busy weeknights. But what if we told you there’s a way to take this classic dish up a notch? Enter the Texas Toast…
-

Classic Pig Pickin’ Cake
When it comes to Southern desserts, few sweets shine as brightly as the Classic Pig Pickin’ Cake. This nostalgic cake, sometimes called a “Mandarin Orange Cake,” has roots deep in Southern tradition. It gets its playful name from its frequent appearance at pig pickin’s—Southern-style barbecue gatherings where communities come together to enjoy slow-cooked pork, sides,…
-

Lemon Garlic Butter Chicken with Creamy Parmesan Pasta
There’s something irresistible about the combination of tender, golden-browned chicken paired with a creamy pasta coated in Parmesan cheese. Add the brightness of lemon, the depth of garlic, and the richness of butter, and you have a recipe that feels indulgent yet approachable enough for a weeknight dinner. Lemon Garlic Butter Chicken with Creamy Parmesan…