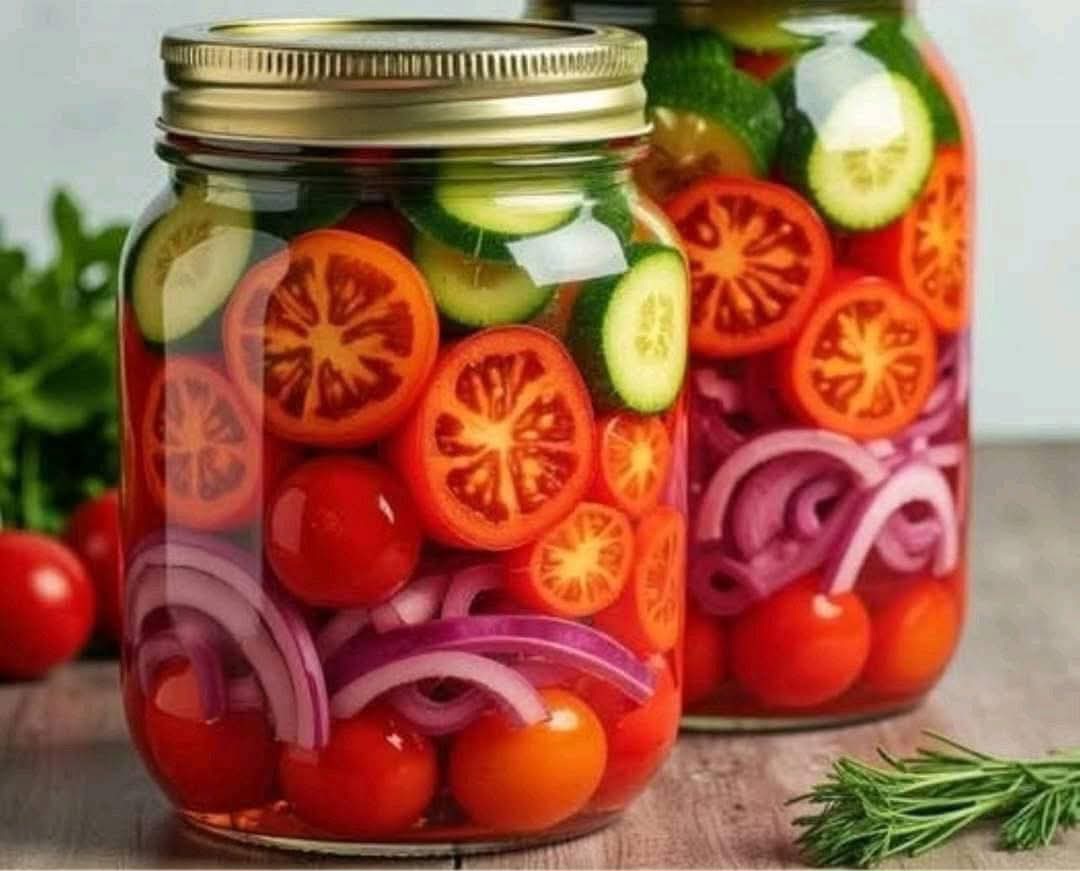
If you’re a fan of tangy, crunchy snacks, then you have to try this Pickled Cherry Tomatoes, Red Onions, and Cucumbers recipe. The combination of fresh vegetables pickled in a zesty vinegar-based brine offers a delightful balance of flavors that will awaken your taste buds and elevate any meal. Plus, it’s super easy to make, and you don’t even need to can them—just refrigerate and enjoy!
This vibrant pickle mix is perfect as a side dish, a topping for tacos or sandwiches, or even as a crunchy snack on its own. Whether you’re looking for a way to use up fresh summer produce or simply love the tang of homemade pickles, this recipe is one you’ll want to keep in your rotation.
Why Pickled Cherry Tomatoes, Red Onions, and Cucumbers?
Pickles are the ultimate way to preserve the fresh flavors of vegetables. This recipe adds a unique twist by combining cherry tomatoes, red onions, and cucumbers—each bringing its own refreshing crunch and vibrant color to the mix. Here’s why this recipe works so well:
Flavor balance – The tangy vinegar cuts through the sweetness of the tomatoes, while the onions and cucumbers add freshness and texture.
Easy and quick – You only need a few simple ingredients, and there’s no need for canning, just a couple of hours in the fridge.
Customizable – You can adjust the heat with more or less red pepper flakes and add extra herbs like thyme or rosemary for more flavor.
It’s a simple, yet satisfying way to enjoy fresh vegetables with a little zing!
What You’ll Need
Here are the ingredients for this delicious refrigerator pickle recipe:
1 pint cherry tomatoes – Look for firm, ripe tomatoes for the best crunch.
½ red onion – Thinly sliced for a mild, sweet flavor that adds a slight bite.
½ cucumber – Sliced thin to soak up the pickling liquid.
1 cup white vinegar – The base of the pickling liquid, providing a sharp tang.
½ cup water – To dilute the vinegar slightly and balance the flavors.
¼ cup sugar – This will sweeten the brine just enough to complement the acidity of the vinegar.
1 teaspoon salt – Essential for drawing out the moisture and enhancing the flavors.
½ teaspoon dried oregano – Adds a subtle, savory depth to the brine.
¼ teaspoon red pepper flakes – Optional, but it gives the pickles a nice kick. Adjust based on your heat preference.
¼ cup fresh dill – Fresh dill is key to bringing that authentic pickle flavor.
Step-by-Step Instructions
Step 1: Prepare the Vegetables
Start by rinsing and drying the cherry tomatoes, red onion, and cucumber. This step ensures that the veggies are free from any dirt or residue that could interfere with the pickling process.
Slice the red onion thinly, ensuring that each piece is uniform in size for even pickling.
Similarly, slice the cucumber thinly so that it can easily absorb the brine and soften as it pickles. You can peel the cucumber if you prefer, but leaving the skin on adds extra texture and color.
Step 2: Make the Pickling Liquid
In a small saucepan, combine the following ingredients for the pickling brine:
1 cup white vinegar
½ cup water
¼ cup sugar
1 teaspoon salt
½ teaspoon dried oregano
¼ teaspoon red pepper flakes (optional)
Place the saucepan over medium heat and stir continuously until the mixture comes to a boil. Allow it to simmer for 2-3 minutes, making sure the sugar and salt have completely dissolved into the liquid. This is the key to achieving a smooth, balanced brine.
Step 3: Combine Vegetables and Brine
Once the pickling liquid is ready, it’s time to combine the veggies and the brine:
Place the cherry tomatoes, red onion, and cucumber in a large jar or container. A mason jar works perfectly for this, but any container with a tight-fitting lid will do.
Carefully pour the hot pickling liquid over the vegetables. Ensure that all the veggies are fully submerged in the liquid. You can press them down gently if needed.
Step 4: Add the Dill
For that classic pickle flavor, stir in ¼ cup chopped fresh dill. This will give the pickles a fresh, herbaceous note that pairs perfectly with the tangy brine.
If you prefer a stronger dill flavor, you can add more dill, or experiment with other fresh herbs like thyme or tarragon.
Step 5: Seal and Refrigerate
Seal the jar or container tightly. Place it in the fridge for at least 2 hours, but the longer it sits, the more flavorful it becomes. Ideally, let it sit for 24 hours to allow the flavors to fully develop. However, you can start enjoying them after just a couple of hours if you’re in a hurry!
These pickles can be kept in the fridge for up to 2 weeks, though they’re typically eaten long before then.
Tips for Pickle Perfection
Use fresh, firm vegetables – The key to great pickles is starting with fresh produce. Overripe tomatoes or cucumbers won’t have the same crisp texture.
Customize the heat – If you love heat, don’t be afraid to increase the amount of red pepper flakes, or even add a sliced jalapeño to the jar for extra spice.
Add garlic for extra flavor – Throw in a couple of garlic cloves (smashed) for that savory depth of flavor that garlic-lovers crave.
Experiment with other veggies – You can easily adapt this recipe by adding or substituting other vegetables like bell peppers, carrots, or zucchini.
Why You’ll Love These Pickles
This refrigerator pickle recipe is a game-changer for several reasons:
Crunchy texture – The vegetables maintain their crunch even after days in the brine.
Quick and easy – With no cooking or canning required, you can have pickles ready to eat in just a couple of hours.
Versatile – These pickles are perfect for adding a fresh twist to sandwiches, tacos, or grilled meats. You can also enjoy them as a healthy, low-calorie snack.
Customizable – Adjust the heat, add herbs, or experiment with different vegetables to suit your personal tastes.
Serving Suggestions
As a side dish – Serve these pickled veggies alongside your favorite grilled meats or BBQ for a refreshing contrast to the rich flavors.
On tacos – Top your tacos with these pickled veggies for a burst of tangy, crunchy texture.
In salads – Add these pickles to a fresh salad for a pop of color and flavor.
As a snack – They’re the perfect crunchy, tangy treat when you’re craving something light and refreshing.
Final Thoughts
If you haven’t yet tried making your own pickled vegetables, this Pickled Cherry Tomatoes, Red Onions, and Cucumbers recipe is a great place to start. With minimal effort and ingredients, you’ll have a jar of fresh, crunchy pickles that are full of flavor. Whether you’re enjoying them on their own or pairing them with a meal, they’ll surely become a new favorite in your recipe collection.
More Articles You Might Like
-

Texas Toast Sloppy Joes: The Crunchy, Cheesy Upgrade You Didn’t Know You Needed
There’s something timeless about sloppy joes. For generations, this saucy, savory, and slightly sweet ground beef sandwich has been a go-to comfort food in American kitchens. It’s quick, filling, and family-friendly—perfect for busy weeknights. But what if we told you there’s a way to take this classic dish up a notch? Enter the Texas Toast…
-

Classic Pig Pickin’ Cake
When it comes to Southern desserts, few sweets shine as brightly as the Classic Pig Pickin’ Cake. This nostalgic cake, sometimes called a “Mandarin Orange Cake,” has roots deep in Southern tradition. It gets its playful name from its frequent appearance at pig pickin’s—Southern-style barbecue gatherings where communities come together to enjoy slow-cooked pork, sides,…
-

Lemon Garlic Butter Chicken with Creamy Parmesan Pasta
There’s something irresistible about the combination of tender, golden-browned chicken paired with a creamy pasta coated in Parmesan cheese. Add the brightness of lemon, the depth of garlic, and the richness of butter, and you have a recipe that feels indulgent yet approachable enough for a weeknight dinner. Lemon Garlic Butter Chicken with Creamy Parmesan…