Growing your own hydrangeas from cuttings is not only an incredibly satisfying gardening project, but it’s also one that allows you to expand your garden with beautiful blooms that hold sentimental value. Hydrangeas, with their stunning clusters of flowers in varying colors, are a classic favorite for gardeners everywhere. If you’ve been wondering how to propagate hydrangeas, you’re in the right place. Here’s a simple, step-by-step guide on how to grow your own hydrangeas from cuttings.
Why This Method Works
Growing hydrangeas from cuttings is a reliable propagation method because it allows you to create genetically identical plants from an existing hydrangea. Unlike seeds, which can vary in appearance, cuttings give you the ability to clone a specific plant, ensuring your new hydrangeas have the same beautiful traits as the original. With patience and the right care, hydrangea cuttings can quickly develop into healthy, vibrant plants that will bloom year after year.
What You’ll Need for This Recipe
To get started on growing your hydrangeas from cuttings, you’ll need the following items:
A healthy hydrangea plant with flowerless stems
Sharp pruning shears or scissors
Rooting hormone (optional, but helpful for encouraging root growth)
Well-drained soil mix, preferably one that includes perlite or vermiculite for better drainage
Plastic bag or bell jar to create a humid environment (mini greenhouse)
Small pot with drainage holes
Water (for keeping the soil moist)
How to Make This Recipe
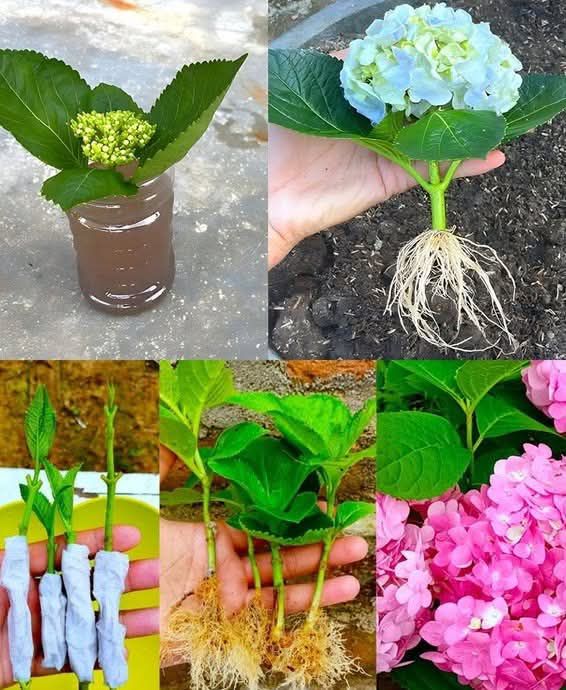
Choose Your Couture Select a healthy, flowerless stem from your hydrangea plant. The best stems are 12-15 cm (about 5-6 inches) long, with two pairs of leaves and fresh new growth. Avoid stems that have bloomed or those that are overly woody, as they’re less likely to root successfully.
Prepare the Stitching Using your sharp pruning shears, cut the stem at a 45-degree angle. This angled cut helps maximize the surface area for root growth. Remove all the leaves from the bottom two-thirds of the stem but leave the top pair of leaves intact. Optionally, you can dip the severed end of the cutting into rooting hormone to promote root development. The hormone helps stimulate root growth, increasing your chances of success.
Plant the Stitching Choose a small pot with good drainage and fill it with a well-drained soil mix. The soil should be light and airy, and a mix containing perlite or vermiculite works wonders for root development. Using a pencil or a stick, drill a hole in the soil deep enough to bury the bottom of the cutting. Insert the stem into the hole and gently pack the soil around it to secure it in place. Be careful not to crush the cutting.
Create a Mini-Greenhouse To keep the cutting in a humid environment, cover the pot with a plastic bag or a bell jar. This creates a mini greenhouse effect, trapping moisture and warmth around the cutting. However, make sure the plastic does not touch the leaves, as this can lead to mold or rot. If you’re using a plastic bag, you can secure it around the edges with a rubber band or string.
Take Care of Your Beauty Place your newly planted cutting in a bright spot, but avoid direct sunlight. Indirect light is ideal for encouraging root growth without overwhelming the cutting. Keep the soil moist, but not soggy. Check the condensation inside the plastic cover regularly and adjust the ventilation as needed to prevent excess moisture from building up, which could lead to mold. You may need to open the bag slightly to allow fresh air circulation.
Check Out the Roots Growing After about 2-4 weeks, gently pull on the cutting to check for resistance. If you feel resistance, it means roots are beginning to develop! This is a good sign that your hydrangea cutting is on its way to becoming a thriving plant.
Transplant Your New Hydrangea Once your cutting has developed a healthy root system, it’s time to transplant it into a larger pot or directly into the garden. Choose a location with morning sunlight and afternoon shade, as hydrangeas thrive in this type of environment. Water the plant well after transplanting to ensure it settles into its new home.
Patience and Persistence Remember that patience is key when growing hydrangeas from cuttings. Not every cutting will take root, so don’t be discouraged if some fail. With practice, you’ll get the hang of it, and soon you’ll be able to grow your own beautiful hydrangea plants that will bloom year after year.
Tips + Tricks & More for Recipe Success
Timing is Important: The best time to take cuttings from hydrangeas is in the late spring or early summer when the plant is actively growing. Avoid taking cuttings in the fall or winter, as the plant is typically in a dormant state.
Keep an Eye on Humidity: A consistent humidity level is crucial for successful rooting. If you live in a particularly dry climate, consider placing the cutting pot on a tray of water and pebbles to increase moisture around the plant without the cutting sitting in the water.
Be Gentle: Hydrangea cuttings are delicate, so handle them with care when preparing and planting. Avoid touching the cut ends as much as possible to prevent damaging the sensitive areas where roots will form.
Rooting Hormone: While optional, rooting hormone can significantly improve your chances of success. It helps to stimulate the growth of roots, which is essential for the cutting’s survival and development.
Avoid Overwatering: While it’s important to keep the soil moist, overwatering can lead to rot. Ensure that the soil is well-drained and that the pot has adequate drainage holes to prevent water from sitting at the bottom.
How to Serve and Serving Suggestions
Once your hydrangea cutting has rooted and been transplanted, the real beauty begins to unfold. Place your new hydrangea in a garden bed or a decorative pot, depending on your space and preference. Hydrangeas are known for their large, beautiful blooms, so they’re perfect for adding a touch of color and vibrancy to any outdoor space or even as a stunning indoor plant in a bright, cool room.
Garden Planting: Hydrangeas prefer well-drained, slightly acidic soil and thrive in areas with morning sun and afternoon shade. They also appreciate moist soil, so keep them well-watered, especially during hot spells.
Indoor Display: If growing hydrangeas indoors, place them in a location where they can receive bright, indirect light. While they do best outdoors, hydrangeas can also thrive as potted plants if given the right care and attention.
Time
Preparation and Cutting: About 30 minutes.
Rooting Time: 2-4 weeks for roots to develop.
Transplanting: Once the roots are strong, transplanting takes about 30 minutes.
Total Time: From cutting to transplanting, the entire process may take 3-4 weeks.
By following these simple steps and incorporating some patience and love, you’ll soon have your own thriving hydrangeas, whether as part of your garden or adorning your home. Enjoy the process of watching these beautiful plants grow, and celebrate the joy of nurturing nature right from your doorstep. 🌸
More Articles You Might Like
-

Texas Toast Sloppy Joes: The Crunchy, Cheesy Upgrade You Didn’t Know You Needed
There’s something timeless about sloppy joes. For generations, this saucy, savory, and slightly sweet ground beef sandwich has been a go-to comfort food in American kitchens. It’s quick, filling, and family-friendly—perfect for busy weeknights. But what if we told you there’s a way to take this classic dish up a notch? Enter the Texas Toast…
-

Classic Pig Pickin’ Cake
When it comes to Southern desserts, few sweets shine as brightly as the Classic Pig Pickin’ Cake. This nostalgic cake, sometimes called a “Mandarin Orange Cake,” has roots deep in Southern tradition. It gets its playful name from its frequent appearance at pig pickin’s—Southern-style barbecue gatherings where communities come together to enjoy slow-cooked pork, sides,…
-

Lemon Garlic Butter Chicken with Creamy Parmesan Pasta
There’s something irresistible about the combination of tender, golden-browned chicken paired with a creamy pasta coated in Parmesan cheese. Add the brightness of lemon, the depth of garlic, and the richness of butter, and you have a recipe that feels indulgent yet approachable enough for a weeknight dinner. Lemon Garlic Butter Chicken with Creamy Parmesan…