Growing sweet potatoes in containers is perfect if you lack garden space. With just a sunny balcony and the right pot, you can harvest a delicious crop right at home!
1. Choose the Right Container
Select a pot that is at least 45 cm (18 inches) deep and 35 cm (14 inches) wide, with drainage holes at the bottom to prevent root rot. Fabric grow bags or large plastic containers also work well.
2. Prepare the Soil
Sweet potatoes love loose, well-draining, nutrient-rich soil. Mix:
1 part peat moss
1 part perlite
1 part compost
Aim for a slightly acidic pH of 5.5 to 6.5 for best results.
3. Sprout the Slips (Sprouting the Sweet Potatoes)
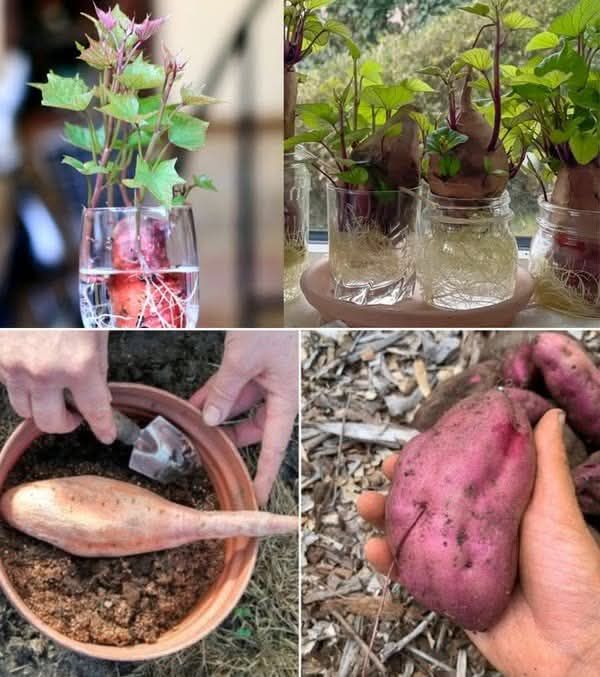
Submerge half of a sweet potato in a glass of water (use toothpicks to keep it suspended).
Place the glass in a warm, sunny spot.
In about 2–4 weeks, 10-inch-long sprouts (“slips”) will grow from the top.
Gently twist off the slips and place them in water to develop roots.
4. Plant the Rooted Slips
Once your slips have grown roots:
Fill your pot with the prepared soil mix.
Plant each slip about 4–6 inches deep, spacing them around 12 inches apart if your container is wide enough.
Keep the leaves above the soil.
5. Watering
Water deeply and thoroughly, then allow the topsoil to dry slightly between waterings.
Avoid soggy soil—it can lead to rot.
As plants grow, water more frequently in hot weather.
6. Fertilize Regularly
Feed your sweet potatoes every 2–3 weeks using a balanced liquid fertilizer (like 10-10-10 or 5-10-10). Switch to a low-nitrogen formula once vines start to take off to promote root development instead of foliage.
7. Provide Plenty of Sunlight
Place your container in a spot with at least 6 hours of direct sunlight per day—more is even better. Sweet potatoes are sun lovers!
8. Pest & Disease Care
Check leaves weekly for aphids, whiteflies, or fungal spots.
Remove any yellow or dying leaves to prevent disease.
Consider using neem oil or insecticidal soap if pests appear.
9. Harvesting Time
After 100–120 days, your sweet potatoes are likely ready. Signs it’s time to harvest:
Leaves start to yellow and die back.
Gently dig into the soil to check size.
After harvesting, cure your sweet potatoes:
Leave them in a warm, dry place (80–85°F / 27–29°C) for about 7–10 days to improve sweetness and shelf life.
More Articles You Might Like
-

Texas Toast Sloppy Joes: The Crunchy, Cheesy Upgrade You Didn’t Know You Needed
There’s something timeless about sloppy joes. For generations, this saucy, savory, and slightly sweet ground beef sandwich has been a go-to comfort food in American kitchens. It’s quick, filling, and family-friendly—perfect for busy weeknights. But what if we told you there’s a way to take this classic dish up a notch? Enter the Texas Toast…
-

Classic Pig Pickin’ Cake
When it comes to Southern desserts, few sweets shine as brightly as the Classic Pig Pickin’ Cake. This nostalgic cake, sometimes called a “Mandarin Orange Cake,” has roots deep in Southern tradition. It gets its playful name from its frequent appearance at pig pickin’s—Southern-style barbecue gatherings where communities come together to enjoy slow-cooked pork, sides,…
-

Lemon Garlic Butter Chicken with Creamy Parmesan Pasta
There’s something irresistible about the combination of tender, golden-browned chicken paired with a creamy pasta coated in Parmesan cheese. Add the brightness of lemon, the depth of garlic, and the richness of butter, and you have a recipe that feels indulgent yet approachable enough for a weeknight dinner. Lemon Garlic Butter Chicken with Creamy Parmesan…