If you love growing your own food but are short on space, How to Build a Vertical Green Onion Tower might just be the perfect solution for your garden goals. This simple, space-saving project allows you to grow dozens—even hundreds—of green onions in a single vertical structure. Whether you have a small balcony, a sunny corner of the backyard, or even a patio, this DIY green onion tower makes the most out of limited gardening space while keeping things neat, organized, and highly productive.
In this guide, you’ll learn How to Build a Vertical Green Onion Tower from scratch, using basic tools and everyday materials. We’ll walk you through why this method works so well, what materials you’ll need, a step-by-step guide, tips for success, harvesting techniques, and even ideas on how to use your homegrown green onions.
Why This Method Works
Before we dive into How to Build a Vertical Green Onion Tower, let’s talk about why this method is so effective:
✔ Space Optimization: Growing vertically maximizes your harvest in minimal space.
✔ Efficient Watering: Water moves down the tower, hydrating each level evenly—especially if you install a PVC pipe watering system.
✔ Continuous Harvest: You can harvest green onions repeatedly from the same bulbs.
✔ Aesthetic Appeal: The tower looks lush and vibrant, making it a great decorative and functional garden piece.
✔ Reduced Weeds: Vertical gardening minimizes weed growth compared to traditional beds.
With that in mind, let’s look at what you need to get started.
What You’ll Need For This Recipe (Garden Version!)
To learn How to Build a Vertical Green Onion Tower, gather these basic materials:
Materials:
A large plastic container, grow bag, or recycled drum (20-30 gallons recommended)
Drill or utility knife
1-inch hole saw bit (if using a drill)
Chicken wire or hardware cloth
Zip ties or twine
Optional: 2-inch PVC pipe for internal watering
Well-draining potting soil rich in organic matter
Compost
Green onion bulbs or seeds
Bottom tray or saucer (to catch excess water)
Tools:
Scissors or wire cutters
Garden gloves
Small shovel or trowel
Watering can
How to Make a Vertical Green Onion Tower
Now, let’s break down How to Build a Vertical Green Onion Tower step by step:
1. Prepare the Structure
Start with a clean, empty plastic container or grow bag. Cut or drill evenly spaced holes about 1 inch wide, leaving 2-3 inches between each. These will act as mini planting pockets. Make sure the container has drainage holes at the bottom.
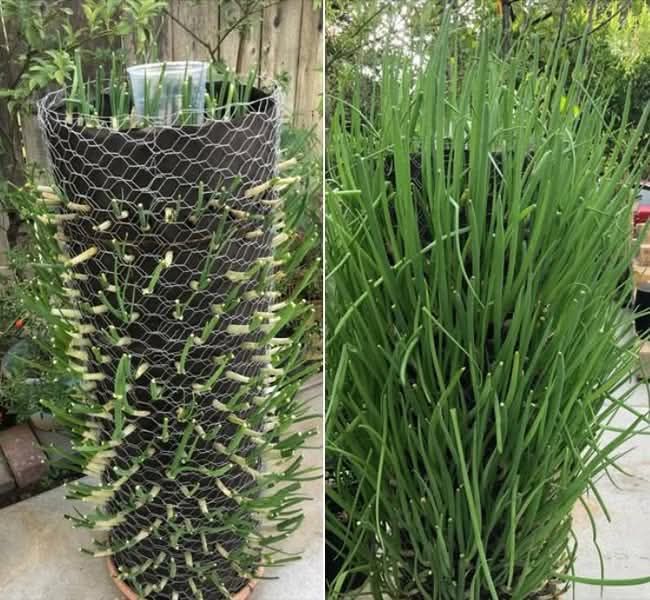
2. Add Mesh Support
Wrap chicken wire or mesh around the outside to keep the soil from spilling out through the holes. Secure it with zip ties or twine. If using a hard plastic container, you can drill extra holes to secure the mesh more tightly.
3. Create an Optional Watering System
If using a PVC pipe, drill small holes along its length and plug the bottom. Insert this vertically in the center of the container before adding any soil. When you water from the top of the pipe, it will evenly distribute moisture to the surrounding soil.
4. Fill with Soil
Add a layer of compost first to enrich the bottom. Then begin filling with a mix of well-draining potting soil and compost. Pack the soil gently around the PVC pipe (if using) and against the mesh to hold everything in place.
5. Plant Green Onion Bulbs
Push green onion bulbs into each hole, root side in, green tops facing out. They should sit snugly in the hole with the top portion exposed to light. Continue this process until all holes are filled.
6. Top Planting
Don’t forget the top surface of the tower! Plant extra bulbs or seeds here to fully utilize your growing space.
7. Water Thoroughly
Water from the top (or the PVC pipe) until moisture begins to drip from the bottom. Always keep the soil moist but not soggy. A tray under the container will help catch runoff.
8. Sunlight Exposure
Place your green onion tower in a spot that receives at least 6–8 hours of sunlight per day. If you live in a cooler region, a sunny windowsill or greenhouse works well too.
9. Harvest and Regrow
Once your green onions reach about 6–10 inches, snip off the tops. Leave about 1 inch of growth above the soil and the bulbs will continue to regenerate for several harvests.
Tips + Tricks & More For Recipe Success
Want to get the best results from How to Build a Vertical Green Onion Tower? These practical tips will help you along the way:
🔹 Use Organic Bulbs: Organic green onions tend to sprout more easily and produce healthier growth.
🔹 Stagger Planting: Plant some onions every few days for a continuous supply.
🔹 Mulch the Top Layer: This helps retain moisture and reduce weeds in the top section.
🔹 Don’t Overcrowd: Make sure holes are spaced well so each plant has room to grow.
🔹 Rotate the Tower: Give all sides equal sun exposure by rotating the tower weekly.
🔹 Winter Care: In colder climates, bring the tower indoors or cover it with a garden fleece.
How to Serve Your Homegrown Green Onions
One of the best parts of How to Build a Vertical Green Onion Tower is the delicious harvest you’ll enjoy again and again. Use your green onions in:
✔ Soups & Stews – Add fresh flavor to your favorite comfort foods.
✔ Salads – Slice thin for a crisp, zesty topping.
✔ Omelettes – Mix into your morning eggs for a boost.
✔ Tacos & Burritos – A must-have garnish.
✔ Asian Stir-fries – Fresh green onions add vibrant aroma and crunch.
✔ Cream Cheese Dips – Combine with herbs for an amazing spread.
Serving Suggestions
Not only does learning How to Build a Vertical Green Onion Tower provide a constant supply of fresh greens, but the harvest itself is incredibly versatile. Pair your homegrown onions with:
Grilled meats or tofu
Creamy potato salad
Homemade sushi
Ramen bowls
BBQ flatbreads
Bonus tip: Dehydrate extra onions for longer storage or freeze chopped bits in ice cube trays with olive oil for instant flavor boosts in cooking.
Time & Growth Cycle
Here’s what to expect after you’ve completed the steps in How to Build a Vertical Green Onion Tower:
🕓 Setup Time: 1–2 hours
🌱 Germination (Seeds): 7–10 days
🌱 Sprouting (Bulbs): 3–5 days
🌿 First Harvest: 2–3 weeks for bulbs / 3–4 weeks for seeds
🔁 Regrowth Time: Every 10–14 days after harvesting tops
Your tower will remain productive for several months, especially if you rotate planting or replant fresh bulbs as needed.
Final Thoughts: Why You Should Try This Today
Whether you’re a gardening newbie or a seasoned grower, How to Build a Vertical Green Onion Tower is a game-changer. It combines practicality with beauty, provides a continuous harvest of one of the most useful kitchen staples, and takes up very little space. Plus, it’s eco-friendly and can even reduce your grocery bill!
So what are you waiting for? Get your hands on a container, some soil, and green onion bulbs, and build your own little tower of greenery today.
You’ve just learned How to Build a Vertical Green Onion Tower—now go grow something delicious! 🌿🧅
More Articles You Might Like
-

Texas Toast Sloppy Joes: The Crunchy, Cheesy Upgrade You Didn’t Know You Needed
There’s something timeless about sloppy joes. For generations, this saucy, savory, and slightly sweet ground beef sandwich has been a go-to comfort food in American kitchens. It’s quick, filling, and family-friendly—perfect for busy weeknights. But what if we told you there’s a way to take this classic dish up a notch? Enter the Texas Toast…
-

Classic Pig Pickin’ Cake
When it comes to Southern desserts, few sweets shine as brightly as the Classic Pig Pickin’ Cake. This nostalgic cake, sometimes called a “Mandarin Orange Cake,” has roots deep in Southern tradition. It gets its playful name from its frequent appearance at pig pickin’s—Southern-style barbecue gatherings where communities come together to enjoy slow-cooked pork, sides,…
-

Lemon Garlic Butter Chicken with Creamy Parmesan Pasta
There’s something irresistible about the combination of tender, golden-browned chicken paired with a creamy pasta coated in Parmesan cheese. Add the brightness of lemon, the depth of garlic, and the richness of butter, and you have a recipe that feels indulgent yet approachable enough for a weeknight dinner. Lemon Garlic Butter Chicken with Creamy Parmesan…