If you’ve ever wanted to grow your own ginger at home but felt intimidated by the idea of managing soil and garden space—good news! You can grow ginger without soil, right in your kitchen using nothing but water, a shallow dish, and some sunlight. This beginner-friendly water method is perfect for small spaces, apartments, or just for the fun of watching plants grow in real time.
Let’s walk you through the step-by-step process of growing fresh ginger in water—and why it’s a game changer for home gardeners!
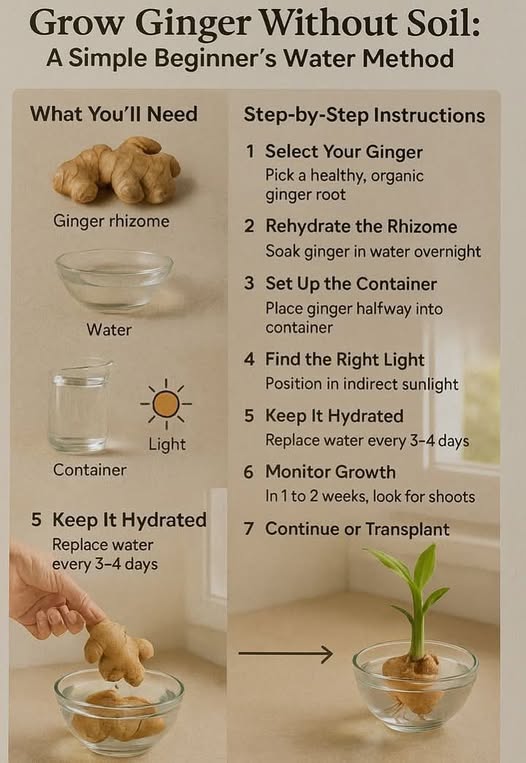
🌱 What You’ll Need
Before we begin, gather these simple supplies:
Fresh Ginger Rhizome: Choose organic ginger with visible “eyes” or buds. These are the small knobby points where shoots will grow.
Container: A wide, shallow glass dish or bowl works best. Avoid metal, as it may react with the water or affect the ginger’s growth.
Water: Use fresh, room-temperature water.
Light: Find a spot with indirect sunlight—ginger likes warmth, but direct sun can dry it out.
🪴 Step-by-Step Instructions
1. Select Your Ginger
The success of your no-soil ginger growing adventure begins with the ginger itself.
Choose organic: Non-organic ginger is often treated with growth inhibitors to extend shelf life, which can stop it from sprouting.
Check the eyes: Look for pieces with swollen, firm “eyes” or buds—these are the ginger’s future shoots.
Firm texture: Avoid wrinkled or mushy pieces. Healthy rhizomes are plump and beige to golden in color.
💡Tip: Split a large rhizome into 2–3 inch chunks to grow multiple plants!
2. Rehydrate the Rhizome
Before placing your ginger in water, soak it overnight (8–12 hours) in clean water. This helps rehydrate the rhizome, wake up the growth buds, and remove any surface chemicals if present.
Use a bowl or cup of room-temperature water.
Discard the soaking water in the morning.
3. Set Up the Container
This is where the magic happens.
Fill your shallow dish with just enough water to submerge the bottom half of the ginger.
Place the ginger pieces horizontally in the dish, eyes facing up. The rhizome should not be completely underwater—only the bottom half should touch water to prevent rot.
You can rest the ginger on small pebbles, chopsticks, or a mesh insert to help it balance above the waterline while still staying hydrated.
4. Find the Right Light
Your ginger will thrive in a warm, well-lit spot with indirect sunlight.
Avoid placing it in direct sun—it can dry out or burn the ginger.
A south- or east-facing windowsill with filtered light is ideal.
You can also place it near a grow light if you’re growing indoors during cooler months.
5. Keep It Hydrated
Water maintenance is key to success.
Top off or replace the water every 3–4 days to prevent stagnation, mold, and bad odors.
Make sure the bottom half of the rhizome remains submerged.
Rinse the ginger occasionally to remove any slimy residue.
If you see any mold or mushiness forming, remove that section and use a new piece if needed.
6. Monitor Growth
Now it’s time to watch and wait!
Within 1 to 2 weeks, you should start to notice:
Green shoots sprouting from the eyes.
White roots forming below the surface.
This is a sign your ginger is happy and healthy. Continue maintaining the water and light conditions for steady growth.
Once the shoot reaches 4–6 inches tall, you can continue to grow it in water as a decorative indoor plant, or…
7. Continue or Transplant to Soil
Your ginger can thrive in water for several weeks or even months, especially as a fun indoor plant. But if you’re aiming to harvest edible ginger eventually, transplanting it to soil will give you a much larger yield.
How to Transplant:
Fill a wide container (at least 12″ wide and 10″ deep) with well-draining soil—ideally a mix of compost, sand, and potting soil.
Plant the rhizome just below the surface, with shoots above the soil.
Water lightly and place it in indirect sunlight.
With the right care, you’ll be able to start harvesting baby ginger in about 3–4 months, and mature ginger in 8–10 months!
🌿 Why Grow Ginger in Water?
This method is simple, clean, and surprisingly effective—even for those without gardening experience. Here’s why you’ll love it:
Mess-Free: No dirt, no digging, and minimal cleanup.
Space-Saving: Perfect for apartments, countertops, or office desks.
Educational: A fun and visual way to learn about plant growth and root development.
Customizable: You can grow it purely for decorative purposes or transplant later for edible rewards.
💡 Bonus Tips
Rotate your container every few days to encourage even shoot growth.
Label your ginger pieces if you’re growing multiple, especially if experimenting with different varieties.
Decorate the container for a natural, tropical indoor centerpiece.
Use filtered water if your tap water is heavily chlorinated—it may affect root development.
Add a few drops of hydrogen peroxide to the water occasionally to prevent algae or bacteria buildup.
🧾 Final Thoughts: Grow Ginger Without Soil, the Easy Ways
Whether you’re a curious beginner, a seasoned houseplant lover, or just someone who loves ginger in tea or stir-fries—growing ginger without soil is a satisfying and low-effort way to enjoy nature indoors.
With just a little attention and patience, you’ll have your own thriving ginger plant growing on a sunny windowsill in no time. 🌱🫚
Ready to try it? Grab a fresh rhizome and start your no-soil ginger-growing journey today!
More Articles You Might Like
-

Texas Toast Sloppy Joes: The Crunchy, Cheesy Upgrade You Didn’t Know You Needed
There’s something timeless about sloppy joes. For generations, this saucy, savory, and slightly sweet ground beef sandwich has been a go-to comfort food in American kitchens. It’s quick, filling, and family-friendly—perfect for busy weeknights. But what if we told you there’s a way to take this classic dish up a notch? Enter the Texas Toast…
-

Classic Pig Pickin’ Cake
When it comes to Southern desserts, few sweets shine as brightly as the Classic Pig Pickin’ Cake. This nostalgic cake, sometimes called a “Mandarin Orange Cake,” has roots deep in Southern tradition. It gets its playful name from its frequent appearance at pig pickin’s—Southern-style barbecue gatherings where communities come together to enjoy slow-cooked pork, sides,…
-

Lemon Garlic Butter Chicken with Creamy Parmesan Pasta
There’s something irresistible about the combination of tender, golden-browned chicken paired with a creamy pasta coated in Parmesan cheese. Add the brightness of lemon, the depth of garlic, and the richness of butter, and you have a recipe that feels indulgent yet approachable enough for a weeknight dinner. Lemon Garlic Butter Chicken with Creamy Parmesan…