Growing your own avocado tree in a pot is a rewarding experience. Not only does it give you fresh, homegrown avocados, but it also adds a touch of greenery and beauty to your home or garden. If you’ve always wanted to grow avocados but thought it was too complicated or only possible with large backyard trees, you’re in luck. With the right materials, care, and patience, you can grow an avocado tree in a pot and enjoy avocados at your convenience. Here’s a step-by-step guide on how to grow avocados in pots so you never have to buy them again!
Materials You’ll Need:
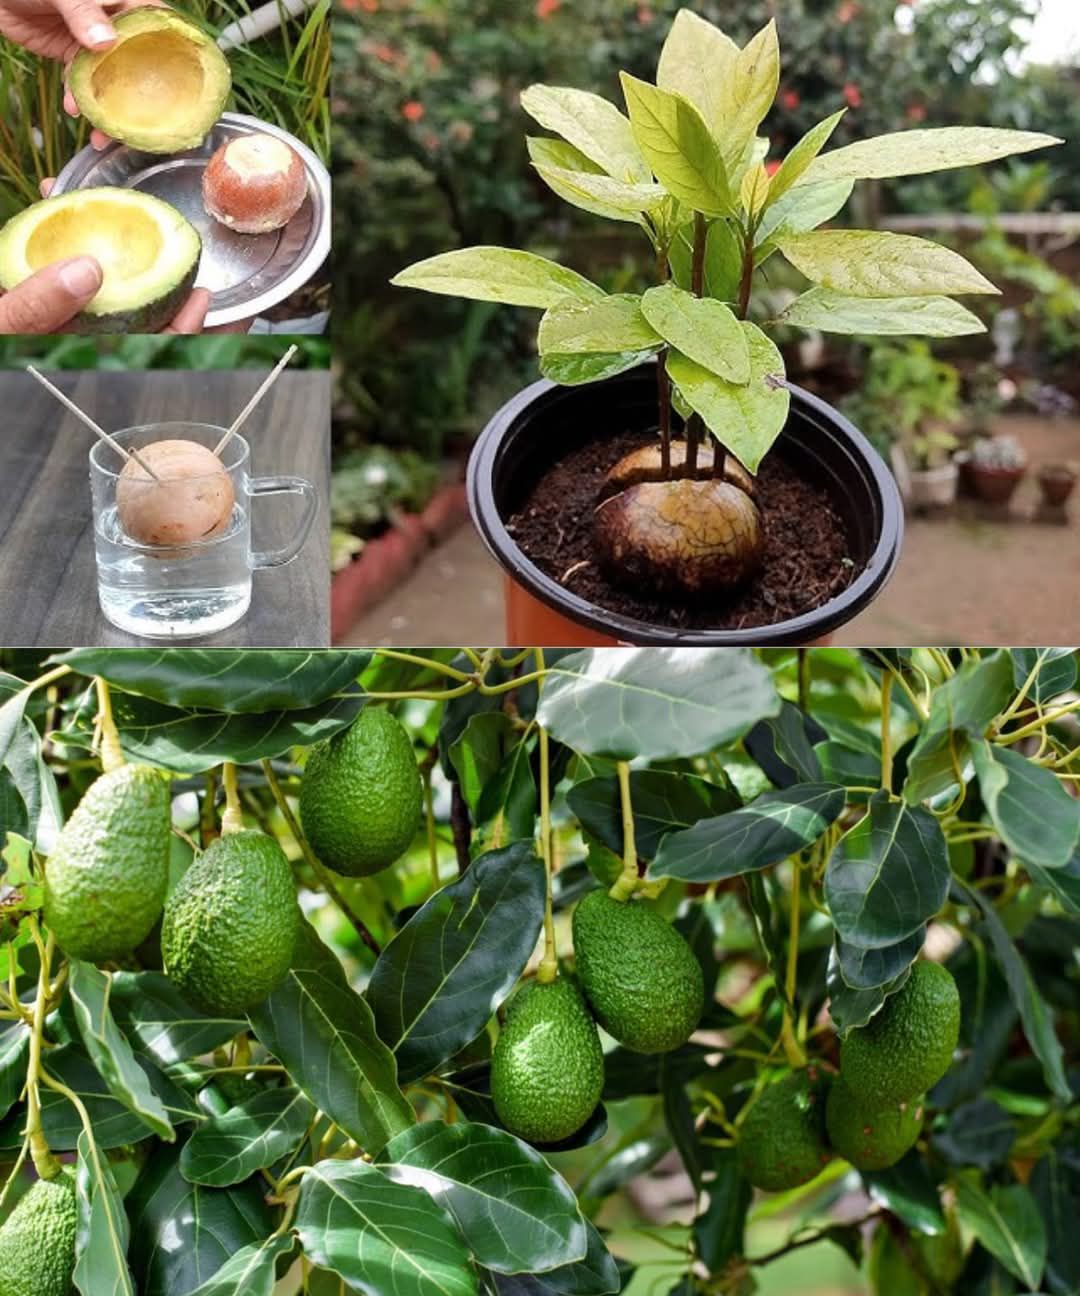
Avocado Pit: The seed from a ripe avocado.
Large Pot (15-20 inches deep): A deep pot with drainage is key to providing enough room for root growth.
Well-Draining Soil: To avoid root rot, use a mix designed for pots or add perlite to regular potting soil.
Toothpicks: To suspend the avocado pit in water.
Water: For soaking the pit and maintaining the plant.
Fertilizer: Use a balanced fertilizer for healthy plant growth.
Step 1: Sprout the Avocado Pit
The first step in growing your own avocado tree is to sprout the pit. This process can take anywhere from 2-6 weeks, so patience is important.
Clean the Pit: After removing the pit from the avocado, rinse it under cold water to remove any leftover fruit pulp.
Dry the Pit: Let the pit dry for a day or two to avoid mold growth.
Insert Toothpicks: Insert three toothpicks around the middle of the avocado pit. These will help suspend the pit in water.
Place in Water: Fill a glass with water and place the pit with the broad end facing down. The toothpicks should rest on the rim of the glass to hold the pit above the water.
Wait for Roots & Sprout: Leave the pit in a sunny location and let the roots grow. In 2-6 weeks, you should see roots forming at the bottom and a sprout emerging from the top.
Step 2: Planting Your Avocado Tree
Once your avocado pit has sprouted and the roots are established, it’s time to transfer it to a pot.
Choose a Pot: Pick a large pot (15-20 inches deep) with proper drainage holes. Avocado trees need plenty of room for their roots to spread.
Prepare the Soil: Fill the pot with a well-draining potting mix. Leave about an inch of space at the top to make watering easier.
Plant the Sprouted Pit: Place the sprouted avocado pit in the soil, leaving the top exposed. The roots should be fully covered, while the sprout remains above the soil surface.
Water: Gently water the soil around the pit to settle it in place. Make sure the water drains well and doesn’t collect at the bottom.
Step 3: Caring for Your Avocado Tree
Now that your avocado tree is planted, it’s time to give it the right conditions to grow strong and healthy.
Light: Avocado trees need at least 6 hours of direct sunlight each day. Place the pot in a sunny spot, such as a south- or west-facing window.
Watering: Water the plant when the top inch of soil feels dry. Make sure to water thoroughly, allowing the excess water to drain out. Avoid letting the tree sit in water to prevent root rot.
Fertilizing: Apply a balanced liquid fertilizer every 4-6 weeks during the growing season (spring and summer). Reduce fertilizing during the winter when the plant is dormant.
Step 4: Pruning Your Avocado Tree
To encourage a bushier, fuller plant, you should prune your avocado tree as it grows.
Pinch Off Leaves: Once the plant reaches about 12 inches tall, pinch off the top leaves to encourage side branches to develop.
Continue to Prune: As the tree grows, continue to pinch the top to encourage branching and maintain a compact, bushy shape.
Step 5: Pollination & Fruit Production
If you’re growing your avocado tree indoors, pollination may be a challenge.
Manual Pollination: Use a small brush to transfer pollen from one flower to another if you see flowers on your tree. This will help with fruit production.
Patience for Fruit: Avocado trees grown from seed can take 5-13 years to produce fruit. Keep in mind that it’s a long wait, but the satisfaction of harvesting your own avocados will be worth it!
Step 6: Harvesting Your Avocados
After years of care, your avocado tree will eventually produce fruit!
Mature Fruit: Avocados do not ripen on the tree. Wait until the fruit is mature, which can be determined by gently squeezing it. If it feels firm but yields slightly, it’s ready to harvest.
Ripen Indoors: Once you harvest the avocado, allow it to ripen at room temperature for a few days. Once ripe, it’s ready to enjoy in your favorite dishes!
Conclusion
Growing avocados in pots is a fun and rewarding project that brings you one step closer to enjoying your own homegrown avocados. With the right care, patience, and dedication, you’ll be able to nurture a beautiful avocado tree right in your home. Follow these simple steps and get ready for fresh, delicious avocados straight from your own pot! 🌿🥑
More Articles You Might Like
-

Texas Toast Sloppy Joes: The Crunchy, Cheesy Upgrade You Didn’t Know You Needed
There’s something timeless about sloppy joes. For generations, this saucy, savory, and slightly sweet ground beef sandwich has been a go-to comfort food in American kitchens. It’s quick, filling, and family-friendly—perfect for busy weeknights. But what if we told you there’s a way to take this classic dish up a notch? Enter the Texas Toast…
-

Classic Pig Pickin’ Cake
When it comes to Southern desserts, few sweets shine as brightly as the Classic Pig Pickin’ Cake. This nostalgic cake, sometimes called a “Mandarin Orange Cake,” has roots deep in Southern tradition. It gets its playful name from its frequent appearance at pig pickin’s—Southern-style barbecue gatherings where communities come together to enjoy slow-cooked pork, sides,…
-

Lemon Garlic Butter Chicken with Creamy Parmesan Pasta
There’s something irresistible about the combination of tender, golden-browned chicken paired with a creamy pasta coated in Parmesan cheese. Add the brightness of lemon, the depth of garlic, and the richness of butter, and you have a recipe that feels indulgent yet approachable enough for a weeknight dinner. Lemon Garlic Butter Chicken with Creamy Parmesan…