Making cheese at home can be a truly rewarding experience, and with this easy method, you can create fresh, delicious cheese in just minutes. This recipe is not only quick and simple, but it also saves you money, allows you to customize your cheese, and guarantees you’ll enjoy a fresher, healthier alternative to store-bought options. Here’s why this method is a game-changer:
🌟 Why You’ll Love This Recipe
Cost-Effective: Instead of paying for expensive store-bought cheese, you can turn affordable milk into high-quality cheese right in your kitchen.
Quick and Easy: No need for complicated techniques or waiting around for hours—this cheese is ready in just 5 minutes.
Customizable: You can tweak the flavor, texture, and type of cheese to your liking, adding herbs, spices, or sweeteners to suit your tastes.
Fresh and Healthy: Say goodbye to preservatives and additives. This cheese is as fresh and natural as it gets.
Impress Your Friends: Homemade cheese is an impressive and thoughtful gift, and it can also elevate any meal you serve it with.
🧑🍳 Ingredients You’ll Need
The beauty of this cheese recipe lies in its simplicity. All you need are a few basic ingredients:
1 liter of whole milk (fresh and full-fat is ideal for the best results)
1 tablespoon lemon juice (or vinegar as a substitute)
1/2 teaspoon salt (optional, for added flavor)
Optional Add-Ins:
Fresh or dried herbs (e.g., black pepper, chili flakes, or oregano)
Garlic powder or onion powder for a savory twist
Honey or maple syrup for a sweet cheese variation
📋 Step-by-Step Instructions
Making cheese has never been easier! Follow these simple steps to create your own delicious cheese in just 5 minutes.
Step 1: Heat the Milk
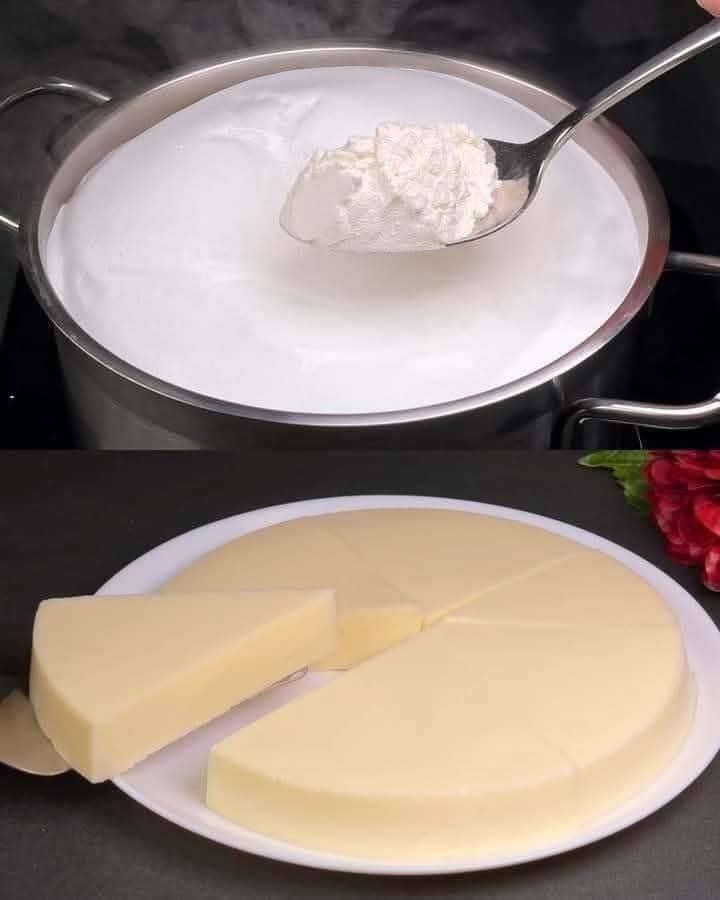
Pour the milk into a saucepan and heat it over medium heat. Stir occasionally to prevent the milk from sticking to the bottom of the pan.
Heat the milk until it reaches 80–90°C (176–194°F), which is just before it starts to boil. You’ll see small bubbles forming around the edges, signaling it’s almost ready.
Step 2: Add the Acid
Remove the saucepan from the heat and slowly stir in the lemon juice (or vinegar). As you mix, the milk will begin to curdle, forming curds (the solid parts) and whey (the liquid parts). This should only take 1–2 minutes.
Step 3: Strain the Curds
Line a colander with a cheesecloth or a clean kitchen towel and place it over a bowl to catch the whey.
Pour the curdled milk mixture into the colander, allowing the whey to drain. Depending on how firm you want your cheese, let it drain for a few minutes.
Step 4: Season and Shape
Transfer the drained curds into a bowl. Add salt and any optional seasonings you like—this is where you can get creative and personalize your cheese.
Mix gently to combine the seasonings. For firmer cheese, you can press the curds into a mold or shape them into a ball with your hands.
Step 5: Enjoy or Store
Your fresh cheese is ready to eat! You can spread it on bread, crumble it over salads, or use it in your favorite recipes.
Store any leftovers in an airtight container in the refrigerator for up to 3–5 days.
🧀 Why This Cheese Is So Special
Making your own cheese has so many advantages:
No preservatives or additives mean that the cheese you’re making is pure and healthier.
You get the satisfaction of creating something from scratch in just minutes.
The flexibility to make it sweet or savory, adjusting the flavor and texture to your preferences.
Whether you’re a cheese lover or just looking to try something new, making cheese at home is fun, rewarding, and economical. So next time you’re craving cheese, skip the store and give this quick and easy recipe a try—you’ll be amazed by how simple it is to make your own delicious cheese!
More Articles You Might Like
-

Texas Toast Sloppy Joes: The Crunchy, Cheesy Upgrade You Didn’t Know You Needed
There’s something timeless about sloppy joes. For generations, this saucy, savory, and slightly sweet ground beef sandwich has been a go-to comfort food in American kitchens. It’s quick, filling, and family-friendly—perfect for busy weeknights. But what if we told you there’s a way to take this classic dish up a notch? Enter the Texas Toast…
-

Classic Pig Pickin’ Cake
When it comes to Southern desserts, few sweets shine as brightly as the Classic Pig Pickin’ Cake. This nostalgic cake, sometimes called a “Mandarin Orange Cake,” has roots deep in Southern tradition. It gets its playful name from its frequent appearance at pig pickin’s—Southern-style barbecue gatherings where communities come together to enjoy slow-cooked pork, sides,…
-

Lemon Garlic Butter Chicken with Creamy Parmesan Pasta
There’s something irresistible about the combination of tender, golden-browned chicken paired with a creamy pasta coated in Parmesan cheese. Add the brightness of lemon, the depth of garlic, and the richness of butter, and you have a recipe that feels indulgent yet approachable enough for a weeknight dinner. Lemon Garlic Butter Chicken with Creamy Parmesan…