This Chocolate Chip Yogurt Cake is a delicious and easy-to-make dessert that doesn’t require an oven. Using basic ingredients like yogurt, eggs, and flour, you can whip up a moist, fluffy cake that’s perfect for when you’re short on time or don’t want to turn the oven on. The addition of chocolate chips brings a delightful touch of sweetness that makes this cake irresistibly tasty.
This cake is ideal for any occasion — whether you’re looking for a quick snack, something to accompany your afternoon tea, or a simple yet indulgent treat for family and friends. Plus, it’s made with yogurt, so it’s a little bit healthier than your average cake. The yogurt helps keep the cake moist and soft while providing beneficial probiotics for your gut health.
Why You Should Try This Recipe
Before we dive into the step-by-step instructions, let’s talk about why this cake is worth making. If you’re someone who enjoys easy-to-follow recipes that yield amazing results, this is the cake for you. There’s no need to worry about complicated techniques or expensive ingredients. What makes this recipe even better is that it’s made without an oven, so it’s perfect for people who may not have access to one or simply don’t want to turn it on in the heat of summer.
Another reason this cake is so great is because of its versatility. While this recipe uses chocolate chips, feel free to get creative. You can swap out the chocolate chips for raisins, nuts, or even dried fruit like cranberries or cherries. If you want a more indulgent treat, add some mini marshmallows or caramel chunks for an extra layer of flavor.
Nutritionally, this cake is a little more balanced than a typical dessert, as it incorporates yogurt and milk, which provide calcium and protein. The use of eggs gives it an extra boost of protein, and the chocolate chips provide a touch of sweetness along with antioxidants.
Now, let’s get started with the recipe!
Ingredients
For the Cake:
1 large egg
3 tbsp sugar (45 g)
1 sachet (8 g) vanilla sugar
3 tbsp vegetable oil (45 ml)
125 g plain yogurt (½ cup)
60 ml milk (¼ cup)
190 g all-purpose flour (1 ½ cups)
10 g baking powder (2 tsp)
50 g chocolate chips (¼ cup)
Preparation
1. Mixing the Wet Ingredients
Start by preparing the wet ingredients. In a large mixing bowl, crack the egg and whisk it together with 3 tbsp sugar and 8 g vanilla sugar. Continue whisking until the sugar has dissolved and the mixture is smooth. It should be a pale yellow color and slightly frothy, indicating that air has been incorporated into the mixture.
Next, add in the 3 tbsp of vegetable oil, 125 g of yogurt, and 60 ml of milk. Whisk the mixture thoroughly until all the ingredients are well combined. The yogurt not only provides a creamy texture but also adds moisture to the cake, making it soft and fluffy. The milk helps to thin out the mixture so that it’s easier to mix with the dry ingredients later.
2. Sifting the Dry Ingredients
In a separate bowl, sift together 190 g of all-purpose flour and 10 g of baking powder. Sifting helps break up any lumps in the flour and ensures that the baking powder is evenly distributed throughout the dry ingredients. This step is essential because it will help the cake rise properly during cooking, giving it a light and fluffy texture.
3. Preparing the Cake Batter
Once the dry ingredients are sifted, gradually add them to the wet ingredients. It’s important to do this in stages, adding a little flour mixture at a time and stirring gently to avoid over-mixing. Stir until the batter is smooth and free of lumps. If the batter feels too thick, you can add a little more milk to adjust the consistency, but be careful not to make it too runny.
Once the batter is smooth, fold in the 50 g of chocolate chips. These little morsels will melt slightly during cooking, creating pockets of gooey chocolate throughout the cake. You can also substitute the chocolate chips for any other mix-ins you like, such as raisins, chopped nuts, or even shredded coconut for a tropical twist.
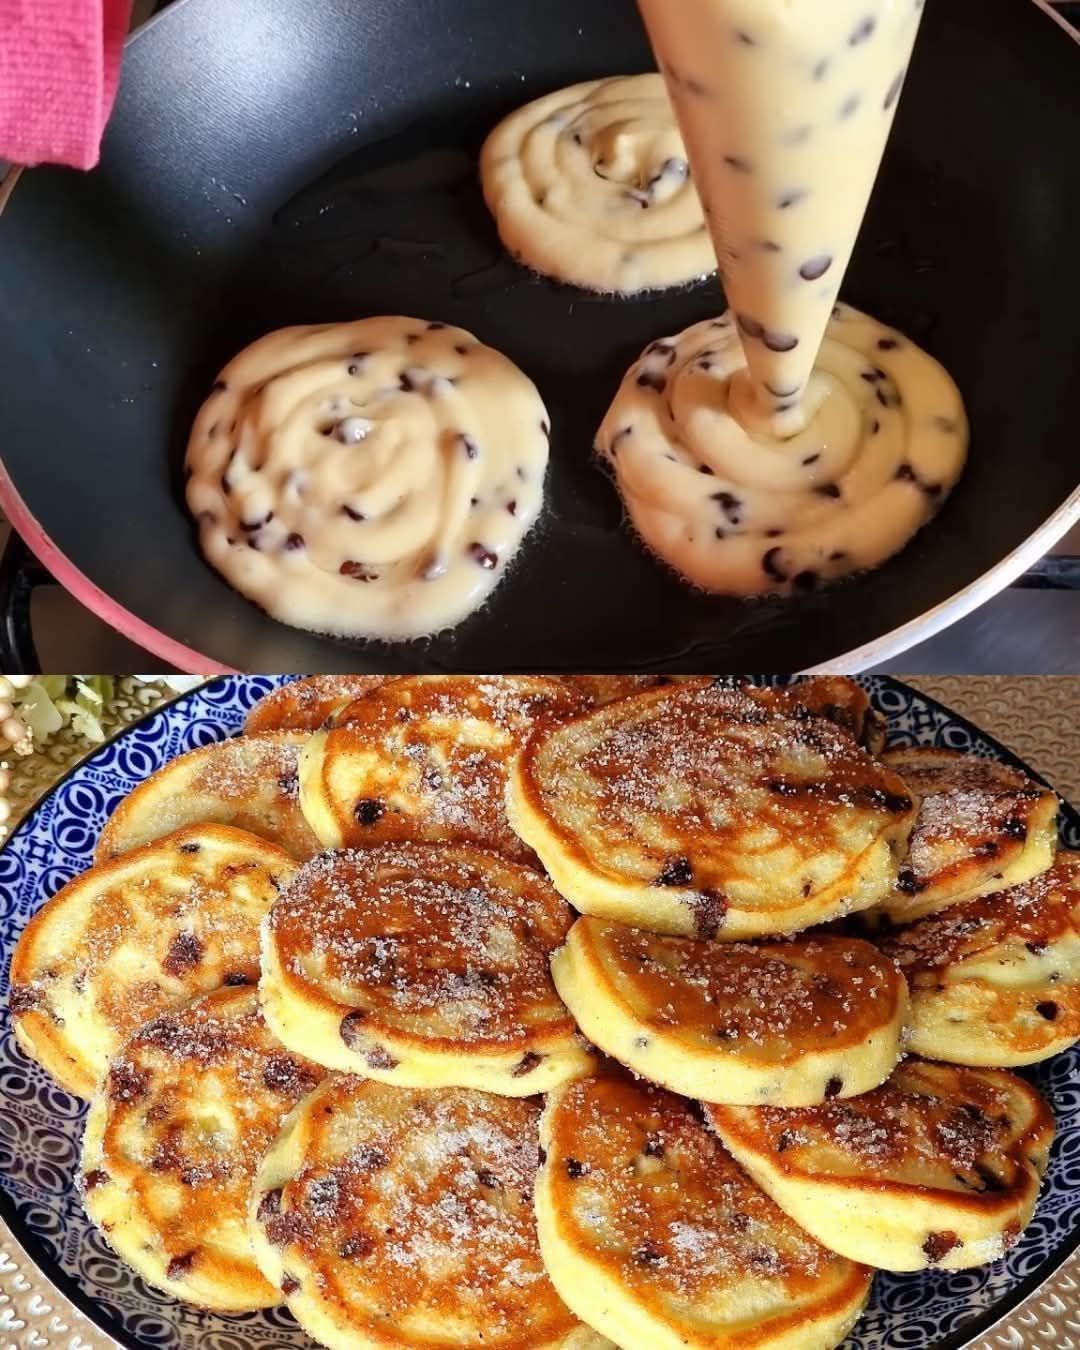
4. Cooking the Cake
Now comes the fun part — cooking the cake without an oven! You’ll need a heavy-bottomed non-stick pan with a lid. If you don’t have a non-stick pan, you can grease a regular pan with a little oil or butter to ensure the cake doesn’t stick.
Place the pan on the stove over low heat and let it preheat for a few minutes. Once the pan is warm, pour the cake batter into the pan. Use a spatula to spread the batter evenly across the pan, making sure it’s smooth and level. Afterward, cover the pan with a lid to help trap the heat and steam while the cake cooks.
Allow the cake to cook on low heat for about 20 minutes. Avoid the temptation to open the lid too often, as this can disrupt the cooking process. Instead, after 15 minutes, check on the cake by gently pressing the top with your finger to see if it’s firm to the touch. When it’s ready, insert a toothpick into the center of the cake — it should come out clean, without any wet batter sticking to it. If the toothpick comes out clean, your cake is ready.
5. Cooling and Serving the Cake
Once the cake is cooked through, remove it from the pan and let it cool for a few minutes. The cake will continue to firm up as it cools, so don’t worry if it seems a little soft when it first comes out of the pan.
Once cooled, slice the cake into 8 pieces and serve. If you’d like, you can dust the top with powdered sugar for a simple finishing touch. Alternatively, serve the cake warm with a scoop of vanilla ice cream or a dollop of whipped cream. This will add an extra layer of creaminess and make the dessert even more indulgent.
Serving Suggestions
This cake can be served in a variety of ways, depending on the occasion and your personal preferences. Here are a few ideas to elevate your cake experience:
Vanilla Ice Cream: Serve the cake with a scoop of vanilla ice cream for a classic dessert combination.
Whipped Cream: Add a light and fluffy touch by topping the cake with whipped cream.
Drizzle of Chocolate Syrup: For an extra indulgent treat, drizzle some chocolate syrup over the cake.
Cup of Tea or Coffee: Pair this cake with a nice hot drink to balance the sweetness and create a comforting snack.
Health Benefits of This Cake
While desserts like this one are indulgent, they also contain some beneficial ingredients:
Yogurt: Rich in calcium and probiotics, yogurt supports bone health and digestive function.
Eggs: A great source of protein, eggs help build and repair tissues in the body.
Chocolate Chips: Dark chocolate, in particular, contains antioxidants that support heart health.
Dietary Information
This cake is vegetarian-friendly and can be made gluten-free by substituting the all-purpose flour with a gluten-free flour blend. However, it does contain dairy, eggs, and gluten, so it’s not suitable for those with dairy, egg, or gluten sensitivities.
Nutritional Information (Per Slice – Approx. 8 slices)
Calories: ~200 kcal
Carbohydrates: 28 g
Proteins: 4 g
Fat: 9 g
Fiber: 1 g
Storage and Shelf Life
If you have any leftover cake, store it in an airtight container at room temperature for up to 3 days. Alternatively, you can refrigerate it for up to 5 days. To reheat, simply pop a slice in the microwave for a few seconds, or gently warm it in a pan over low heat. This cake is also freezer-friendly and can be stored in the freezer for up to 1 month.
Conclusion
This Chocolate Chip Yogurt Cake (No Oven Needed) is a simple, delicious, and versatile dessert that anyone can make. Whether you’re looking for a quick treat, a light snack, or something to serve to guests, this cake delivers on all fronts. Its light texture, gooey chocolate chips, and simple preparation make it a hit every time.
Enjoy this easy and delightful cake with family and friends — it’s sure to become a favorite in your recipe collection!
More Articles You Might Like
-

Texas Toast Sloppy Joes: The Crunchy, Cheesy Upgrade You Didn’t Know You Needed
There’s something timeless about sloppy joes. For generations, this saucy, savory, and slightly sweet ground beef sandwich has been a go-to comfort food in American kitchens. It’s quick, filling, and family-friendly—perfect for busy weeknights. But what if we told you there’s a way to take this classic dish up a notch? Enter the Texas Toast…
-

Classic Pig Pickin’ Cake
When it comes to Southern desserts, few sweets shine as brightly as the Classic Pig Pickin’ Cake. This nostalgic cake, sometimes called a “Mandarin Orange Cake,” has roots deep in Southern tradition. It gets its playful name from its frequent appearance at pig pickin’s—Southern-style barbecue gatherings where communities come together to enjoy slow-cooked pork, sides,…
-

Lemon Garlic Butter Chicken with Creamy Parmesan Pasta
There’s something irresistible about the combination of tender, golden-browned chicken paired with a creamy pasta coated in Parmesan cheese. Add the brightness of lemon, the depth of garlic, and the richness of butter, and you have a recipe that feels indulgent yet approachable enough for a weeknight dinner. Lemon Garlic Butter Chicken with Creamy Parmesan…