Why spend money on cheese when you can make a fresh, flavorful batch right at home? With just 1 liter of milk and a few simple ingredients, you can whip up 1 kilogram of cheese in only five minutes. It’s quick, easy, and incredibly satisfying to create something so delicious from scratch. Plus, you can customize the flavor to suit your taste by adding herbs, spices, or even a touch of butter for extra richness.
Why This Recipe Works
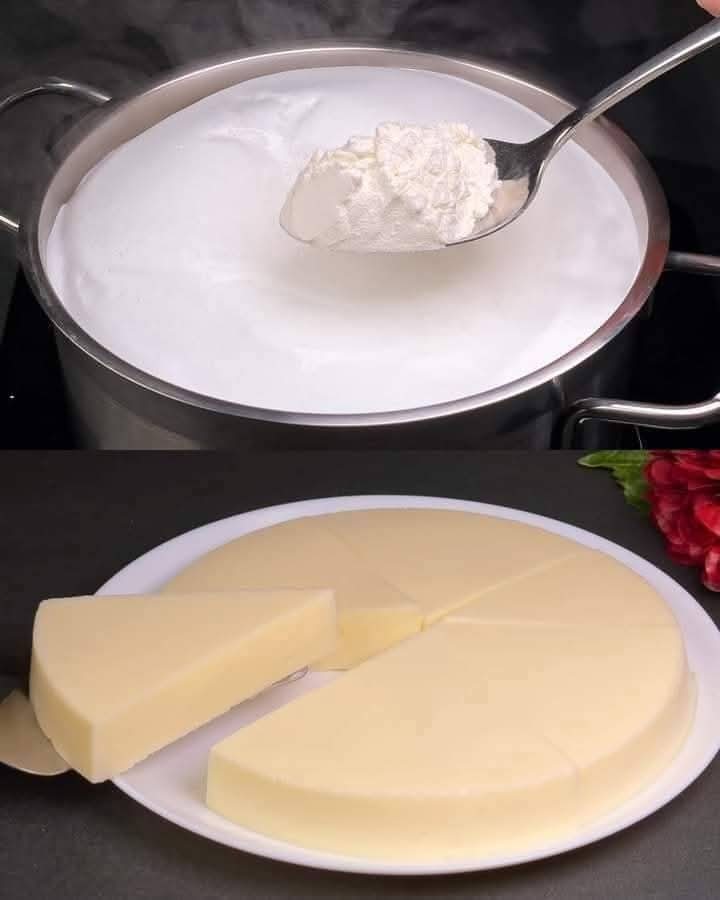
This quick cheese recipe uses the science of curdling milk with an acid like lemon juice or vinegar to separate the curds (solid) from the whey (liquid). Whole milk provides the fat content needed for creamy cheese, and a pinch of salt enhances the flavor. By controlling the ingredients, you get fresh, preservative-free cheese that’s versatile for use in sandwiches, salads, or as a snack.
What You’ll Need
1 liter (4 cups) of whole milk: The richer the milk, the creamier your cheese.
2 tablespoons of lemon juice or white vinegar: The acid that curdles the milk.
1/2 teaspoon of salt: Adds flavor to the cheese.
10 g butter (optional): Enhances sharpness and richness.
Herbs or spices (optional): Think dried oregano, thyme, paprika, or fresh chives for added flavor.
How to Make 1 kg of Cheese in 5 Minutes
Heat the Milk
Pour the 1 liter of whole milk into a large, heavy-bottomed pot. Heat the milk over medium heat, stirring occasionally to prevent it from sticking to the bottom.
When the milk begins to steam and tiny bubbles form around the edges (don’t let it boil), it’s ready for the next step.
Add the Acid
Remove the pot from the heat and slowly stir in 2 tablespoons of lemon juice or white vinegar. You’ll notice the milk starting to curdle almost immediately as the acid causes the curds to form and separate from the whey.
Stir gently for 1-2 minutes to ensure all the curds have formed.
Strain the Curds
Place a clean cheesecloth or a fine mesh strainer over a large bowl. Pour the curdled milk mixture into the strainer, allowing the whey to drain into the bowl. If you want firmer cheese, let it drain for a longer time.
Gently press the curds with a spoon or your hands to remove excess whey.
Add Flavor
Transfer the strained curds to a mixing bowl. Add 1/2 teaspoon of salt and, if desired, 10 g of butter for a sharper, creamier texture. Mix well.
For a personalized touch, mix in your favorite herbs or spices, such as chopped chives, dried oregano, or smoked paprika.
Shape and Chill
Press the cheese into a mold or shape it into a ball using your hands. If you prefer firmer cheese, wrap it in cheesecloth and place a weight on top for 10-15 minutes.
Refrigerate the cheese for at least 1 hour to help it firm up and develop its flavor.
Serve and Enjoy
Slice, spread, or crumble your homemade cheese as desired. It’s perfect on crackers, in salads, or melted over toast.
Tips + Tricks for Perfect Cheese
Don’t overheat the milk: Heating the milk too high can affect the texture of the cheese. Keep it just below boiling for the best results.
Save the whey: The leftover liquid is rich in nutrients and can be used in smoothies, soups, or even as a natural fertilizer for plants.
Customize your cheese: Experiment with different herbs, spices, or even finely chopped garlic for unique flavors.
Serving Suggestions
Homemade cheese is incredibly versatile. Here are a few ideas for how to use it:
Crumble it over a fresh garden salad.
Spread it on warm bread or crackers with a drizzle of honey.
Mix it into pasta dishes for a creamy, tangy boost.
Use it as a topping for baked potatoes or grilled vegetables.
Final Thoughts
Making your own cheese at home is not only economical but also deeply rewarding. With just a handful of ingredients and five minutes of your time, you can enjoy fresh, preservative-free cheese that’s bursting with flavor. Once you try it, you might never go back to store-bought cheese again. So why wait? Grab your milk and get started on this cheesy adventure!